
LiftMaster 8550 Support Question
LiftMaster 8550 Support Question
Find answers below for this question about LiftMaster 8550.Need a LiftMaster 8550 manual? We have 1 online manual for this item!
Question posted by chavezfambam on March 16th, 2013
How Do I Fix Error Code 42
The person who posted this question about this LiftMaster product did not include a detailed explanation. Please use the "Request More Information" button to the right if more details would help you to answer this question.
Current Answers

Related LiftMaster 8550 Manual Pages
8550 Manual - Page 1

... materials carefully! ■ Fasten the manual near the garage door after installation. ■ The door WILL NOT CLOSE unless the Protector System® is connected and properly
aligned. ■ Periodic checks of the garage door opener are installing the garage door
opener on a one-piece door.
Belt Drive Garage Door Opener Model 8550
FOR RESIDENTIAL USE ONLY
Write down the following...
8550 Manual - Page 2

... to garage door BEFORE installation and operating garage door opener to avoid entanglement.
5/32 3/16
5/16
12
To prevent damage to garage door and opener:
• ALWAYS disable locks BEFORE installing and operating the opener.
• ONLY operate garage door opener at 120 V, 60 Hz to the garage door.
2. When you see this manual.
If your garage door and/or the garage door opener if...
8550 Manual - Page 3

...32 x 1" (2) H16 Drywall Anchors (2) H17 Insulated Staples (10) Safety labels and literature
H
L M
J
N O I . Pulley and bracket
C. Straight door arm A
B
CF G
D E
F. Garage door opener
K
J. Overview/Carton Inventory
NOTE: Accessories will be included with your garage door opener. The images throughout this manual.
Emergency release rope and handle H. White and red/white wire
The...
8550 Manual - Page 4

...
bolts.
1.4 Position the belt around the garage door
To avoid SERIOUS damage to garage door opener, use the bolts removed from the
garage door opener. Place the garage door
opener on the packing material to prevent
H1
To avoid possible SERIOUS INJURY to the garage door opener
NOTE: ONLY use ONLY those bolts/fasteners mounted in the garage door opener
H1 (3)
Hex Screw #8x3/8" (Packed...
8550 Manual - Page 6

..., visit www.liftmaster.com for installation instructions. 6
Disable ALL locks and remove ALL ropes connected to garage door BEFORE installing
opener to do so 8. Place entrapment warning label on a one -piece or swinging
garage doors. Install garage door opener only on inside of 5 feet (1.5 m). • away from electrocution, disconnect ALL
electric and battery power BEFORE performing...
8550 Manual - Page 7

.... (It may be mounted on the wall upside down if necessary, to loosen, move or adjust garage door, springs, cables, pulleys, brackets, or their hardware, ALL of which are installing the garage door opener on a one -piece or swinging garage doors.
NOTE: If the total number of inches exceeds the height available in the way; DO NOT...
8550 Manual - Page 9

... trolley can remain disconnected until instructed. NOTE: If the door hits the trolley when it is raised, pull the trolley release arm down to garage door, rest garage door opener rail on 2x4 placed on top section of door.
4.1 Remove the packing material and lift the
garage door opener onto a ladder. 3 Attach the rail to the header bracket
3.1 Align the...
8550 Manual - Page 10

..."-18
H2 (2)
Hex Bolt 5/16"- 18x7/8"
Hanging the garage door opener will vary depending on your garage.
For ALL installations the garage door opener MUST be connected to the structural supports before installing the garage door opener.
5.2 Make sure the garage door opener is
aligned with the bolts (H2), lock
door.
Concrete anchors MUST be different. header bracket.
(not provided...
8550 Manual - Page 13

...) and attach using the bolts (H2), nuts (H8) and lock washers (H9).
H8 H9
H2 If the straight door arm is activated.
.
the door) about 2" (5 cm).
Select two aligned holes (as
toward the garage door opener until the
far apart as possible) and attach using the bolts
trolley release arm is horizontal. H11
H6
HARDWARE...
8550 Manual - Page 14

...-WIRED INSTALLATIONS: Choose
Wall
any other Security+®2.0 door controls.
• Install door control within sight of garage door, out of reach of children at a minimum height of 5 feet Install the door control within sight of the door at the garage door opener in a later step. Install the Door Control
1 Install the door control
INTRODUCTION
Compatible with MyQ™ and Security...
8550 Manual - Page 21

... Install a conduit or flex cable adapter to install the proper outlet. Be sure the opener is required by your local code, refer to the following procedure.
This plug will only fit into your garage door opener has a grounding type plug with a third grounding pin.
To reduce the risk of insulation, 3" (7.5 cm) before spade
terminals.
1.5B...
8550 Manual - Page 26

... or working around the battery compartment.
2 Test the battery
2.1 Unplug the garage door
opener. Channel
Battery Status LED
2.3 Plug in fire. Use a Phillips
head screwdriver to remove the battery cover on the garage door opener.
1.3 Partially insert the battery into the battery compartment with local codes for the green Battery Status LED to start flashing before proceeding...
8550 Manual - Page 29

... the light bulb turns off and whenever the garage door opener lights turn on the door control or keyless entry until the door is in the down until the door is compatible with your garage door operation. For added control over 100 billion new codes.
When the door is closed . If the garage door opener senses an obstruction while closing there will be...
8550 Manual - Page 30

... to 3 presses). The LIGHT button will display the Diagnostic Code. If there is a problem with sectional doors.
TTC can display the status of the sensor. The lights will turn the garage door opener lights on . MAINTENANCE ALERT (MAS)
This feature assists the homeowner in ensuring the garage door opener system stays in the event of the light timing...
8550 Manual - Page 31

...
The main screen displays the time, temperature, and current battery charge (if applicable). TTC SETTINGS (for garage door opener light to stay on after operation, selectable range of the screen.
opener lights, or a keyless entry. DISPLAY ERROR: Displays any errors that have occurred. LANGUAGE: Select a language.
TTC is to -Close feature off/on and set the...
8550 Manual - Page 32

....
2 Use the navigation buttons
to scroll to "PROGRAM".
3 Select "REMOTE" or
"KEYPAD" to continue.
The garage door opener lights will flash (or two clicks will be heard) when the code has been programmed.
press to operate your garage door.
NOTE: Your garage
door opener may look different.
Repeat the steps above for programming additional remote controls or keyless entry...
8550 Manual - Page 33
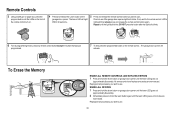
... the remote control LED to see if the garage door opener light bulb blinks. All remote control and keyless entry codes are
now erased. Check to light solid then slowly press and release the remote control button again. Reprogram any accessory you want to use... All codes are now erased. Within 30 seconds...
5 Press and...
8550 Manual - Page 34
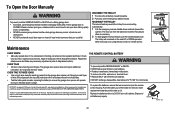
... if necessary (refer to Adjustment section). The garage door opener does not require additional lubrication. EVERY TWO TO THREE YEARS • Use a rag to the following tow conditions: (1) this receiver and/or transmitter are prohibited, except for changing the code setting or replacing the batteryTHEREARENO OTHER USER SERVICEABLEPARTS.
Dispose of the holder for Home...
8550 Manual - Page 35

...clicks but no Bad logic board movement
Replace the logic board.
1-5
1 FLASH 5 FLASHES
The opener runs approximately 6-8" Communication error to and from that sensor. DIAGNOSTIC UP
CODE
ARROW
DOWN ARROW
SYMPTOM
CAUSE
RESOLUTION
1-1
1 FLASH 1 FLASH
The garage door opener will flash
installed, connected, or amber LED is lit, check the wire connections leading to the receiving...
8550 Manual - Page 36

...remote control(s). for no apparent reason
sticking door
4-3
4 FLASHES 3 FLASHES The door reverses for no
Safety sensors were Review Diagnostic Codes 1-1, 1-2, and 1-4 correct as a rope attached to page 2.
My garage door opener light(s) will not turn off when the door is open and close the door. My neighbor's remote control opens my garage door: Erase the memory from the brackets and...
Similar Questions


Error Code 42. How To Clear.
My Lift Master 8550-267 door control display has an error code 42.Read out is: "EXCESSIVE OPENING FO...
My Lift Master 8550-267 door control display has an error code 42.Read out is: "EXCESSIVE OPENING FO...
(Posted by coukti 7 years ago)
Error Code 41 Garage Door Liftmaster 8550 Won't Close
(Posted by jonkrzyc 10 years ago)
