Operating Instructions
Page 3
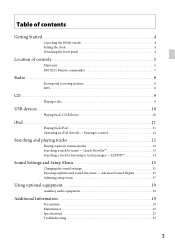
... device 10 iPod 11 Playing back iPod 11 Operating an iPod directly - ZAPPIN 14 Sound Settings and Setup Menu 15 Changing the sound settings 15 Enjoying sophisticated sound functions - Advanced Sound Engine 15 Adjusting setup items 17 Using optional equipment 19 Auxiliary audio equipment 19 Additional Information 19 Precautions 19 Maintenance 21...
... device 10 iPod 11 Playing back iPod 11 Operating an iPod directly - ZAPPIN 14 Sound Settings and Setup Menu 15 Changing the sound settings 15 Enjoying sophisticated sound functions - Advanced Sound Engine 15 Adjusting setup items 17 Using optional equipment 19 Auxiliary audio equipment 19 Additional Information 19 Precautions 19 Maintenance 21...
Operating Instructions
Page 4
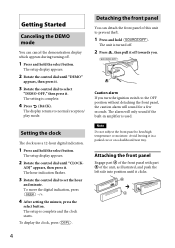
...caution alarm will only sound if the built-in a parked car or on a dashboard/rear tray. The setting is complete and the clock starts. The setup display appears. 2 Rotate the control dial until "CLOCK- Note Do not subject the front panel to normal reception/ play mode. ADJ" appears, then...select "DEMO-OFF," then press it . Setting the clock The clock uses a 12-hour digital indication. 1 Press and hold The unit is used. The setup display appears. 2 Rotate the control dial until "DEMO" appears, then press it. 3 Rotate the control dial to set the hour and minute. Caution ...
...caution alarm will only sound if the built-in a parked car or on a dashboard/rear tray. The setting is complete and the clock starts. The setup display appears. 2 Rotate the control dial until "CLOCK- Note Do not subject the front panel to normal reception/ play mode. ADJ" appears, then...select "DEMO-OFF," then press it . Setting the clock The clock uses a 12-hour digital indication. 1 Press and hold The unit is used. The setup display appears. 2 Rotate the control dial until "DEMO" appears, then press it. 3 Rotate the control dial to set the hour and minute. Caution ...
Operating Instructions
Page 5
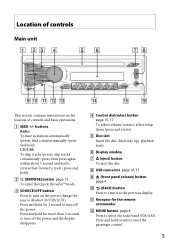
...; Control dial/select button page 15, 17 To adjust volume (rotate); Press and hold for more than 2 seconds to enter/cancel the passenger control. 5 select setup items (press and rotate). Disc slot Insert the disc (label side up), playback starts. Display window (eject) button To eject the...
...; Control dial/select button page 15, 17 To adjust volume (rotate); Press and hold for more than 2 seconds to enter/cancel the passenger control. 5 select setup items (press and rotate). Disc slot Insert the disc (label side up), playback starts. Display window (eject) button To eject the...
Operating Instructions
Page 7
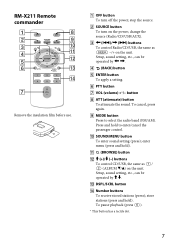
...To cancel, press again. MODE button Press to enter/cancel the passenger control. SOUND/MENU button To enter sound setting (press); Setup, sound setting, etc., can be operated by . (BACK) button ENTER button To apply a setting. &#...58160; PTY button VOL (volume) +*/- To pause playback (press ). * This button has a tactile dot. 7 Setup, sound setting, etc., can be operated by . DSPL/SCRL button Number buttons To receive stored stations (press); qa ...
...To cancel, press again. MODE button Press to enter/cancel the passenger control. SOUND/MENU button To enter sound setting (press); Setup, sound setting, etc., can be operated by . (BACK) button ENTER button To apply a setting. &#...58160; PTY button VOL (volume) +*/- To pause playback (press ). * This button has a tactile dot. 7 Setup, sound setting, etc., can be operated by . DSPL/SCRL button Number buttons To receive stored stations (press); qa ...

Operating Instructions
Page 8
... along with the regular radio program signal. Also searches your selected program type. 1 Press during FM reception. Scanning stops when the unit receives a station. The setup display appears. 3 Rotate the control dial until "TUNER" appears. Radio Storing and receiving stations Caution When tuning in order of the station you want to...
... along with the regular radio program signal. Also searches your selected program type. 1 Press during FM reception. Scanning stops when the unit receives a station. The setup display appears. 3 Rotate the control dial until "TUNER" appears. Radio Storing and receiving stations Caution When tuning in order of the station you want to...
Operating Instructions
Page 9
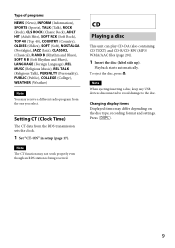
... (Personality), PUBLIC (Public), COLLEGE (College), WEATHER (Weather) Note You may receive a different radio program from the RDS transmission sets the clock. 1 Set "CT-ON" in setup (page 17). Playback starts automatically. To eject the disc, press . CD Playing a disc This unit can play CD-DA (also containing CD TEXT) and...
... (Personality), PUBLIC (Public), COLLEGE (College), WEATHER (Weather) Note You may receive a different radio program from the RDS transmission sets the clock. 1 Set "CT-ON" in setup (page 17). Playback starts automatically. To eject the disc, press . CD Playing a disc This unit can play CD-DA (also containing CD TEXT) and...
Operating Instructions
Page 15
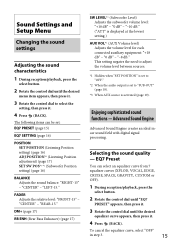
... Volume level) Adjusts the volume level for each connected auxiliary equipment: "+18 dB" - "-10 dB." ("ATT" is activated (page 19). "-8 dB." "0 dB" - Sound Settings and Setup Menu Changing the sound settings Adjusting the sound characteristics 1 During reception/playback, press the select button. 2 Rotate the control dial until the desired equalizer curve...
... Volume level) Adjusts the volume level for each connected auxiliary equipment: "+18 dB" - "-10 dB." ("ATT" is activated (page 19). "-8 dB." "0 dB" - Sound Settings and Setup Menu Changing the sound settings Adjusting the sound characteristics 1 During reception/playback, press the select button. 2 Rotate the control dial until the desired equalizer curve...
Operating Instructions
Page 17
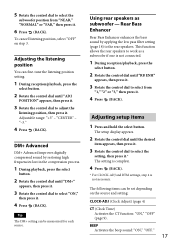
... playback, press the select button. 2 Rotate the control dial until "RB ENH" appears, then press it. 3 Rotate the control dial to the rear speakers. The setup display appears. 2 Rotate the control dial until "ADJ POSITION" appears, then press it. 3 Rotate the control dial to select the setting, then press it . The... listening position, select "OFF" on the source and setting: CLOCK-ADJ (Clock Adjust) (page 4) CT (Clock Time) Activates the CT function: "ON," "OFF" (page 9). Adjusting setup items 1 Press and hold the select button.
... playback, press the select button. 2 Rotate the control dial until "RB ENH" appears, then press it. 3 Rotate the control dial to the rear speakers. The setup display appears. 2 Rotate the control dial until "ADJ POSITION" appears, then press it. 3 Rotate the control dial to select the setting, then press it . The... listening position, select "OFF" on the source and setting: CLOCK-ADJ (Clock Adjust) (page 4) CT (Clock Time) Activates the CT function: "ON," "OFF" (page 9). Adjusting setup items 1 Press and hold the select button.


