Operating Instructions
Page 3
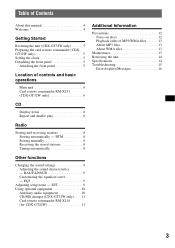
SET 9 Using optional equipment 10 Auxiliary audio equipment 10 CD/MD changer (CDX-GT320/GT32W only 10 Card remote commander RM-X114 (for CDX-GT220/GT22W 11 Additional Information Precautions 12 Notes on discs 12 Playback order of controls and basic operations Main unit 6 Card remote commander RM-X151 (CDX...GT32W only 5 Setting the clock 5 Detaching the front panel 5 Attaching the front panel 5 Location of MP3/WMA files (CDXGT320/GT32W/GT220/GT22W only) . . . 13 About MP3 files (CDX-GT320/GT32W/ GT220/GT22W only 13 About WMA files (CDX-GT320/GT32W/ GT220/GT22W only 13 Maintenance...
SET 9 Using optional equipment 10 Auxiliary audio equipment 10 CD/MD changer (CDX-GT320/GT32W only 10 Card remote commander RM-X114 (for CDX-GT220/GT22W 11 Additional Information Precautions 12 Notes on discs 12 Playback order of controls and basic operations Main unit 6 Card remote commander RM-X151 (CDX...GT32W only 5 Setting the clock 5 Detaching the front panel 5 Attaching the front panel 5 Location of MP3/WMA files (CDXGT320/GT32W/GT220/GT22W only) . . . 13 About MP3 files (CDX-GT320/GT32W/ GT220/GT22W only 13 About WMA files (CDX-GT320/GT32W/ GT220/GT22W only 13 Maintenance...
Operating Instructions
Page 5
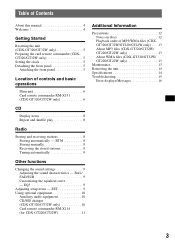
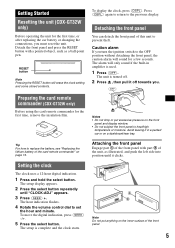
... panel and display window. • Do not subject the front panel to the previous display. Preparing the card remote commander (CDX-GT320/GT32W only) Before using the card remote commander for the first time, remove the insulation film. Getting Started Resetting the unit... with part B of the front panel with a pointed object, such as illustrated, and push the left side into position until "CLOCK-ADJ" appears. 3 Press (SEEK) +. Setting the clock The clock uses a 12-hour digital indication. 1 Press and hold the select button. A B Note Do not put excessive pressure on page...
... panel and display window. • Do not subject the front panel to the previous display. Preparing the card remote commander (CDX-GT320/GT32W only) Before using the card remote commander for the first time, remove the insulation film. Getting Started Resetting the unit... with part B of the front panel with a pointed object, such as illustrated, and push the left side into position until "CLOCK-ADJ" appears. 3 Press (SEEK) +. Setting the clock The clock uses a 12-hour digital indication. 1 Press and hold the select button. A B Note Do not put excessive pressure on page...
Operating Instructions
Page 8
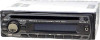
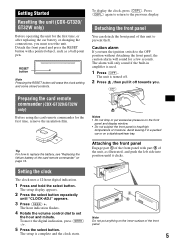
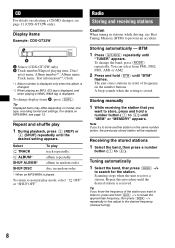
...prevent an accident. Display items Example: CDX-GT320 A Source (CDX-GT320/GT32W only) B Track number/Elapsed playing time, Disc/ artist name, Album number*1, Album name, Track name, Text information*2, Clock *1 Album number is displayed only when the album is changed. (CDX-GT320/GT32W/GT220/GT22W only) *2 When playing an MP3,... a station. For details on MP3/WMA, see page 10 (CDX-GT320/GT32W only). album in random order. * When an MP3/WMA is stored. A beep sounds when the setting is played. (CDX-GT320/GT32W/GT220/GT22W only) To return to store another station on the same number ...
...prevent an accident. Display items Example: CDX-GT320 A Source (CDX-GT320/GT32W only) B Track number/Elapsed playing time, Disc/ artist name, Album number*1, Album name, Track name, Text information*2, Clock *1 Album number is displayed only when the album is changed. (CDX-GT320/GT32W/GT220/GT22W only) *2 When playing an MP3,... a station. For details on MP3/WMA, see page 10 (CDX-GT320/GT32W only). album in random order. * When an MP3/WMA is stored. A beep sounds when the setting is played. (CDX-GT320/GT32W/GT220/GT22W only) To return to store another station on the same number ...
Operating Instructions
Page 9
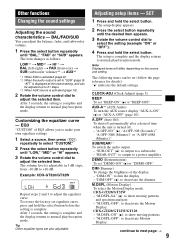
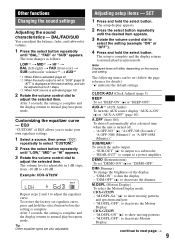
... appears. 3 Rotate the volume control dial to normal play /reception mode. CDX-GT220/GT22W/GT120 - "M.DSPL-OFF": to next page t 9 continue to deactivate Motion Display. After 3 seconds, the setting is adjustable in 1 dB steps, from -10 dB to deactivate the Motion... (z): to show moving patterns and spectrum analyzer. - Other functions Changing the sound settings Adjusting the sound characteristics - Example: CDX-GT320/GT32W Repeat steps 2 and 3 to deactivate the dimmer. CLOCK-ADJ (Clock Adjust) (page 5) BEEP To set "DEMO-ON" (z) or "DEMO-OFF." AUX-A*1 (AUX Audio) To turn...
... appears. 3 Rotate the volume control dial to normal play /reception mode. CDX-GT220/GT22W/GT120 - "M.DSPL-OFF": to next page t 9 continue to deactivate Motion Display. After 3 seconds, the setting is adjustable in 1 dB steps, from -10 dB to deactivate the Motion... (z): to show moving patterns and spectrum analyzer. - Other functions Changing the sound settings Adjusting the sound characteristics - Example: CDX-GT320/GT32W Repeat steps 2 and 3 to deactivate the dimmer. CLOCK-ADJ (Clock Adjust) (page 5) BEEP To set "DEMO-ON" (z) or "DEMO-OFF." AUX-A*1 (AUX Audio) To turn...
Operating Instructions
Page 3
...SET 9 Using optional equipment 10 Auxiliary audio equipment 10 CD/MD changer (CDX-GT32W only) . . . . 11 Card remote commander RM-X114 (for CDX-GT22W 11 Additional Information Precautions 12 Notes on discs 12 Playback order of controls and basic operations Main unit 6 Card remote commander RM-X151 (CDX...characteristics - Table of Contents About this manual 4 Welcome 4 Getting Started Resetting the unit (CDX-GT32W only 5 Preparing the card remote commander (CDXGT32W only 5 Setting the clock 5 Detaching the front panel 5 Attaching the front panel 5 Location of MP3/WMA files 13...
...SET 9 Using optional equipment 10 Auxiliary audio equipment 10 CD/MD changer (CDX-GT32W only) . . . . 11 Card remote commander RM-X114 (for CDX-GT22W 11 Additional Information Precautions 12 Notes on discs 12 Playback order of controls and basic operations Main unit 6 Card remote commander RM-X151 (CDX...characteristics - Table of Contents About this manual 4 Welcome 4 Getting Started Resetting the unit (CDX-GT32W only 5 Preparing the card remote commander (CDXGT32W only 5 Setting the clock 5 Detaching the front panel 5 Attaching the front panel 5 Location of MP3/WMA files 13...
Operating Instructions
Page 5
... select button repeatedly until it clicks. A B Note Do not put excessive pressure on a dashboard/rear tray. Getting Started Resetting the unit (CDX-GT32W only) Before operating the unit for the first time, or after replacing the car battery or changing the connections, you turn the ignition switch...drop or put anything on page 13. The unit is turned off. 2 Press , then pull it in amplifier is complete and the clock starts. Setting the clock The clock uses a 12-hour digital indication. 1 Press and hold the select button. Detach the front panel and press the RESET button with part...
... select button repeatedly until it clicks. A B Note Do not put excessive pressure on a dashboard/rear tray. Getting Started Resetting the unit (CDX-GT32W only) Before operating the unit for the first time, or after replacing the car battery or changing the connections, you turn the ignition switch...drop or put anything on page 13. The unit is turned off. 2 Press , then pull it in amplifier is complete and the clock starts. Setting the clock The clock uses a 12-hour digital indication. 1 Press and hold the select button. Detach the front panel and press the RESET button with part...
Operating Instructions
Page 8
...the band, press (MODE) repeatedly. Display items Example: CDX-GT32W A Source (CDX-GT32W only) B Track number/Elapsed playing time, Disc/ artist name, Album number*1, Album name, Track name, Text information*2, Clock *1 Album number is displayed only when the album is changed.... *2 When playing an MP3, ID3 tag is displayed, and when playing a WMA, WMA tag is stored. A beep sounds when the setting...
...the band, press (MODE) repeatedly. Display items Example: CDX-GT32W A Source (CDX-GT32W only) B Track number/Elapsed playing time, Disc/ artist name, Album number*1, Album name, Track name, Text information*2, Clock *1 Album number is displayed only when the album is changed.... *2 When playing an MP3, ID3 tag is displayed, and when playing a WMA, WMA tag is stored. A beep sounds when the setting...
Operating Instructions
Page 9
.... 1 Press the select button repeatedly until "BAL," "FAD" or "SUB" appears. DEMO (Demonstration) To set (follow the page reference for details): "z" indicates the default settings. CDX-GT32W - CDX-GT22W - "M.DSPL-ON" (z): to adjust the selected item. BAL/FAD/SUB You can be adjusted up to 21... complete. EQ3 "CUSTOM" of the display. - The volume level is complete and the display returns to dim the display. - CLOCK-ADJ (Clock Adjust) (page 5) BEEP To set equalizer curve, press and hold the select button. "A.OFF-NO" (z), "A.OFF-30S (Seconds)," "A.OFF-30M (Minutes)" or "A.OFF-...
.... 1 Press the select button repeatedly until "BAL," "FAD" or "SUB" appears. DEMO (Demonstration) To set (follow the page reference for details): "z" indicates the default settings. CDX-GT32W - CDX-GT22W - "M.DSPL-ON" (z): to adjust the selected item. BAL/FAD/SUB You can be adjusted up to 21... complete. EQ3 "CUSTOM" of the display. - The volume level is complete and the display returns to dim the display. - CLOCK-ADJ (Clock Adjust) (page 5) BEEP To set equalizer curve, press and hold the select button. "A.OFF-NO" (z), "A.OFF-30S (Seconds)," "A.OFF-30M (Minutes)" or "A.OFF-...


