
Operating Instructions
Page 4
... panel You can detach the front panel of the unit, as a ball-point pen. To move the digital indication, press (DSPL). 5 Press the select button. The alarm will only sound if the built-in a parked car or on the front panel and display window. • Do not subject the front...reset the unit. Setting the clock The clock uses a 12-hour digital indication. 1 Press and hold the select button. The setup is used. 1 Press (OFF). The setup display appears. 2 Press the select button repeatedly until it clicks. Notes • Do not drop or put anything on the inner surface of the front...
... panel You can detach the front panel of the unit, as a ball-point pen. To move the digital indication, press (DSPL). 5 Press the select button. The alarm will only sound if the built-in a parked car or on the front panel and display window. • Do not subject the front...reset the unit. Setting the clock The clock uses a 12-hour digital indication. 1 Press and hold the select button. The setup is used. 1 Press (OFF). The setup display appears. 2 Press the select button repeatedly until it clicks. Notes • Do not drop or put anything on the inner surface of the front...

Operating Instructions
Page 5
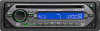
Location of controls and basic operations Main unit CDX-GT100 CDX-GT10W Refer to the pages listed for details. B Volume control dial/select button 6 To adjust volume (rotate); H (front panel release) button 4 I SEEK -/+ buttons CD: To skip tracks (press); J SOURCE button To power on; M RESET button (located behind the front panel) 4 N Number buttons CD: (3): REP To play the current track repeatedly...
Location of controls and basic operations Main unit CDX-GT100 CDX-GT10W Refer to the pages listed for details. B Volume control dial/select button 6 To adjust volume (rotate); H (front panel release) button 4 I SEEK -/+ buttons CD: To skip tracks (press); J SOURCE button To power on; M RESET button (located behind the front panel) 4 N Number buttons CD: (3): REP To play the current track repeatedly...
Operating Instructions
Page 6
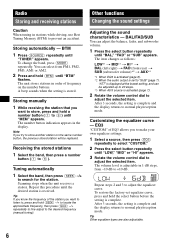
... when the setting is complete and the display returns to prevent an accident. Tip If you want to listen to, press and hold the select button before the setting is activated (page 7). 2 Rotate the volume control dial to 20 steps. *3 When AUX source is complete. Other functions..., then press (EQ3) repeatedly to normal play /reception mode. The volume level is complete and the display returns to select "CUSTOM." 2 Press the select button repeatedly until "BTM" flashes. Customizing the equalizer curve - To restore the factory-set to adjust the equalizer curve. BAL/FAD/SUB...
... when the setting is complete and the display returns to prevent an accident. Tip If you want to listen to, press and hold the select button before the setting is activated (page 7). 2 Rotate the volume control dial to 20 steps. *3 When AUX source is complete. Other functions..., then press (EQ3) repeatedly to normal play /reception mode. The volume level is complete and the display returns to select "CUSTOM." 2 Press the select button repeatedly until "BTM" flashes. Customizing the equalizer curve - To restore the factory-set to adjust the equalizer curve. BAL/FAD/SUB...
Operating Instructions
Page 7
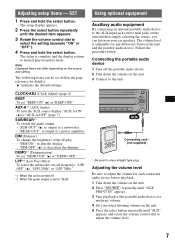
... device. 2 Turn down the volume on the unit. 5 Press the select button repeatedly until "AUX" appears, and rotate the volume control dial to select the setting (example "ON" or "OFF"). 4 Press and hold the select button. Note Displayed items will differ, depending on the unit. 3 Connect to... 1 Turn off . *2 When the audio output is adjustable for details): "z" indicates the default settings. The setup display appears. 2 Press the select button repeatedly until "AUX FRONT IN" appears. 3 Start playback of the display. - The volume level is set to the AUX input jack (stereo ...
... device. 2 Turn down the volume on the unit. 5 Press the select button repeatedly until "AUX" appears, and rotate the volume control dial to select the setting (example "ON" or "OFF"). 4 Press and hold the select button. Note Displayed items will differ, depending on the unit. 3 Connect to... 1 Turn off . *2 When the audio output is adjustable for details): "z" indicates the default settings. The setup display appears. 2 Press the select button repeatedly until "AUX FRONT IN" appears. 3 Start playback of the display. - The volume level is set to the AUX input jack (stereo ...

Operating Instructions
Page 10
...(reference: 1 Watt into 4 Ohms) CD Player section Signal-to-noise ratio: 120 dB Frequency response: 10 - 20,000 Hz Wow and flutter: Below measurable limit Tuner section FM Tuning range: 87.5 - 107.9 MHz Antenna... terminal: External antenna connector Intermediate frequency: 10.7 MHz/450 kHz Usable sensitivity: 9 dBf Selectivity: 75 dB at 400 kHz...and operating procedures. The power antenna does not have been erased. • The RESET button has been pressed. The contents of the memory have a relay box. Makes noise ...
...(reference: 1 Watt into 4 Ohms) CD Player section Signal-to-noise ratio: 120 dB Frequency response: 10 - 20,000 Hz Wow and flutter: Below measurable limit Tuner section FM Tuning range: 87.5 - 107.9 MHz Antenna... terminal: External antenna connector Intermediate frequency: 10.7 MHz/450 kHz Usable sensitivity: 9 dBf Selectivity: 75 dB at 400 kHz...and operating procedures. The power antenna does not have been erased. • The RESET button has been pressed. The contents of the memory have a relay box. Makes noise ...


