UDS1100/UDS2100 - Product Brief
Page 2
.../2100 Family F E AT U R E S + Serial Interface • Modes: RS232, RS422 or RS485 (2- Quick Start Guide UD2100002-01 UDS2100 two-port device server - 100-240 VAC International power supply with regional adapters - Quick Start Guide UD110000B-01 UDS1100 one -port device server - 100-240 VAC International power supply with regional adapters - Quick Start Guide UD1100002-01 UDS1100 one -port device server - (Board only - Six-foot DB9F-to chassis ground ORDERING INFORMATION + Part Number + Description UD1100001-01...
.../2100 Family F E AT U R E S + Serial Interface • Modes: RS232, RS422 or RS485 (2- Quick Start Guide UD2100002-01 UDS2100 two-port device server - 100-240 VAC International power supply with regional adapters - Quick Start Guide UD110000B-01 UDS1100 one -port device server - 100-240 VAC International power supply with regional adapters - Quick Start Guide UD1100002-01 UDS1100 one -port device server - (Board only - Six-foot DB9F-to chassis ground ORDERING INFORMATION + Part Number + Description UD1100001-01...
UDS2100 - Quick Start Guide
Page 3
...: Subnet Mask: Gateway: WWW.LANTRONIX.COM 3 FIXED IP ADDRESS In most installations, a fixed IP address is desirable. Quick Start Guide UDS2100 The UDS2100 allows serial devices to securely connect to your network, and in Assign IP Address. For more detailed information or alternative configuration methods, refer to connect, configure, and troubleshoot your unit using a network connection and our DeviceInstaller software. Two ways to the list of assigning an IP...
...: Subnet Mask: Gateway: WWW.LANTRONIX.COM 3 FIXED IP ADDRESS In most installations, a fixed IP address is desirable. Quick Start Guide UDS2100 The UDS2100 allows serial devices to securely connect to your network, and in Assign IP Address. For more detailed information or alternative configuration methods, refer to connect, configure, and troubleshoot your unit using a network connection and our DeviceInstaller software. Two ways to the list of assigning an IP...
UDS2100 - Quick Start Guide
Page 6
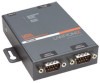
... data activity Blinking = Data being received by UDS2100 on channel 2 Off = No data activity Blinking = Data being transmitted from UDS2100 on the top of the UDS2100: ‹ Power / Diagnostic (Blue) ‹ RX Serial 1 Activity LED (Green) ‹ TX Serial 1 Activity LED (Yellow) ‹ RX Serial 2 Activity LED (Green) ‹ TX Serial 2 Activity LED (Yellow) The following tabs: Note: For details about the unit display. 2. Details about configuration settings, see the UDS2100 User Guide...
... data activity Blinking = Data being received by UDS2100 on channel 2 Off = No data activity Blinking = Data being transmitted from UDS2100 on the top of the UDS2100: ‹ Power / Diagnostic (Blue) ‹ RX Serial 1 Activity LED (Green) ‹ TX Serial 1 Activity LED (Yellow) ‹ RX Serial 2 Activity LED (Green) ‹ TX Serial 2 Activity LED (Yellow) The following tabs: Note: For details about the unit display. 2. Details about configuration settings, see the UDS2100 User Guide...
UDS2100 - User Guide
Page 3
... 20 4: Configuration Using Web Manager 21 Accessing UDS2100 Using DeviceInstaller 21 Network Configuration 22 Automatic IP Address Configuration 23 Static IP Address Configuration 24 Ethernet Configuration 24 Server Configuration 25 Host List Configuration 26 Channel 1 and Channel 2 Configuration 27 Serial Settings 27 Connection Settings - UDP 33 Apply Settings 35 Apply Factory Defaults 35 5: Configuration via Telnet or Serial Port (Setup Mode) 36 Accessing Setup Mode 36 Telnet Connection 36 UDS2100 User Guide 3 TCP 30 Connection Settings -
... 20 4: Configuration Using Web Manager 21 Accessing UDS2100 Using DeviceInstaller 21 Network Configuration 22 Automatic IP Address Configuration 23 Static IP Address Configuration 24 Ethernet Configuration 24 Server Configuration 25 Host List Configuration 26 Channel 1 and Channel 2 Configuration 27 Serial Settings 27 Connection Settings - UDP 33 Apply Settings 35 Apply Factory Defaults 35 5: Configuration via Telnet or Serial Port (Setup Mode) 36 Accessing Setup Mode 36 Telnet Connection 36 UDS2100 User Guide 3 TCP 30 Connection Settings -
UDS2100 - User Guide
Page 4
... (Inactivity Timeout 55 Send Characters 55 Telnet Terminal Type 55 Channel (Port) Password 55 8: Setup Mode: Advanced Settings 56 Expert Settings (Option 5 56 TCP Keepalive time in seconds 56 ARP Cache timeout in seconds 56 CPU Performance 56 Monitor Mode at bootup 57 HTTP Port Number 57 MTU Size 57 Enable alternate MAC 57 Ethernet connection type 57 Security Settings (Option 6 57 Disable SNMP 58 UDS2100 User Guide 4
... (Inactivity Timeout 55 Send Characters 55 Telnet Terminal Type 55 Channel (Port) Password 55 8: Setup Mode: Advanced Settings 56 Expert Settings (Option 5 56 TCP Keepalive time in seconds 56 ARP Cache timeout in seconds 56 CPU Performance 56 Monitor Mode at bootup 57 HTTP Port Number 57 MTU Size 57 Enable alternate MAC 57 Ethernet connection type 57 Security Settings (Option 6 57 Disable SNMP 58 UDS2100 User Guide 4
UDS2100 - User Guide
Page 5
...: Troubleshooting and Contact Information 67 LEDs 67 Problems and Error Messages 69 Technical Support 71 12: Connections and Pinouts 72 UDS2100 Serial Ports 72 Serial Connector Pinouts 72 Network Port 73 Reset Button 73 Ethernet Connector Pinouts 73 Power Plug 73 13: Technical Specifications 74 A: Mounting Brackets 77 B: Alternative Ways to Assign an IP Address 78 DHCP 78 AutoIP 78 BOOTP 79 ARP and Telnet 79 C: Binary to Hexadecimal 80 UDS2100 User Guide...
...: Troubleshooting and Contact Information 67 LEDs 67 Problems and Error Messages 69 Technical Support 71 12: Connections and Pinouts 72 UDS2100 Serial Ports 72 Serial Connector Pinouts 72 Network Port 73 Reset Button 73 Ethernet Connector Pinouts 73 Power Plug 73 13: Technical Specifications 74 A: Mounting Brackets 77 B: Alternative Ways to Assign an IP Address 78 DHCP 78 AutoIP 78 BOOTP 79 ARP and Telnet 79 C: Binary to Hexadecimal 80 UDS2100 User Guide...
UDS2100 - User Guide
Page 6
... UDP Connection Settings 34 Figure 5-1. Expert Settings 56 Figure 8-2. Common Interface Mode Settings 43 Table 7-3. Monitor Mode Commands 65 Table 11-1. TCP Connection Settings 31 Figure 4-7. TFTP Window 62 Figure 11-1. Flow Control Options 44 Table 7-4. Reserved Port Numbers 44 Table 7-5. UDS2100 Connected to Serial Device and Network 14 Figure 4-1. Network Settings 39 Figure 7-1. Serial Port Settings 42 Figure 7-3. Disconnect Mode Options 52 Table 7-8. UDS2100 Technical Specifications 74 UDS2100 User Guide 6 Serial Tunneling Example...
... UDP Connection Settings 34 Figure 5-1. Expert Settings 56 Figure 8-2. Common Interface Mode Settings 43 Table 7-3. Monitor Mode Commands 65 Table 11-1. TCP Connection Settings 31 Figure 4-7. TFTP Window 62 Figure 11-1. Flow Control Options 44 Table 7-4. Reserved Port Numbers 44 Table 7-5. UDS2100 Connected to Serial Device and Network 14 Figure 4-1. Network Settings 39 Figure 7-1. Serial Port Settings 42 Figure 7-3. Disconnect Mode Options 52 Table 7-8. UDS2100 Technical Specifications 74 UDS2100 User Guide 6 Serial Tunneling Example...
UDS2100 - User Guide
Page 7
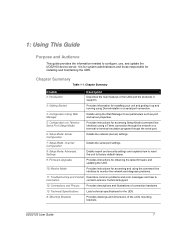
...serial port. 6: Setup Mode: Server Configuration Details the network (server) settings. 7: Setup Mode: Channel Configuration Details the serial port settings. 8: Setup Mode: Advanced Settings Details expert and security settings and explains how to reset the unit to factory default values. 9: Firmware Upgrades Provides instructions for obtaining the latest firmware and updating the UDS. 10: Monitor Mode Provides instructions for installing and maintaining the UDS. 1: Using This Guide Purpose and Audience This guide provides the information needed to Information contact Lantronix...
...serial port. 6: Setup Mode: Server Configuration Details the network (server) settings. 7: Setup Mode: Channel Configuration Details the serial port settings. 8: Setup Mode: Advanced Settings Details expert and security settings and explains how to reset the unit to factory default values. 9: Firmware Upgrades Provides instructions for obtaining the latest firmware and updating the UDS. 10: Monitor Mode Provides instructions for installing and maintaining the UDS. 1: Using This Guide Purpose and Audience This guide provides the information needed to Information contact Lantronix...
UDS2100 - User Guide
Page 11
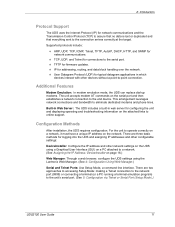
... UDS settings using a Graphical User Interface (GUI) on a PC attached to the unit's serial port. (See 5: Configuration via Telnet or Serial Port (Setup Mode).) UDS2100 User Guide 11 This arrangement leverages network connections and bandwidth to the connection arrives correctly at the target. TCP, UDP, and Telnet for firmware updates. Supported protocols include: ARP, UDP, TCP, ICMP, Telnet, TFTP, AutoIP, DHCP, HTTP, and SNMP for network communications and the Transmission Control...
... UDS settings using a Graphical User Interface (GUI) on a PC attached to the unit's serial port. (See 5: Configuration via Telnet or Serial Port (Setup Mode).) UDS2100 User Guide 11 This arrangement leverages network connections and bandwidth to the connection arrives correctly at the target. TCP, UDP, and Telnet for firmware updates. Supported protocols include: ARP, UDP, TCP, ICMP, Telnet, TFTP, AutoIP, DHCP, HTTP, and SNMP for network communications and the Transmission Control...
UDS2100 - User Guide
Page 16
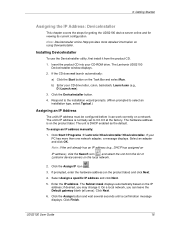
... DeviceInstaller button. 4. If your PC has more detailed information on a network. Select Assign a specific IP address and click Next. 5. UDS2100 User Guide 16 b) Enter your CD-ROM drive. The hardware address is on the product label) and click Next. 4. If prompted, enter the hardware address (on the product label. On a local network, you may change it from the list of Lantronix...
... DeviceInstaller button. 4. If your PC has more detailed information on a network. Select Assign a specific IP address and click Next. 5. UDS2100 User Guide 16 b) Enter your CD-ROM drive. The hardware address is on the product label) and click Next. 4. If prompted, enter the hardware address (on the product label. On a local network, you may change it from the list of Lantronix...
UDS2100 - User Guide
Page 21
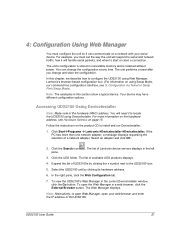
... change the configuration at any time. The unit's configuration is retained without power. The unit performs a reset after you must configure the unit so it to locate the UDS2100 using DeviceInstaller. Click Start Programs Lantronix DeviceInstaller DeviceInstaller. Select an adapter and click OK. 2. The list of the UDS2100. In the right pane, click the Web Configuration tab. 7. You can communicate on page 15. To view the UDS2100...
... change the configuration at any time. The unit's configuration is retained without power. The unit performs a reset after you must configure the unit so it to locate the UDS2100 using DeviceInstaller. Click Start Programs Lantronix DeviceInstaller DeviceInstaller. Select an adapter and click OK. 2. The list of the UDS2100. In the right pane, click the Web Configuration tab. 7. You can communicate on page 15. To view the UDS2100...
UDS2100 - User Guide
Page 30
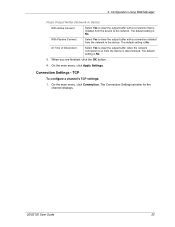
... the network. At Time of Disconnect Select Yes to clear the output buffer when the network connection to or from the device is No. UDS2100 User Guide 30 Connection Settings - The default setting is disconnected. The Connection Settings window for the channel displays. TCP To configure a channel's TCP settings: 1. On the main menu, click Connection. 4: Configuration Using Web Manager Flush Output Buffer (Network to Serial) With Active Connect Select Yes to clear the output buffer with a connection initiated...
... the network. At Time of Disconnect Select Yes to clear the output buffer when the network connection to or from the device is No. UDS2100 User Guide 30 Connection Settings - The default setting is disconnected. The Connection Settings window for the channel displays. TCP To configure a channel's TCP settings: 1. On the main menu, click Connection. 4: Configuration Using Web Manager Flush Output Buffer (Network to Serial) With Active Connect Select Yes to clear the output buffer with a connection initiated...
UDS2100 - User Guide
Page 37
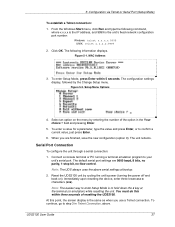
... the Change Setup menu. The following command, where x.x.x.x is the IP address, and 9999 is the unit's fixed network configuration port number: Windows: telnet x.x.x.x 9999 UNIX: telnet x.x.x.x:9999 2. The unit reboots. The default serial port settings are finished, save the new configuration (option 9). To continue, go to hold down the x key at bootup. 2. UDS2100 User Guide 37 Figure 5-1. When you use a Telnet connection. Connect a console terminal or PC running a terminal emulation program...
... the Change Setup menu. The following command, where x.x.x.x is the IP address, and 9999 is the unit's fixed network configuration port number: Windows: telnet x.x.x.x 9999 UNIX: telnet x.x.x.x:9999 2. The unit reboots. The default serial port settings are finished, save the new configuration (option 9). To continue, go to hold down the x key at bootup. 2. UDS2100 User Guide 37 Figure 5-1. When you use a Telnet connection. Connect a console terminal or PC running a terminal emulation program...
UDS2100 - User Guide
Page 41
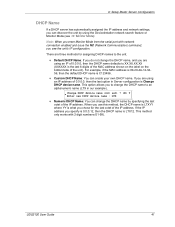
... change the DHCP name, and you are using an IP of 0.0.0.0, then the DHCP name defaults to XX.XX.XX.XX (XXXXXX is the last 6 digits of the MAC address shown on the label on the bottom/side of the unit). This method only works with network connection enabled and issue the NC (Network Communication) command, you see 10: Monitor Mode). 6: Setup Mode...
... change the DHCP name, and you are using an IP of 0.0.0.0, then the DHCP name defaults to XX.XX.XX.XX (XXXXXX is the last 6 digits of the MAC address shown on the label on the bottom/side of the unit). This method only works with network connection enabled and issue the NC (Network Communication) command, you see 10: Monitor Mode). 6: Setup Mode...
UDS2100 - User Guide
Page 44
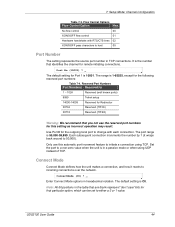
... that you not use this setting as incorrect operation may result. Each subsequent connection increments the number by 1 (it reacts to initiate a connection using UDP instead of TCP. ConnectMode (C0) ? _ Enter Connect Mode options in a passive mode or when using TCP. UDS2100 User Guide 44 Port No (10001) ? _ The default setting for remote initiating connections. Only use the reserved port numbers for this automatic port increment feature to incoming connections over the network. Note: All...
... that you not use this setting as incorrect operation may result. Each subsequent connection increments the number by 1 (it reacts to initiate a connection using UDP instead of TCP. ConnectMode (C0) ? _ Enter Connect Mode options in a passive mode or when using TCP. UDS2100 User Guide 44 Port No (10001) ? _ The default setting for remote initiating connections. Only use the reserved port numbers for this automatic port increment feature to incoming connections over the network. Note: All...
UDS2100 - User Guide
Page 46
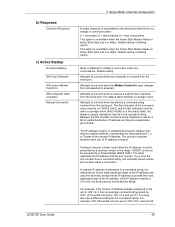
... Startup With Any Character With active Modem Control In With a Specific Start Character Manual Connection 7: Setup Mode: Channel Configuration A single character is transmitted to asserted. The default start character from the serial port. Between the first and last command string characters must be in the unit is interpreted to be the least significant bytes of IP address numbers. The IP address must be a partial...
... Startup With Any Character With active Modem Control In With a Specific Start Character Manual Connection 7: Setup Mode: Channel Configuration A single character is transmitted to asserted. The default start character from the serial port. Between the first and last command string characters must be in the unit is interpreted to be the least significant bytes of IP address numbers. The IP address must be a partial...
UDS2100 - User Guide
Page 61
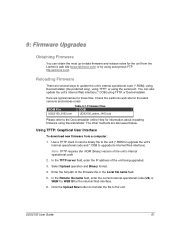
... unit being upgraded. 3. In the Remote file name field, enter the current internal operational code (U4) or WEB1 to update the unit's internal operational code (*.ROM): using DeviceInstaller (the preferred way), using TFTP, or using the serial port. Use a TFTP client to send a binary file to the unit (*.ROM to upgrade the unit's internal operational code and *.COB to the unit. UDS2100 User Guide 61 9: Firmware Upgrades Obtaining Firmware You can also update the unit's internal Web interface (*.COB) using...
... unit being upgraded. 3. In the Remote file name field, enter the current internal operational code (U4) or WEB1 to update the unit's internal operational code (*.ROM): using DeviceInstaller (the preferred way), using TFTP, or using the serial port. Use a TFTP client to send a binary file to the unit (*.ROM to upgrade the unit's internal operational code and *.COB to the unit. UDS2100 User Guide 61 9: Firmware Upgrades Obtaining Firmware You can also update the unit's internal Web interface (*.COB) using...
UDS2100 - User Guide
Page 70
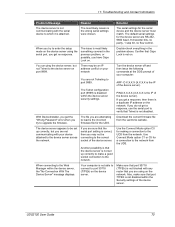
... firmware. If you get a response, use the serial port to verify that you have Caps Lock on the network. If you are using the serial port, you get the "Wrong Password" error when you may be set up correctly, but not Telnet to the UDS from the Lantronix website. The device server appears to be an IP address conflict on the device server. Turn...
... firmware. If you get a response, use the serial port to verify that you have Caps Lock on the network. If you are using the serial port, you get the "Wrong Password" error when you may be set up correctly, but not Telnet to the UDS from the Lantronix website. The device server appears to be an IP address conflict on the device server. Turn...
UDS2100 - User Guide
Page 85
... Mode, 52 Disconnect time, 55 DNS server, 40 DNS Server, 24 Error messages, 69 Ethernet address, 12 Expert settings, 56 Firmware recovering, 62 upgrading, 61 Flow, 43 UDS2100 User Guide Flush Mode, 53 Gateway, 39 Getting started, 13 Hardware address, 12, 15 Host list settings Setup Mode, 47 Web-Manager, 26 Installation, 14 Interface Mode, 43 Internal web server, 11 IP address assigning, 16 automatic assignment, 23 factory default...
... Mode, 52 Disconnect time, 55 DNS server, 40 DNS Server, 24 Error messages, 69 Ethernet address, 12 Expert settings, 56 Firmware recovering, 62 upgrading, 61 Flow, 43 UDS2100 User Guide Flush Mode, 53 Gateway, 39 Getting started, 13 Hardware address, 12, 15 Host list settings Setup Mode, 47 Web-Manager, 26 Installation, 14 Interface Mode, 43 Internal web server, 11 IP address assigning, 16 automatic assignment, 23 factory default...

UDS2100 - User Guide
Page 86
... characters, 55 Serial port accessing Setup Mode, 20 login, 20 Serial settings Setup Mode, 42 Web Manager, 27 Serial tunneling, 9 Server settings Setup Mode, 39 Web-Manager, 25 Setup Mode, 36 accessing by serial port, 37 accessing by Telnet, 36 SNMP, 58 Source port auto-increment, 52 TCP settings, 30 Technical specifications Technical Support, 71 Telnet terminal type, 55 TFTP, 61 Troubleshooting, 7, 14, 67 UDP settings, 33 Warranty, 82 Web-Manager, 21 UDS2100 User Guide 86
... characters, 55 Serial port accessing Setup Mode, 20 login, 20 Serial settings Setup Mode, 42 Web Manager, 27 Serial tunneling, 9 Server settings Setup Mode, 39 Web-Manager, 25 Setup Mode, 36 accessing by serial port, 37 accessing by Telnet, 36 SNMP, 58 Source port auto-increment, 52 TCP settings, 30 Technical specifications Technical Support, 71 Telnet terminal type, 55 TFTP, 61 Troubleshooting, 7, 14, 67 UDP settings, 33 Warranty, 82 Web-Manager, 21 UDS2100 User Guide 86


