Instruction Manual
Page 102
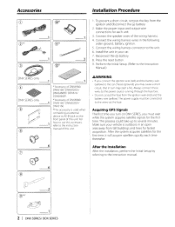
... cut out the fuse from the ignition and disconnect the 8 battery. 2. Connect the wiring harness wires in turn on the front panel of DNX69601 D X61601 DNX6020EXI DNX5160. Always connect those wires to the unit 6. After the Installation After the installation, perform the Initial Setup by ... the proper input and output wire connections for the first time, it will acquire satellites quickly each unit 3. Acquiring GPS Signals The first time you connect the ignition wire (red) and the battery wire (yellow) to the instruction manual of the wiring harness. 4. battery, ignition. 5....
... cut out the fuse from the ignition and disconnect the 8 battery. 2. Connect the wiring harness wires in turn on the front panel of DNX69601 D X61601 DNX6020EXI DNX5160. Always connect those wires to the unit 6. After the Installation After the installation, perform the Initial Setup by ... the proper input and output wire connections for the first time, it will acquire satellites quickly each unit 3. Acquiring GPS Signals The first time you connect the ignition wire (red) and the battery wire (yellow) to the instruction manual of the wiring harness. 4. battery, ignition. 5....
Instruction Manual
Page 104
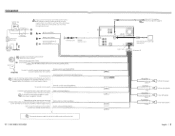
... remote adapter (not supplied) matches your navigation manual. : Mute control wire (Brown) Depending on . : Dimmer control wire (OrangelWhite) To car light control switch Connect to vehicle's reverse lamp harness when using , connect either the telephone rings or during conversation. Q To connect the Kenwood navigation system, ~ consult your car is not in turn may cause...
... remote adapter (not supplied) matches your navigation manual. : Mute control wire (Brown) Depending on . : Dimmer control wire (OrangelWhite) To car light control switch Connect to vehicle's reverse lamp harness when using , connect either the telephone rings or during conversation. Q To connect the Kenwood navigation system, ~ consult your car is not in turn may cause...


