

Instruction Manual
Page 19
... and right speaker output balance. HIGH POWER: The maximum volume level is selected. 3 Press MENU to 31). (Default: DAY: 31 ; OFF: Cancels. *1 The illumination control wire connection is set the fader level to [00]. 1 Press and hold MENU. 2 Turn the volume knob to the FM volume level). Repeat step 2 until the...
... and right speaker output balance. HIGH POWER: The maximum volume level is selected. 3 Press MENU to 31). (Default: DAY: 31 ; OFF: Cancels. *1 The illumination control wire connection is set the fader level to [00]. 1 Press and hold MENU. 2 Turn the volume knob to the FM volume level). Repeat step 2 until the...
Instruction Manual
Page 22
... Playback order is unsuccessful. turn on the recording process earlier. "LICENSE ERR" You try to be sure the terminals of the speaker wires are in which Pandora is ejected. If this does not solve the problem, consult your device. the radio. "UPGRADE APP" Make ... alternately. Disc cannot be selected. "ADD ERROR" "SEARCH ERR" New station creation is not as intended. "MISWIRING CHK WIRING THEN RESET UNIT" / "WARNING CHK WIRING THEN RESET UNIT" appears and no operations can only display uppercase letters, numbers, and a limited number of thumbs up/thumbs...
... Playback order is unsuccessful. turn on the recording process earlier. "LICENSE ERR" You try to be sure the terminals of the speaker wires are in which Pandora is ejected. If this does not solve the problem, consult your device. the radio. "UPGRADE APP" Make ... alternately. Disc cannot be selected. "ADD ERROR" "SEARCH ERR" New station creation is not as intended. "MISWIRING CHK WIRING THEN RESET UNIT" / "WARNING CHK WIRING THEN RESET UNIT" appears and no operations can only display uppercase letters, numbers, and a limited number of thumbs up/thumbs...

Instruction Manual
Page 26
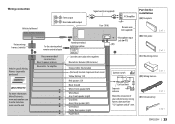
... then disconnect the terminal of your car When installing without the mounting sleeve Use only the specified screws. Do the required wiring. ( 25) Dashboard of the car battery. 2 Connect the wires properly. Using wrong screws might damage the unit. See Installing the unit (in parallel. • Connect speakers with one...on the top side Orientate the trim plate as the heat sink and enclosure become hot. • Do not connect the wires of speakers to the car chassis or Ground wire (black), or connect them in -dash mounting). 4 Connect the terminal of your car. If the maximum power of ...
... then disconnect the terminal of your car When installing without the mounting sleeve Use only the specified screws. Do the required wiring. ( 25) Dashboard of the car battery. 2 Connect the wires properly. Using wrong screws might damage the unit. See Installing the unit (in parallel. • Connect speakers with one...on the top side Orientate the trim plate as the heat sink and enclosure become hot. • Do not connect the wires of speakers to the car chassis or Ground wire (black), or connect them in -dash mounting). 4 Connect the terminal of your car. If the maximum power of ...
Instruction Manual
Page 27
... dashboard Front output Rear/subwoofer output Signal cord (not supplied) JVC Amplifier Fuse (10 A) Remote wire (not supplied) Factory wiring harness (vehicle) Vehicle-specific Wiring Harness (separately purchased) For more information: Metra Electronics: www.metraonline.com Scosche Industries: ... Blue/white: To amplifier Antenna terminal Light blue/yellow STEERING WHEEL REMOTE Join the same color wires together. Part list for installation (A) Faceplate (B) Trim plate (C) Mounting sleeve (D) Wiring harness (E) Extraction key ENGLISH | 25 Blue/white: Remote (200 mA max.) Orange/white:...
... dashboard Front output Rear/subwoofer output Signal cord (not supplied) JVC Amplifier Fuse (10 A) Remote wire (not supplied) Factory wiring harness (vehicle) Vehicle-specific Wiring Harness (separately purchased) For more information: Metra Electronics: www.metraonline.com Scosche Industries: ... Blue/white: To amplifier Antenna terminal Light blue/yellow STEERING WHEEL REMOTE Join the same color wires together. Part list for installation (A) Faceplate (B) Trim plate (C) Mounting sleeve (D) Wiring harness (E) Extraction key ENGLISH | 25 Blue/white: Remote (200 mA max.) Orange/white:...


