
User Manual
Page 5
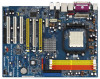
...guide to the hardware installation. ASRock website http://www.asrock.com 1.1 Package Contents 1 x ASRock ALiveNF5SLI-1394 Motherboard (ATX Form Factor: 12.0-in x 9.0-in, 30.5 cm x 22.9 cm) 1 x ASRock SLI Bridge 1 x ASRock ALiveNF5SLI-1394 Quick Installation Guide 1 x ASRock ALiveNF5SLI-1394 Support CD 1 x Ultra...this manual will be subject to quality and endurance. Introduction Thank you for purchasing ASRock ALiveNF5SLI-1394 motherboard, a reliable motherboard produced under ASRock's consistently stringent quality control. Because the motherboard specifications and the BIOS software might ...
...guide to the hardware installation. ASRock website http://www.asrock.com 1.1 Package Contents 1 x ASRock ALiveNF5SLI-1394 Motherboard (ATX Form Factor: 12.0-in x 9.0-in, 30.5 cm x 22.9 cm) 1 x ASRock SLI Bridge 1 x ASRock ALiveNF5SLI-1394 Quick Installation Guide 1 x ASRock ALiveNF5SLI-1394 Support CD 1 x Ultra...this manual will be subject to quality and endurance. Introduction Thank you for purchasing ASRock ALiveNF5SLI-1394 motherboard, a reliable motherboard produced under ASRock's consistently stringent quality control. Because the motherboard specifications and the BIOS software might ...

Quick Installation Guide
Page 1
... expressed or implied, including but not limited to change without written consent of the FCC Rules. This device complies with Part 15 of ASRock Inc. All rights reserved. 1 ASRock ALiveNF5SLI-1394 Motherboard English With respect to infringe. Operation is subject to the following two conditions: (1) this device may not cause harmful interference, and (2) this...
... expressed or implied, including but not limited to change without written consent of the FCC Rules. This device complies with Part 15 of ASRock Inc. All rights reserved. 1 ASRock ALiveNF5SLI-1394 Motherboard English With respect to infringe. Operation is subject to the following two conditions: (1) this device may not cause harmful interference, and (2) this...
Quick Installation Guide
Page 2
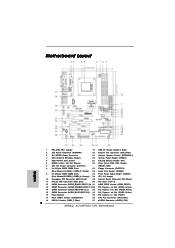
... Module 22 System Panel Header (PANEL1) 5 AM2 940-Pin CPU Socket 23 Infrared Module Header (IR1) 6 NVIDIA nForce 560 SLI Chipset 24 Front Panel IEEE 1394 Header 7 ATX 12V Power Connector (ATX12V1) (FRONT_1394) 8 2 x 240-pin DDRII DIMM Slots 25 Floppy Connector (FLOPPY1) (Dual Channel A: DDRII_1, DDRII_2; Yellow) 26 Game Port Header... 35 PCI Express x1 Slot (PCIE1) 17 Clear CMOS Jumper (CLRCMOS1) 36 CPU Fan Connector (CPU_FAN1) 18 USB 2.0 Header (USB6_7, Blue) 37 eSATAII Connector (eSATAII_TOP) 2 ASRock ALiveNF5SLI-1394 Motherboard
... Module 22 System Panel Header (PANEL1) 5 AM2 940-Pin CPU Socket 23 Infrared Module Header (IR1) 6 NVIDIA nForce 560 SLI Chipset 24 Front Panel IEEE 1394 Header 7 ATX 12V Power Connector (ATX12V1) (FRONT_1394) 8 2 x 240-pin DDRII DIMM Slots 25 Floppy Connector (FLOPPY1) (Dual Channel A: DDRII_1, DDRII_2; Yellow) 26 Game Port Header... 35 PCI Express x1 Slot (PCIE1) 17 Clear CMOS Jumper (CLRCMOS1) 36 CPU Fan Connector (CPU_FAN1) 18 USB 2.0 Header (USB6_7, Blue) 37 eSATAII Connector (eSATAII_TOP) 2 ASRock ALiveNF5SLI-1394 Motherboard

Quick Installation Guide
Page 3
... use 2-channel speaker, please connect the speaker's plug into "Front Speaker Jack". V 6 V -- TABLE for connection details in BIOS setup first. 3 ASRock ALiveNF5SLI-1394 Motherboard English ASRock 1394_eSATAII I/O Plus 1 PS/2 Mouse Port (Green) 2 Parallel Port 3 IEEE 1394 Port 4 RJ-45 Port 5 Side Speaker (Gray) 6 Rear Speaker (Black) 7 Central / Bass (Orange) 8 Line In (Light Blue) * 9 Front Speaker...
... use 2-channel speaker, please connect the speaker's plug into "Front Speaker Jack". V 6 V -- TABLE for connection details in BIOS setup first. 3 ASRock ALiveNF5SLI-1394 Motherboard English ASRock 1394_eSATAII I/O Plus 1 PS/2 Mouse Port (Green) 2 Parallel Port 3 IEEE 1394 Port 4 RJ-45 Port 5 Side Speaker (Gray) 6 Rear Speaker (Black) 7 Central / Bass (Orange) 8 Line In (Light Blue) * 9 Front Speaker...
Quick Installation Guide
Page 4
... without notice. It delivers excellent performance with robust design conforming to ASRock's commitment to change without further notice. ASRock website http://www.asrock.com 1.1 Package Contents 1 x ASRock ALiveNF5SLI-1394 Motherboard (ATX Form Factor: 12.0-in x 9.0-in, 30.5 cm x 22.9 cm) 1 x ASRock SLI Bridge 1 x ASRock ALiveNF5SLI-1394 Quick Installation Guide 1 x ASRock ALiveNF5SLI-1394 Support CD 1 x Ultra ATA 66/100/133 IDE Ribbon Cable (80...
... without notice. It delivers excellent performance with robust design conforming to ASRock's commitment to change without further notice. ASRock website http://www.asrock.com 1.1 Package Contents 1 x ASRock ALiveNF5SLI-1394 Motherboard (ATX Form Factor: 12.0-in x 9.0-in, 30.5 cm x 22.9 cm) 1 x ASRock SLI Bridge 1 x ASRock ALiveNF5SLI-1394 Quick Installation Guide 1 x ASRock ALiveNF5SLI-1394 Support CD 1 x Ultra ATA 66/100/133 IDE Ribbon Cable (80...

Quick Installation Guide
Page 5
... - Gigabit LAN 10/100/1000 Mb/s - Supports AMD's Cool 'n' QuietTM Technology - Giga PHY Realtek RTL8211B - capacity: 8GB (see CAUTION 8) 5 ASRock ALiveNF5SLI-1394 Motherboard English 1.2 Specifications Platform CPU Chipset Memory Hybrid Booster Expansion Slot Audio LAN Rear Panel I /O Plus - 1 x PS/2 Mouse Port - 1 x... Jack: Side Speaker/Rear Speaker/Central/Bass/ Line in , 30.5 cm x 22.9 cm - CPU Frequency Stepless Control (see CAUTION 5) - ASRock U-COP (see CAUTION 4) - ATX Form Factor: 12.0-in x 9.0-in /Front Speaker/Microphone (see CAUTION 3) - Support DDRII800/667/533 -...
... - Gigabit LAN 10/100/1000 Mb/s - Supports AMD's Cool 'n' QuietTM Technology - Giga PHY Realtek RTL8211B - capacity: 8GB (see CAUTION 8) 5 ASRock ALiveNF5SLI-1394 Motherboard English 1.2 Specifications Platform CPU Chipset Memory Hybrid Booster Expansion Slot Audio LAN Rear Panel I /O Plus - 1 x PS/2 Mouse Port - 1 x... Jack: Side Speaker/Rear Speaker/Central/Bass/ Line in , 30.5 cm x 22.9 cm - CPU Frequency Stepless Control (see CAUTION 5) - ASRock U-COP (see CAUTION 4) - ATX Form Factor: 12.0-in x 9.0-in /Front Speaker/Microphone (see CAUTION 3) - Support DDRII800/667/533 -...

Quick Installation Guide
Page 6
... headers (support 4 USB 2.0 ports) (see CAUTION 12) - Voltage Monitoring: +12V, +5V, +3.3V, Vcore - Supports jumperfree - FCC, CE, WHQL Certificated English 6 ASRock ALiveNF5SLI-1394 Motherboard Connector BIOS Feature Support CD Hardware Monitor OS Certifications - 4 x SATAII 3.0Gb/s connectors, support RAID (RAID 0, RAID 1, RAID 0+1, JBOD and RAID 5), NCQ and ... - 2 x ATA133 IDE connectors (support 4 x IDE devices) - 1 x Floppy connector - 1 x IR header - 1 x Game header - 1 x HDMI_SPDIF header - 1 x IEEE 1394 header - CPU Ambient Temperature Sensing - Chassis Temperature Sensing -
... headers (support 4 USB 2.0 ports) (see CAUTION 12) - Voltage Monitoring: +12V, +5V, +3.3V, Vcore - Supports jumperfree - FCC, CE, WHQL Certificated English 6 ASRock ALiveNF5SLI-1394 Motherboard Connector BIOS Feature Support CD Hardware Monitor OS Certifications - 4 x SATAII 3.0Gb/s connectors, support RAID (RAID 0, RAID 1, RAID 0+1, JBOD and RAID 5), NCQ and ... - 2 x ATA133 IDE connectors (support 4 x IDE devices) - 1 x Floppy connector - 1 x IR header - 1 x Game header - 1 x HDMI_SPDIF header - 1 x IEEE 1394 header - CPU Ambient Temperature Sensing - Chassis Temperature Sensing -
Quick Installation Guide
Page 7
...CPU, there is no such limitation. 4. Frequencies other than 4GB for the reservation for all CPU/DRAM configurations. This motherboard supports ASRock AM2 Boost overclocking technology. However, we can not guarantee the system stability for system usage under Windows® XP and Windows®...the compatible SLITM Mode PCI Express VGA cards, please refer to read "Untied Overclocking Technology" on page 12 for proper connection. 7 ASRock ALiveNF5SLI-1394 Motherboard English Please check the table on page 14. 8. While CPU overheat is enabled, it back again. For the information of ...
...CPU, there is no such limitation. 4. Frequencies other than 4GB for the reservation for all CPU/DRAM configurations. This motherboard supports ASRock AM2 Boost overclocking technology. However, we can not guarantee the system stability for system usage under Windows® XP and Windows®...the compatible SLITM Mode PCI Express VGA cards, please refer to read "Untied Overclocking Technology" on page 12 for proper connection. 7 ASRock ALiveNF5SLI-1394 Motherboard English Please check the table on page 14. 8. While CPU overheat is enabled, it back again. For the information of ...
Quick Installation Guide
Page 8
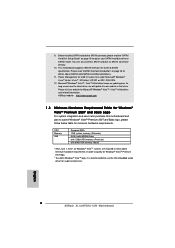
As long as we have the latest driver, we will update it is recommended to SATAII mode. English 8 ASRock ALiveNF5SLI-1394 Motherboard Before installing SATAII hard disk to submit Windows® VistaTM Premium 2007 and Basic logo, please follow below table for audio ...to qualify for Windows® VistaTM Premium 2007 logo. * To submit Windows® VistaTM logo, it to SATAII connector directly. 10. ASRock website http://www.asrock.com 1.3 Minimum Hardware Requirement Table for Windows® VistaTM Premium 2007 and Basic Logo For system integrators and users who purchase this motherboard...
As long as we have the latest driver, we will update it is recommended to SATAII mode. English 8 ASRock ALiveNF5SLI-1394 Motherboard Before installing SATAII hard disk to submit Windows® VistaTM Premium 2007 and Basic logo, please follow below table for audio ...to qualify for Windows® VistaTM Premium 2007 logo. * To submit Windows® VistaTM logo, it to SATAII connector directly. 10. ASRock website http://www.asrock.com 1.3 Minimum Hardware Requirement Table for Windows® VistaTM Premium 2007 and Basic Logo For system integrators and users who purchase this motherboard...

Quick Installation Guide
Page 9
... 6800 GeForce 6600GT GeForce 6600 GeForce 7900GS GeForce 7300GS GeForce 7300GT * These two cards can only work under Windows® XP / XP 64-bit OS. ASRock website: http://www.asrock.com/support/index.htm English 9 ASRock ALiveNF5SLI-1394 Motherboard
... 6800 GeForce 6600GT GeForce 6600 GeForce 7900GS GeForce 7300GS GeForce 7300GT * These two cards can only work under Windows® XP / XP 64-bit OS. ASRock website: http://www.asrock.com/support/index.htm English 9 ASRock ALiveNF5SLI-1394 Motherboard

Quick Installation Guide
Page 10
... any component, place it . Unplug the power cord from the power supply. Hold components by the edges and do so may damage the motherboard. 10 ASRock ALiveNF5SLI-1394 Motherboard English 2. Pre-installation Precautions Take note of your motherboard directly on a grounded antistatic pad or in , 30.5 cm x 22.9 cm) motherboard. To avoid damaging...
... any component, place it . Unplug the power cord from the power supply. Hold components by the edges and do so may damage the motherboard. 10 ASRock ALiveNF5SLI-1394 Motherboard English 2. Pre-installation Precautions Take note of your motherboard directly on a grounded antistatic pad or in , 30.5 cm x 22.9 cm) motherboard. To avoid damaging...

Quick Installation Guide
Page 11
.... Position the CPU directly above the socket such that the CPU and the heatsink are securely fastened and in one correct orientation. Step 4. English 11 ASRock ALiveNF5SLI-1394 Motherboard Unlock the socket by lifting the lever up to avoid bending of the CPU fan and the heatsink. Carefully insert the CPU into the...
.... Position the CPU directly above the socket such that the CPU and the heatsink are securely fastened and in one correct orientation. Step 4. English 11 ASRock ALiveNF5SLI-1394 Motherboard Unlock the socket by lifting the lever up to avoid bending of the CPU fan and the heatsink. Carefully insert the CPU into the...

Quick Installation Guide
Page 12
... the slots of memory modules in DDRII_1 and DDRII_3, it is not allowed to install identical DDRII DIMM pair in all four slots. 1. English 12 ASRock ALiveNF5SLI-1394 Motherboard Orange slots; Populated Populated (3)* Populated Populated Populated Populated * For the configuration (3), please install identical DDRII DIMMs in the set of memory modules is unable...
... the slots of memory modules in DDRII_1 and DDRII_3, it is not allowed to install identical DDRII DIMM pair in all four slots. 1. English 12 ASRock ALiveNF5SLI-1394 Motherboard Orange slots; Populated Populated (3)* Populated Populated Populated Populated * For the configuration (3), please install identical DDRII DIMMs in the set of memory modules is unable...

Quick Installation Guide
Page 13
... power supply before adding or removing DIMMs or the system components. Step 3. The DIMM only fits in place and the DIMM is properly seated. 13 ASRock ALiveNF5SLI-1394 Motherboard English Step 2. Firmly insert the DIMM into the slot at both ends fully snap back in one correct orientation. Unlock a DIMM slot by pressing...
... power supply before adding or removing DIMMs or the system components. Step 3. The DIMM only fits in place and the DIMM is properly seated. 13 ASRock ALiveNF5SLI-1394 Motherboard English Step 2. Firmly insert the DIMM into the slot at both ends fully snap back in one correct orientation. Unlock a DIMM slot by pressing...

Quick Installation Guide
Page 14
... installation. Remove the system unit cover (if your graphics cards can only choose to support SLITM function. Step 5. Step 6. Step 4. Replace the system cover. 14 ASRock ALiveNF5SLI-1394 Motherboard English PCIE Slots: PCIE1 (PCIE x1 slot) is used for the card before you intend to use either PCIE3 slot or PCIE2 / PCIE4 slot...
... installation. Remove the system unit cover (if your graphics cards can only choose to support SLITM function. Step 5. Step 6. Step 4. Replace the system cover. 14 ASRock ALiveNF5SLI-1394 Motherboard English PCIE Slots: PCIE1 (PCIE x1 slot) is used for the card before you intend to use either PCIE3 slot or PCIE2 / PCIE4 slot...

Quick Installation Guide
Page 15
... two identical NVIDIA® SLITM enabled PCI Express x16 graphics cards. Step2. Make sure that the SLI Bridge is firmly in this section. English 15 ASRock ALiveNF5SLI-1394 Motherboard Make sure that the cards are NVIDIA® certified. 2. SLITM Technology Requirements 1. Install the identical SLITM-ready graphics cards that are NVIDIA® certified...
... two identical NVIDIA® SLITM enabled PCI Express x16 graphics cards. Step2. Make sure that the SLI Bridge is firmly in this section. English 15 ASRock ALiveNF5SLI-1394 Motherboard Make sure that the cards are NVIDIA® certified. 2. SLITM Technology Requirements 1. Install the identical SLITM-ready graphics cards that are NVIDIA® certified...

Quick Installation Guide
Page 16
...-Graphics Processing Unit (GPU) feature in the NVIDIA® nView system tray utility. Please follow the below procedures to your Windows® taskbar. English 16 ASRock ALiveNF5SLI-1394 Motherboard D. Step5. Click the NVIDIA Settings icon on your system. From the nView Desktop Manager window, select the Desktop Management tab. Step4. Step6. From the...
...-Graphics Processing Unit (GPU) feature in the NVIDIA® nView system tray utility. Please follow the below procedures to your Windows® taskbar. English 16 ASRock ALiveNF5SLI-1394 Motherboard D. Step5. Click the NVIDIA Settings icon on your system. From the nView Desktop Manager window, select the Desktop Management tab. Step4. Step6. From the...

Quick Installation Guide
Page 17
Click the Enable SLI multi-GPU check box. Click OK when done. 17 ASRock ALiveNF5SLI-1394 Motherboard English F. I. Click the slider to display the following screen, then select the SLI multi-GPU item. E. H. From the Display Properties dialog box, select the Settings tab then click Advanced. G. Select the NVIDIA GeForce tab.
Click the Enable SLI multi-GPU check box. Click OK when done. 17 ASRock ALiveNF5SLI-1394 Motherboard English F. I. Click the slider to display the following screen, then select the SLI multi-GPU item. E. H. From the Display Properties dialog box, select the Settings tab then click Advanced. G. Select the NVIDIA GeForce tab.

Quick Installation Guide
Page 18
Click the Start icon on your Windows taskbar. Select Control Panel tab. Select NVIDIA Control Panel tab. From the pop-up menu, select All Programs, and then click NVIDIA Corporation. For Windows® VistaTM / VistaTM 64-bit OS: A. D. E. From the pop-up menu, select Set SLI configuration, and then click Apply. * SLITM appearing here is a registered trademark of NVIDIA® Technologies Inc., and is used only for identification or explanation and to the owners' benefit, without intent to infringe. 18 ASRock ALiveNF5SLI-1394 Motherboard English C. B.
Click the Start icon on your Windows taskbar. Select Control Panel tab. Select NVIDIA Control Panel tab. From the pop-up menu, select All Programs, and then click NVIDIA Corporation. For Windows® VistaTM / VistaTM 64-bit OS: A. D. E. From the pop-up menu, select Set SLI configuration, and then click Apply. * SLITM appearing here is a registered trademark of NVIDIA® Technologies Inc., and is used only for identification or explanation and to the owners' benefit, without intent to infringe. 18 ASRock ALiveNF5SLI-1394 Motherboard English C. B.

Quick Installation Guide
Page 19
... p.2, No. 28) Note: If the jumpers JL1 and JR1 are short, both the front panel and the rear panel audio connectors can work. English 19 ASRock ALiveNF5SLI-1394 Motherboard
... p.2, No. 28) Note: If the jumpers JL1 and JR1 are short, both the front panel and the rear panel audio connectors can work. English 19 ASRock ALiveNF5SLI-1394 Motherboard


