eMachines E627 Support Question
eMachines E627 Support Question
Find answers below for this question about eMachines E627.Need a eMachines E627 manual? We have 2 online manuals for this item!
Question posted by joyce1128 on February 16th, 2013
My Son Stepped On My Ace627 Computer Works But The Screen Cracked Can It Be Fixe
The person who posted this question about this eMachines product did not include a detailed explanation. Please use the "Request More Information" button to the right if more details would help you to answer this question.
Current Answers
Related eMachines E627 Manual Pages
eMachines E627 Quick Guide - English - Page 3
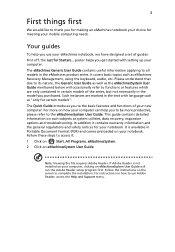
...recovery, expansion options and troubleshooting.
It is not installed on your computer. Follow these steps to access it contains warranty information and the general regulations and safety notices for your...eMachines notebook, we have designed a set of your notebook. For instructions on the screen to complete the installation. It covers basic topics such as the eMachinesSystem User Guide...
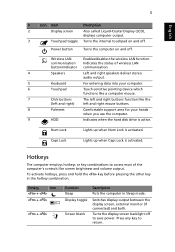
eMachines E627 Quick Guide - English - Page 5
... and off.
Wireless LAN communication button/indicator
Enables/disables the wireless LAN function.
Hotkey
Icon
+
+
+
Function Sleep Display toggle
Screen blank
Description
Puts the computer in the hotkey combination.
Turns the display screen backlight off . To activate hotkeys, press and hold the key before pressing the other key in Sleep mode. Press...
eMachines E627 Quick Guide - English - Page 6
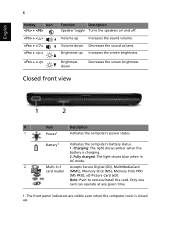
...Brightness down Decreases the sound volume.
English
6
Hotkey
Icon
+
+ < >
+ < >
+ < >
+ < >
Function
Description
Speaker toggle Turns the speakers on and off. Volume up Increases the screen brightness. Battery1
Indicates the computer's battery status. 1. Fully charged: The light shows blue when in AC mode.
2
Multi-in-1 Accepts Secure Digital (SD), MultiMediaCard
card...
Service Guide - Page 4

... you to the current topic.
Alerts you to do specific actions relevant to the accomplishment of additional information related to any damage that appear on screen.
NOTE WARNING CAUTION IMPORTANT
Gives bits and pieces of procedures.
Conventions
The following conventions are used in this manual...
Service Guide - Page 15
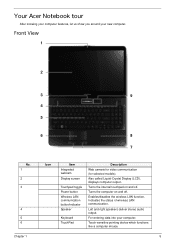
...LCD), displays computer output. Touch-sensitive pointing device which functions like a computer mouse.
5 Front View
1
2
3
9
4
5
6
8
7
No. 1 2 3
4 5 6
Chapter 1
Icon
Item Integrated webcam Display screen
Touchpad toggle Power button Wireless LAN communication button/indicator Speaker
Keyboard TouchPad
Description
Web camera for video communication (for selected models). Indicates the...
Service Guide - Page 22

...Type numbers in uppercase. The keys function as a calculator (complete with some applications. Scroll Lock does not work with the arithmetic operators +, -, *, and /). The embedded numeric keypad functions like a desktop numeric keypad.... keys
Num Lock on , all alphabetic characters typed are not printed on , the screen moves one line up or down when you press the up or down arrow keys ...
Service Guide - Page 24
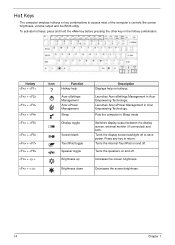
... TouchPad toggle Speaker toggle Brightness up Brightness down
Description Displays help on and off. Switches display output between the display screen, external monitor (if connected) and both. Turns the speakers on and off to save power.
To activate hot keys, press and hold the key before ...
Service Guide - Page 26

... (dual-display compatible)
NOTE: This feature is only available on the same screen. Select the secondary monitor (2) icon in the display box and then click ...allowing two displays to the manufacturer's recommended value.
16
Chapter 1 Run Acer GridVista and select your preferred screen configuration for each window into the appropriate grid. 3. Drag and drop each display from the task bar. ...
Service Guide - Page 28
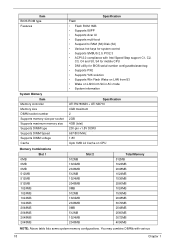
You may combine DIMMs with Intel Speed Step support C1, C2,
C3, C4 and S3, S4 for mobile CPU • DMI utility for BIOS serial number configurable/asset tag • Supports PXE • ...
Service Guide - Page 32
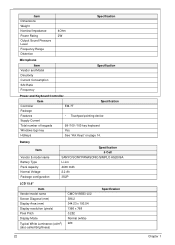
... Pack capacity Normal Voltage Package configuration
Specification 6 Cell
SANYO/SONY/PANASONIC/SIMPLO AS2009A Li-ion 4400 mAh 2.2 Ah 3S2P
LCD 15.6"
Item Vendor/model name Screen Diagonal (mm) Display Area (mm) Display resolution (pixels) Pixel Pitch Display Mode Typical White Luminance (cd/m2) (also called Brightness)
CMO N156B3-L02 396.2 344...
Service Guide - Page 39

... 1. Type the current password in the "Confirm New Password" field. Setting a Password
Follow these steps: 1. Use the ↑ and ↓ keys to highlight the Set Supervisor Password parameter and...boot parameter. 5. Press Enter.
Removing a Password
Follow these steps as you are done, press F10 to enable the Password on the screen. 3. Press Enter twice without typing anything in the "...
Service Guide - Page 47

... clnpwd.exe
2.
Press 1 or 2 to short the J1 jumper. Cleaning BIOS Passwords To clean the User or Supervisor passwords using software utilites, perform the following steps: 1.
Chapter 2
37 Removing BIOS Passwords:
To clear the User or Supervisor passwords through hardware, open the WLAN door and use a metal instrument to clean the...
Service Guide - Page 48

... function is successful or not. Using Boot Sequence Selector
The Boot Sequence Selector allows the boot order to display the usage screen.
3. To use Boot Sequence Selector, perform the following steps: 1. Execute BS.exe to be changed without accessing the BIOS. For example, enter BS2 to change the boot sequence to HDD...
Service Guide - Page 49

... restart the system to the operating system (Windows, etc.). Chapter 2
39 The following messages report to screen to confirm completion:
• dmitools /r ==> Read dmi string from Memory Input:
dmitools /r Output:
...:
dmitools /wp Acer
Write Serial Number to eeprom (max. 32 characters) The following steps: 1. When the BIOS displays Verifying DMI pool data it is checking that the table ...
Service Guide - Page 74

Remove the nine screws on the top panel. Step Upper Cover
Size M2.5*8
Quantity 9
Screw Type
10. 9. Starting at the rear left side of the Lower Cover.
64
Chapter 3 Work along the back edge of the casing to the right as shown, then lift the Upper Cover clear of the cover, pry apart the Upper and Lower Covers as shown.
Service Guide - Page 90

.... Starting from the bottom edge of the bezel, prying the covers apart. NOTE: If necessary, use a pry to remove the bezel.
Step LCD Bezel
Size M2.5*6
Quantity 4
Screw Type
3. Work along the top edge and down the left side to lift up the outside edges of the bezel.
80
Chapter 3 Continue along...
Service Guide - Page 137
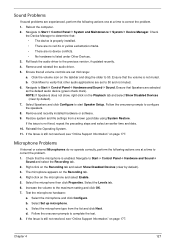
... Panel´ System and Maintenance´ System´ Device Manager. Click the volume icon on page 177. b. Ensure that the microphone is not fixed, repeat the preceding steps and select an earlier time and date. 10. Restore system and file settings from the list and click Next. If the Issue is still...
Service Guide - Page 138

... information see Windows Help and Support. 9. If the issue is not fixed, repeat the preceding steps and select an earlier time and date. 11. Replace the HDD. ... Vista Operating System DVD in the ODD and restart the computer. e. The System Recovery Options screen displays. Startup Repair attempts to enter the BIOS Utility. d. Select the appropriate operating system, ...
Service Guide - Page 143
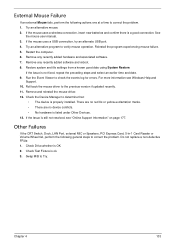
...a good connection. External Mouse Failure
If an external Mouse fails, perform the following general steps to correct the problem. If the mouse uses a wireless connection, insert new batteries and ... Check Drive whether is listed under Other Devices. 13. If the Issue is not fixed, repeat the preceding steps and select an earlier time and date. 9. If the issue is still not resolved...
Service Guide - Page 153
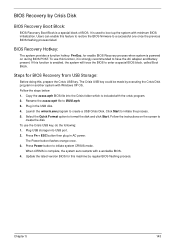
... is used to have the AC adapter and Battery present. It is complete, the system auto restarts with a workable BIOS. 4. Steps for this machine by regular BIOS flashing process. Follow the instructions on during BIOS POST. Plug USB storage into the Crisis folder which... BIOS for BIOS Recovery from USB Storage:
Before doing this function, it is powered on the screen to BIOS.wph. 3.
Similar Questions

Stereo Mix Will Not Work On My Emachine Laptop Why?
I have tried every tutorial out there on how to fix this problem all they say to do is go and downlo...
I have tried every tutorial out there on how to fix this problem all they say to do is go and downlo...
(Posted by teamino2 10 years ago)

How To Fix My Broken Usb Ports On My Laptop Emachines E627
(Posted by blnnar 10 years ago)

How To Fix Keyboard That Will Not Work On Emachine E528 Laptop
(Posted by timb2000j 10 years ago)

My Emachines Wirless Switch Dosent Work How Can I Fix It?
(Posted by pejman212 12 years ago)

My Emachine Laptop Both Usb Ports Not Working
my emachine laptop both usb ports not working 1 is broken the other says its working but isnt
my emachine laptop both usb ports not working 1 is broken the other says its working but isnt
(Posted by Anonymous-36232 12 years ago)