eMachines E528 Support Question
eMachines E528 Support Question
Find answers below for this question about eMachines E528.Need a eMachines E528 manual? We have 1 online manual for this item!
Question posted by daddfrank on October 21st, 2013
Emachine Laptop E528 Lcd Will Not Come On
The person who posted this question about this eMachines product did not include a detailed explanation. Please use the "Request More Information" button to the right if more details would help you to answer this question.
Current Answers
Related eMachines E528 Manual Pages
User Guide - Page 2

eMachines Series Notebook PC Model number Serial number Date of purchase Place of purchase Copyright © 2009. Acer Incorporated. All Rights Reserved.
User Guide - Page 4
... exceed the extension cord ampere rating. Contact your electrician for ventilation to ensure reliable
operation of internal components and to prevent battery leakage,
do not come in contact with your dealer or local power company.
• Do not allow anything to protect it from overheating. If the product
falls, it could...
User Guide - Page 6
... 40°C (104°F).
Do not disassemble or dispose of batteries in summer or winter. A device with the approved chargers designated for example, when you come into contact with the leaked fluids, rinse thoroughly with water and seek medical attention immediately. Do not dispose of them away from the battery, which...
User Guide - Page 7
... are not limited to the network. Operating environment
Warning! For safety reasons, turn off your nearest AUTHORIZED service station.
Parts of electric shock from your laptop under the following conditions. This device meets RF exposure guidelines when used normally, and it may be erased. Metallic materials may cause interference or danger...
User Guide - Page 9
... (WEEE) regulations, visit http://www.acer-group.com/public/Sustainability/ sustainability01.htm
Mercury advisory
For bulb-inside projectors or electronic products containing an nonLED-backlit-LCD/CRT monito or display: Lamp(s) inside this product contain mercury and must be advised to local, state or federal laws. To make emergency calls through...
User Guide - Page 13
... an eMachines notebook your choice for using the keyboard, audio, etc.
This guide contains detailed information on such subjects as eMachines Recovery ...language such as the User Guide mentioned below the LCD screen beside the easy-launch buttons. Your guides
To... are marked in Portable Document Format (PDF) and comes preloaded on the computer, simply press and release the...
User Guide - Page 18
...
BIOS utility
20
Boot sequence
20
Enable disk-to RF fields (RSS-102)
36
LCD panel ergonomic specifications
36 Low-power license-exempt radio
communication devices (RSS-210)
36
Exposure... recovery
20
Password
20
Using software
21
Playing DVD movies
21
Power management
22
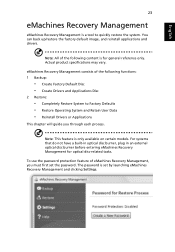
eMachines Recovery Management
23
Burn backup discs
24
Restore
25
Restore Windows from backup discs
26...
User Guide - Page 24
... Recovery setting in Main is a mechanical eject hole on the optical drive. Before performing a restore operation, please check the BIOS settings. 1 Check to see if eMachines Disk-to its original settings without turning on the power.
Follow the steps below to back up all data files before using this option. The...
User Guide - Page 25

Important! English
7
To start the recovery process: 1 Restart the system. 2 While the eMachines logo is showing, press + at the same time
to enter the recovery process. 3 Refer to the onscreen instructions to perform system recovery. This feature occupies 15 GB in a hidden partition on your hard disk.
User Guide - Page 26
... the computer on. 2 Connect the AC adapter and fully charge the battery. 3 Disconnect the AC adapter. 4 Turn on ordering a spare battery pack.
The battery will come in handy when you are advised to adhere to the recommendations set out below. Maximizing the battery's life
Like all other batteries, your dealer for...
User Guide - Page 32
... locally.
If you are moving within a larger distance, for 30 minutes in the computer is greater than 10 °C (18 °F), allow the computer to come to and from your computer at home.
User Guide - Page 34
... investment that you need to protect and take care of. Important! Learn how to take care of your computer. Using a computer security lock
The notebook comes with password checkpoints on boot-up and resume from Hibernation for maximum security.
• Password on boot-up and resume from Hibernation for your Supervisor...
User Guide - Page 37
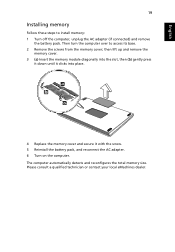
... it with the screw. 5 Reinstall the battery pack, and reconnect the AC adapter. 6 Turn on the computer. Please consult a qualified technician or contact your local eMachines dealer.
User Guide - Page 41
...: 1 Backup:
• Create Factory Default Disc • Create Drivers and Applications Disc
2 Restore:
• Completely Restore System to quickly restore the system.
Note: All of eMachines Recovery Management, you through each process.
You can back up/restore the factory default image, and reinstall applications and drivers. Note: This feature is only...
User Guide - Page 42

... Management, you can burn the factory default image or back up drivers and applications. 1 Click on Start > All Programs > eMachines > eMachines Recovery
Management. 2 eMachines Recovery Management opens to the Backup page.
3 Select the type of backup (factory default or drivers and applications) you would like to burn to disc.
4 ...
User Guide - Page 43
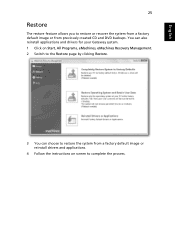
You can also reinstall applications and drivers for your Gateway system. 1 Click on Start, All Programs, eMachines, eMachines Recovery Management. 2 Switch to the Restore page by clicking Restore.
3 You can choose to complete the process. English
25
Restore
The restore feature allows you ...
User Guide - Page 44
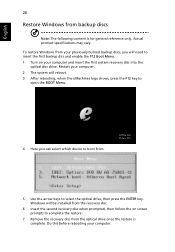
... be installed from the optical drive once the restore is for general reference only. Restart your computer. 2 The system will reboot. 3 After rebooting, when the eMachines logo shows, press the F12 key to complete the restore.
7 Remove the recovery disc from the recovery disc.
6 Insert the second recovery disc when prompted...
User Guide - Page 45
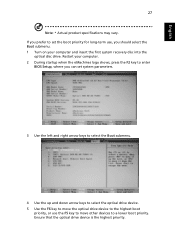
Restart your computer. 2 During startup when the eMachines logo shows, press the F2 key to a lower boot priority. Ensure that the optical drive device is the highest priority. If you prefer to set ...
User Guide - Page 52

... give rise to the same line as black or red dots. Radio device regulatory notice
Note: Below regulatory information is DTMF tone dialing.
LCD pixel statement
The LCD unit is produced with pulse dialing while the Telecom standard is for products with the radio frequency and safety standards of any country or...
User Guide - Page 54

... obtainable from Health Canada's website at www.hc-sc.gc.ca/rpb. LCD panel ergonomic specifications
Design viewing distance Design inclination angle Design azimuth angle Viewing direction... (250cosα)] lx where α = 85°
• Color: Source D65 • Ordinary LCD: Class I • Protective LCD: Class III Both • Yn • u'n • v'n
Class II Also any tampering of the...
Similar Questions


