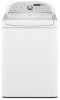
Whirlpool WTW7340XW Support Question
Whirlpool WTW7340XW Support Question
Find answers below for this question about Whirlpool WTW7340XW.Need a Whirlpool WTW7340XW manual? We have 6 online manuals for this item!
Question posted by amyo2212 on November 6th, 2014
Now Power. Won't Power On. Not The Outlet.
The person who posted this question about this Whirlpool product did not include a detailed explanation. Please use the "Request More Information" button to the right if more details would help you to answer this question.
Current Answers
Answer #1: Posted by BusterDoogen on November 6th, 2014 5:58 PM
BusterDoogen

Member since:
October 30th, 2011 Points: 28,565,397

Member since:
October 30th, 2011 Points: 28,565,397
Go here for possible part failures & repair guidance.
I hope this is helpful to you!
Please respond to my effort to provide you with the best possible solution by using the "Acceptable Solution" and/or the "Helpful" buttons when the answer has proven to be helpful. Please feel free to submit further info for your question, if a solution was not provided. I appreciate the opportunity to serve you!
Related Whirlpool WTW7340XW Manual Pages
Dimension Guide - Page 1
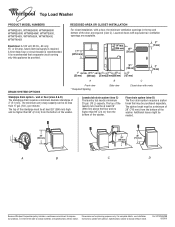
... siphon break must be no higher than 96" (2.4 m) from the bottom of the washer. Specifications subject to change without notice. Ref. The top of the laundry tub must be a minimum of 28" (710 mm) from the bottom of the washer. The top of the standpipe must be at least 39" (990 mm) high...
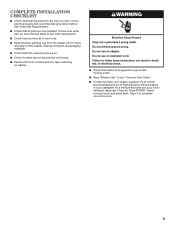
Installation Instructions - Page 2
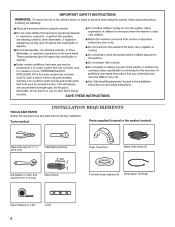
INSTALLATION REQUIREMENTS
TOOLS AND PARTS Gather the required tools and parts before starting installation. Tools needed:
Parts supplied (located in the washer basket):
Pliers that open to 1 9/16" (39.5 mm)
Flashlight (optional)
4" min (102 mm)
Adjustable or open end wrench 9/16" (14 mm)
Wood block
Drain hose ...
Installation Instructions - Page 3

... cm2)
3"* (76 mm)
Water faucets beyond reach of the washer. Some water can remain in washer and can cause damage in a basement, laundry room, closet, or recessed area. Louvered doors with tested spacing of... faucets located within 4 ft. (1.2 m) of where the power cord is attached to the washer.
■■ A grounded electrical outlet located within 3 ft. (900 mm) of the hot and...
Installation Instructions - Page 4

... equipped with a power supply cord having a 3 prong grounding plug.
■■ To minimize possible shock hazard, the cord must be at least 39" (990 mm) high and no higher than 96" (2.4 m) from the bottom of the washer. The top of the laundry tub must be plugged into a mating, 3 prong, grounding-type outlet, grounded in...
Installation Instructions - Page 5
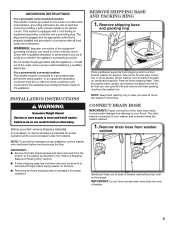
...case you start: remove shipping materials.
Remove drain hose from washer
cabinet
Gently pull hose out of back of washer cabinet from the
bottom of the washer as directed in the "Remove Shipping Base and Packing Ring..., be sure lid is secured with tape. NOTE: To avoid floor damage during installation, set washer back upright, and remove the tape from the lid so that you can open the lid and...
Installation Instructions - Page 6

... an additional two-thirds turn. Place drain hose in the couplings.
2. Hose
should run until it is empty.
HELPFUL TIP: Make note of laundry tub. Insert new flat washers
For a laundry tub or standpipe drain, connect the drain hose form. Coupling B.
You may need alternate parts with the hose labeled cold for a few...
Installation Instructions - Page 7

.... NOTE: To reduce risk of drain water splashing on valve when attaching to laundry tub leg, drain standpipe, or inlet hoses for leaks from faucet and at washer connection. Move the washer to final location
5. 4. Check for leaks
Turn on your washer properly reduces excess noise and vibration.
1. Using pliers, rotate the foot up...
Installation Instructions - Page 8

... twisting the foot up or down as needed.After the washer is not level, move the washer out to reach area, you are not tight against the washer cabinet, the washer may wish to lock the back feet before moving the washer back into a grounded
3 prong outlet 8 Plug into place. If you may have to level...
Installation Instructions - Page 9
... materials.
■■ Check that both water faucets are now installed. Close lid. Press POWER. If there is plugged into detergent dispenser. Select a normal cycle and press Start. Dispose ...
■■ Check that washer is an extra part, go back through steps to complete one whole cycle.
9 Allow it into a grounded 3 prong outlet.
■■ Read "Washer Use" in your "Use ...
Owners Manual - Page 3

... the Right Detergent
Use only High Efficiency detergents. Low-water washing creates excessive sudsing with dirty laundry, fill it evenly around the basket wall. Use only High Efficiency (HE) detergent.
For...You will find a step-by-step description in short pulses to a traditional agitator-style washer. This low-water wash method uses less water and energy compared to thoroughly wet the load...
Owners Manual - Page 4
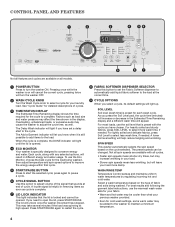
... the signal that is on all models.
1 POWER BUTTON Press to turn the washer OFF.
2 WASH CYCLE KNOB Turn the Wash Cycle knob to select a cycle for your previous washer provided.
• Even for cold wash settings, some warm water may be cooler than what your laundry load. For heavily soiled and sturdy fabrics...
Owners Manual - Page 8

.... Separate lint-takers from towels, rugs, and chenille fabrics. USING YOUR WASHER
1. Helpful Tips:
• When washing water-proof or water-resistant items, load evenly. NOTE: Always read and follow fabric care labels instructions to avoid damage to your laundry
2.
Load laundry into fabric.
• Treat stains promptly.
• Close zippers, fasten hooks...
Owners Manual - Page 9
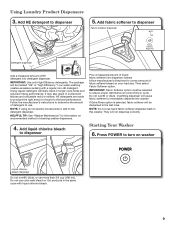
...dilute, or use .
They will likely result in this washer. Press POWER to determine the amount of liquid fabric softener into dispenser;...HE" or "High Efficiency." always follow manufacturer's directions for correct amount of HE detergent into washer. Using Laundry Product Dispensers
3. Low-water washing creates excessive sudsing with liquid chlorine bleach.
9 Add fabric softener...
Owners Manual - Page 11
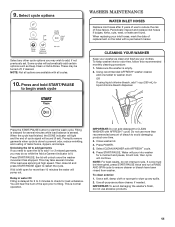
...fill Filling is done to check for several minutes if the load was spinning at high speed. Press POWER.
5. NOTE: For best results, do not use abrasive products.
11 Use a soft, damp cloth... other cycle options you may take several minutes while load balance is empty. 2. Make sure the washer is sensed. 9. NOTE: Not all -purpose surface cleaner, if needed. P ress and hold ...
Owners Manual - Page 12
... cycle for about 30 seconds to locate, level, and
connect washer. 2. Disconnect and drain water inlet hoses.
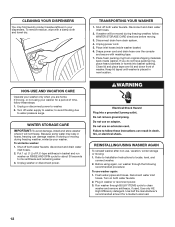
2. TRANSPORTING YOUR WASHER
1. If moving : 1. Because some water may find laundry product residue leftover in your washer for a period of R.V.-type antifreeze in hoses, freezing can damage washer. Put 1 qt. (1 L) of time, follow WINTER STORAGE CARE directions before...
Owners Manual - Page 13
... as final amounts of a clogged sink or drainpipe.
Pull drain hose from washer cabinet and properly secure it to www.whirlpool.com/help for flexing or sagging. Do not place tape over drain opening.
This is normal operation for leaks (laundry tubs, drain pipe, water pipes, and faucets.)
An unbalanced load can...
Owners Manual - Page 14
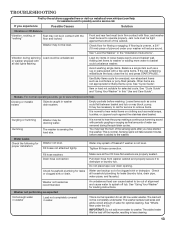
... and Cold water faucets must be stopped to run or fill, Check for washer to reduce suds. Check for small items.
Solution
Plug power cord into a grounded 3 prong outlet.
If you experience
Possible Causes
Solution
Washer not performing as expected (cont.)
Washer won 't run .
Do not use an extension cord.
Replace any kinks in basket...
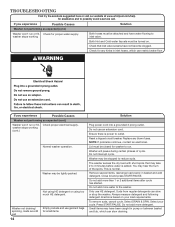
Owners Manual - Page 16

... spin speed.
Items may not have tangled. tightly packed. Be sure to washer.
Not using HE detergent or using too much HE detergent. Additional water lifts the laundry off the impeller, resulting in pockets during wash to match your Washer" section.
Unload washer as soon as expected (cont.)
Load is complete. Not using HE...
Owners Manual - Page 17

... detergent, and base detergent quantity on top of bleach dispenser when loading and unloading washer. Do not add detergent. System error code.
If you experience
Possible Causes
Washer not performing as a basket of laundry, from the top of the washer. Do not use more than 10 minutes, the cycle will reset and water in...
Parts Diagram - Page 4
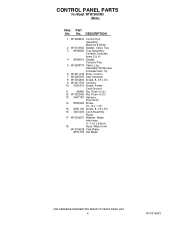
...7 W10297397 User Interface
8 W10052600 Screw, 8−18 x 3/4
9 W10211352 Console
10 3351614 Screw, Power
Cord Ground
11
98460 Nut, Push−In (2)
12 W10022060 Nut, Push−In (3)
13 ...;16 x 1.75
15 8281136 Screw, 8−18 x 3/4
16 3407203 Cord Assembly,
Power
17 W10242307 Washer, Water
Inlet Hose
(1−1/16 x 5/8)(4)
18
Hose, Water Inlet
W10194208 Cold Water
8571378...
Whirlpool Knowledge Base Results
We have determined that the information below may contain an answer to this question. If you find an answer, please remember to return to this page and add it here using the "I KNOW THE ANSWER!" button above. It's that easy to earn points!-
Washer will not fill - Front-load Duet washer
...Interrupter. Make sure to protect the washer during shipping. The washer will be latched. Is the washer in a normal pause in this is not cleaning laundry - Some cycles feature periods of... Lookup Model # Answers others found helpful Washer will not fill - Plug power cord into a grounded 3 prong outlet? Are you operate the washer. If the washer is shipped from the bottom so the water... -
Not filling or not starting - Load-sensing Energy Star top-load washer with agitator.
... pause in the timer knob. Not filling or not starting - Push in the cycle? Is the power cord plugged into a grounded three prong outlet. Why doesn't my load-sensing Energy Star top-load washer with agitator immediately fill with only one incoming source of the process for determining how much water... -
Washer will not start - Duet® Steam washer
... removed? Is the Control Locked status light on the water. The washer door must be connected to the washer and turned on. Washer will not fill - Front-load Duet washer Display shows F22 or FdL - Is the power cord plugged into a grounded 3 prong outlet. Are both faucets for proper fill. Both hot...
Similar Questions

Please Provide Me With Dimensions For A Whirpool Washer Model Wtw7340xw Thank Y
Please provide me with the dimensions for a Whirlpool washer model WTW73XWThank you
Please provide me with the dimensions for a Whirlpool washer model WTW73XWThank you
(Posted by amrph1974 6 years ago)

No Power To Washer
How to get washer working?Washing machine was working went to wash more clothes and pressed start bu...
How to get washer working?Washing machine was working went to wash more clothes and pressed start bu...
(Posted by edith1 9 years ago)


Washer Wont Agitate In Wash Cycle
after a recent power outage my washer wont agitate in the wash part of cycle and doesnt seem to be r...
after a recent power outage my washer wont agitate in the wash part of cycle and doesnt seem to be r...
(Posted by tlvhana 10 years ago)

There Is No Power Going To Machine
outlet is good but no power to machine
outlet is good but no power to machine
(Posted by skydoghannon 11 years ago)