
Whirlpool WTW57ESVW Support Question
Whirlpool WTW57ESVW Support Question
Find answers below for this question about Whirlpool WTW57ESVW - Plus Ing Washer.Need a Whirlpool WTW57ESVW manual? We have 5 online manuals for this item!
Question posted by taiklUNGIL on May 22nd, 2014
Wtw57esvw1 Won't Drain
The person who posted this question about this Whirlpool product did not include a detailed explanation. Please use the "Request More Information" button to the right if more details would help you to answer this question.
Current Answers
Related Whirlpool WTW57ESVW Manual Pages
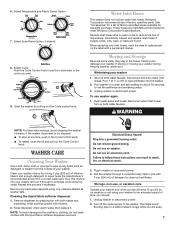
Owners Manual - Page 3
...your garments and laundry products to the
washer and washer dispensers.
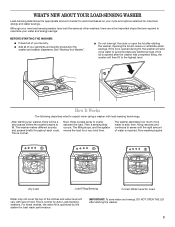
IMPORTANT: To save water and energy, DO NOT OPEN THE LID after starting the washer. Although your new load-sensing washer may not ... water to maximize your water and energy savings:
BEFORE STARTING THE WASHER:
■■ Presort all of your laundry. ■■ Add all of your cycle and options selected...
Owners Manual - Page 4
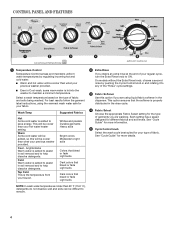
... and cold water.
■■ Warm and hot water will be cooler than what your previous washer provided. This option ensures that bleed or fade Light soils
NOTE: In wash water temperatures colder than... "Rinse" cycle settings.
3 Fabric Softener Use this will be cooler than what your previous washer provided.
■■ Even in Cool wash, some warm water is properly distributed in the...
Owners Manual - Page 5
... as normal. Drain existing water: advance Cycle Select knob to select a second rinse. Light
6 Use for special care items. Brief lowspeed agitations and short soaks provide the gentlest cleaning. Select prior to starting washer to automatically add to wash cycle, eliminating need to return later to a spin setting. Option 2 - Add laundry products and...
Owners Manual - Page 6
... bags for best cleaning and to the dispenser.
Bleach is immediately added into the washer and is added automatically during the wash cycle.
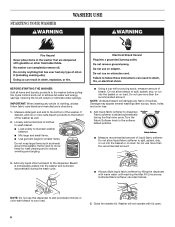
■■ Always dilute liquid ...not allow bleach to the bottom of the washer. STARTING YOUR WASHER
WASHER USE
BEFORE STARTING THE WASHER: Add all items and laundry products to the washer before pulling the Cycle Control knob out to...
Owners Manual - Page 7
... Push the Cycle Control knob in and turn clockwise to the cycle you are away.
7
Winterizing your inlet hoses, mark the date of use washer again
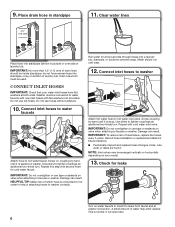
1. Flush water pipes and hoses.
Disconnect and drain water inlet hoses. To use to equal twice the manufacturer's recommended amount for an extended period of your...
Owners Manual - Page 8
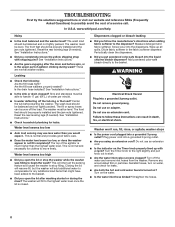
... that might have been added to the basket.
■■ Did you open the lid after the drain and before starting the washer. www.whirlpool.com/help
Noisy
■■ Is the load balanced and the washer level? Reset the rear leveling legs (if needed ). See "Installation Instructions."
■■ Are the gears...
Owners Manual - Page 9
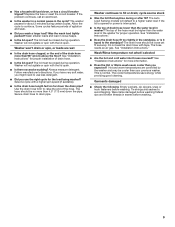
... need to avoid tangling.
Wash/Rinse temperature not what I selected
■■ Are the hot and cold water inlet hoses reversed? The washer pauses for proper installation of the drain hose more than 96" (2.4 m) above the floor? The lid must be loose yet fit securely. Follow manufacturer's directions. cycle seems stuck
■...
Owners Manual - Page 10
... such damage results from defects in the United States or Canada and applies only when the major appliance is used for future reference. WHIRLPOOL CORPORATION LAUNDRY WARRANTY
LIMITED WARRANTY
For one year from the date of purchase, when this major appliance is operated and maintained according to instructions attached to or...
Dimension Guide - Page 1
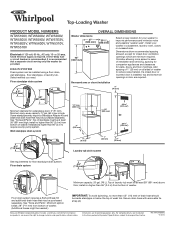
...
27" (686 mm)
251/2" (648 mm)
42" (1067 mm)
Select proper location for your washer in .2 (155 cm2)
0" (0 mm)
1" (25 mm)
3" (76 mm)
4.5" (113 mm)
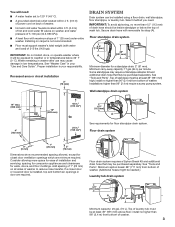
Laundry tub drain system
See requirements for a standpipe drain: 2" (51 mm). Install your washer to reduce noise transfer.
If a closet door or louvered door is recommended that may be inside...
Installation Instructions - Page 2

... Gather required tools and parts before starting installation. Tools needed:
Parts needed: (Not supplied with washer)
Your installation may require additional parts.
If you have:
You will need:
Overhead sewer
Standard 20 gal. (76 L) 39" (991 mm) tall drain tub or utility sink, sump pump, and connectors (available from local suppliers)
Short...
Installation Instructions - Page 3
... installation is not recommended.
■■ Floor must be needed.)
Laundry tub drain system
4.5" (113 mm)
A
39" (991 mm)
Minimum capacity: 20 gal. (76 L). Installations higher than 96" (2.4 m) from bottom of washer. See "Tools and Parts". Installing on all sides of laundry tub must support washer's total weight (with removable tie strap (A).
IMPORTANT: To avoid...
Installation Instructions - Page 4
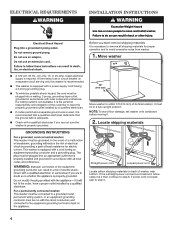
...on back of its final location; ELECTRICAL REQUIREMENTS
INSTALLATION INSTRUCTIONS
Before you are not sure the washer is required. If it is looped, skip to step 6; if power cord is a ... obligation of the customer to within 3 ft (914 mm) of washer, near bottom. NOTE: To avoid floor damage, set washer onto cardboard before moving it is recommended that a qualified electrician determine ...
Installation Instructions - Page 5
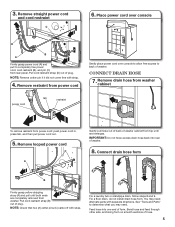
...sections of plug. Remove drain hose from washer
cabinet
power cord
tab
...restraint
To remove restraint from top until both ends are completely removed from power cord
Gently place power cord over console
D
B A
Firmly grasp power cord (A) and pull to determine what you may need . Feed hose into rear of form. For a laundry tub or standpipe drain...
Installation Instructions - Page 6
... hoses every 5 years. IMPORTANT: No more than 4.5" (113 mm) of which hose is seated on washer.
Washer must be arranged vertically or horizontally depending on bottom of laundry tub. Damage can result. HELPFUL TIP: Make note of drain hose should run until it is connected to hot water to help in attaching hoses to...
Installation Instructions - Page 7
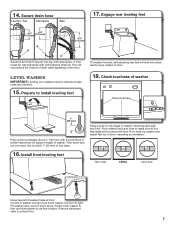
... laundry tub leg, drain standpipe, or inlet hoses for wall standpipe with removable tie strap (A).
Place a level on the floor. Install front leveling feet
Not Level
LEVEL
Not Level
Screw feet into place. Engage rear leveling feet
4.5" (113 mm)
4.5" (113 mm)
4.5" (113 mm)
A A
A
Secure drain hose to install leveling feet
18. Gently lower washer...
Installation Instructions - Page 8
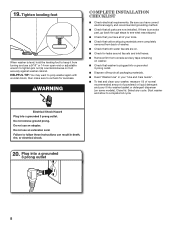
... steps to tighten jam nut (A) counterclockwise on .
■■ Check for levelness. Start washer and allow to recheck for leaks around faucets and inlet hoses.
■■ Remove film from...from back of powdered or liquid detergent and pour it into washer basket or detergent dispenser (on washer.
■■ Check that washer is level, hold the leveling foot to keep it from console...
Warranty - Page 1

... determined.
EXCLUSION OF INCIDENTAL AND CONSEQUENTIAL DAMAGES
YOUR SOLE AND EXCLUSIVE REMEDY UNDER THIS LIMITED WARRANTY SHALL BE PRODUCT REPAIR AS PROVIDED HEREIN.
WHIRLPOOL CORPORATION LAUNDRY WARRANTY
LIMITED WARRANTY
For one year from the date of purchase, when this major appliance is operated and maintained according to instructions attached to or...
Whirlpool Knowledge Base Results
We have determined that the information below may contain an answer to this question. If you find an answer, please remember to return to this page and add it here using the "I KNOW THE ANSWER!" button above. It's that easy to earn points!-
Vibration - Front-load washer
... removed from the factory with four bolts, which are with your hands; These high-spin speed washers require sturdy floors. The final spin lasts about 2 to 3 minutes. During the ... floor from being damaged during drain - Do you operate the washer. Each unit is flexing. Flooring that you do not have your hands; The washer spin speeds range from 900 to ... -
Washer continues to fill - Front-load washer
...;out of the drainpipe covered in the drainpipe or laundry tub. Do not seal the drain hose into the drainpipe or laundry tub. Top-load washer Washer not draining, not spinning out water; Front-load washer Anti-flood hoses and controls Washer continues to flow through. Check that the drain hose does not extend more than the minimum height... -
Washer continues to fill - Front-load washer
...,480);return false;" href="#"> Lookup Model # Answers others found helpful Washer continues to drain - wet loads - Do not seal the drain hose into the drainpipe or laundry tub. Front-load washer Washer continues to fill or continues to drain - The drain hose may be a gap between the drain hose and the drainpipe to allow air to gravity. The...
Similar Questions

Whirlpool Washer Wtw57esvw Won't Drain Or Spin
(Posted by cempoli 9 years ago)


Whirlpool Washer Wtw57esvw1 Won't Drain
(Posted by ChJLope 9 years ago)

Whirlpool Top Load Washer Wtw57esvw Will Not Run Any Cycle Or Run Water
(Posted by tstatfra 10 years ago)

Washer Wtw57esvw Is One Month Old And Agitator Begins Before Tub Even Fills . Ih
Just got the machine-it worked perfectly. Now the agitator begins before tub fills-cycles as normal ...
Just got the machine-it worked perfectly. Now the agitator begins before tub fills-cycles as normal ...
(Posted by islandlucaya 14 years ago)