Whirlpool WML55011HS Support Question
Whirlpool WML55011HS Support Question
Find answers below for this question about Whirlpool WML55011HS.Need a Whirlpool WML55011HS manual? We have 3 online manuals for this item!
Question posted by Lbrumley on October 15th, 2023
Light.
where can I purchase a replacement light for under the microwave? Not the inside one
Current Answers
Answer #1: Posted by Technicalproblemsolver on October 17th, 2023 2:03 PM
Technicalproblemsolver

Member since:
September 25th, 2023 Points: 190,500

Member since:
September 25th, 2023 Points: 190,500
Visit www.whirlpoolparts.com
"Hi there,
I hope my response was helpful in addressing your question or concern. If you found it valuable, I kindly ask you to consider accepting my answer by clicking the designated button. Your support will not only acknowledge my efforts but also guide others in finding useful solutions. Thank you for your trust and I'm ready to assist you further if needed.
Best regards,
Technicalproblemsolver"
Related Whirlpool WML55011HS Manual Pages
Owners Manual - Page 1
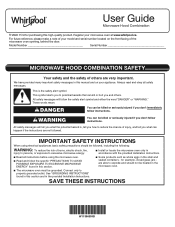
... please make a note of your microwave oven at www.whirlpool.ca.
These words...purchasing this manual and on the front facing of others . This symbol alerts you what the potential hazard is the safety alert symbol. All safety messages will tell you to potential hazards that can happen if the instructions are able to properly grounded outlet.
I Install or locate the microwave oven...
Owners Manual - Page 2

... with any openings on hood or filter. I Use care when cleaning the vent-hood filter. If materials inside the oven to operate this microwave oven outdoors. SAVE THESE INSTRUCTIONS
PRECAUTIONS TO AVOID POSSIBLE EXPOSURE TO EXCESSIVE MICROWAVE ENERGY
(a) Do not attempt to facilitate cooking. Visible bubbling or boiling when the container is removed from the...
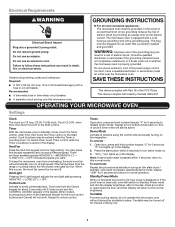
Owners Manual - Page 3
...) clock.
Vent Fan
Press the Vent Fan keypad once for the electric current.
Vent Light
Pressing Vent Light keypad adjusts the vent light setting among HIGH("HI") -> LOW("LO") -> OFF.
Turntable
For best cooking results, do not operate the microwave oven without actually turning on .
3. Failure to disable button tones. Required: ■■ A 120 V, 60...
Owners Manual - Page 4
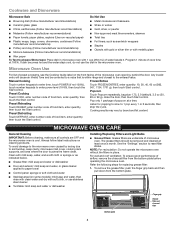
... stays cool, do not use stainless steel cleaner
■■ Turntable: mild soap and water or dishwasher
Installing/Replacing Filters and Light Bulbs
■■ Grease filters: Grease filters are OFF and the microwave oven is within range and closest to paper towel
■■ Control panel: sponge or soft cloth and water
■...
Owners Manual - Page 5
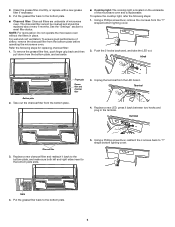
... 4 screws from the bottom plate.
3. Take out the charcoal filter from the "T"
shaped bottom lighting cover.
2. Unplug the terminal from the bottom plate before operating the microwave oven. Slots 4. Put the grease filter back to reset filter status. Replace a new LED, press it back to the bottom plate, and make sure both left and...
Owners Manual - Page 6
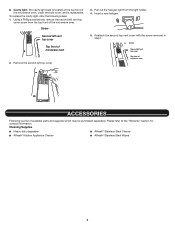
... of available parts and supplies which may be purchased separately. ■■ Cavity light: The cavity light bulb is located at the top front of micowave oven
2. Using a Phillips screwdriver, remove the second left vent top cover
Top front of the microwave oven, under the bulb cover, and is replaceable. Screw
Second left vent top
cover screw...
Owners Manual - Page 7
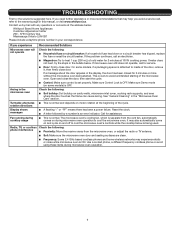
...or a circuit breaker has tripped, replace the fuse or reset the circuit breaker. If you avoid a service call, refer to cool the microwave oven. See "General Cleaning" in your ... fan, automatically comes on and off to inside of the cycle.
Open and close door. Fan running during microwave oven operation.
7 If microwave oven still does not operate, call an electrician....
Owners Manual - Page 8
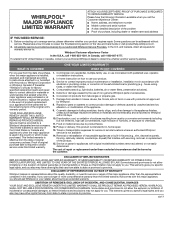
...This limited warranty is used in the country in which it was purchased or, at its sole discretion, replace the product. WHIRLPOOL SHALL NOT BE LIABLE FOR INCIDENTAL OR CONSEQUENTIAL ... THIS LIMITED WARRANTY SHALL BE PRODUCT REPAIR AS PROVIDED HEREIN. In the U.S. Consumable parts (e.g., light bulbs, batteries, air or water filters, preservation solutions). Repairs to parts or systems to :...
Specification Sheet - Page 1
... Low Profile Microwave Hood. **Performance varies based on 24" minimum install for planning purposes only.
Low Profile Microwave Hood Combination
WML55011H
Stainless Steel WML55011HS
Also available...Dishwasher-Safe Turntable Plate
Microwave Presets
Add 30 Seconds Option
Electrical Details
Amps
15
Volts
120
Technical Details
Microwave Type
CFMs Lighting Type Number of smoke...
Installation Instructions - Page 1

... up to Wall 9 Install the Microwave Oven 9 Complete Installation 10 VENTING DESIGN SPECIFICATIONS 11 ASSISTANCE 12 Replacement Parts 12
MICROWAVE HOOD COMBINATION SAFETY
Your safety and ...be killed or seriously injured if you don't follow instructions.
Table of Contents
MICROWAVE HOOD COMBINATION SAFETY 1 INSTALLATION REQUIREMENTS 2
Tools and Parts 2 Location Requirements 2 ...
Installation Instructions - Page 2

...;■ Charcoal filters
NOTE: Depending on reordering, see the "Replacement Parts" section. hole drill bit for wall or roof venting. See "Rectangular to make sure that the materials used will be free of 150 lbs (68 kg) which includes microwave oven and items placed inside the microwave oven and upper cabinet.
■■ Grounded electrical outlet...
Installation Instructions - Page 3

... kit replacing the mounting plate from Whirlpool.
12" DEEPER 14"
14" DEEPER 15"
mounting plate
Bump out mounting bracket
Product Dimensions
*Overall depth of product will vary slightly depending on type of range/cooktop below. Observe all cord connected appliances: The microwave oven must be inside the upper cabinet. The plug must be purchased from...
Installation Instructions - Page 4

... recirculation installations. Check that the damper blade hinge is reinstalled in case the venting method is changed or the microwave oven is at the top, and the damper blade opens away from the microwave oven. A
BC
D
Wall Venting Installation Only
1. Damper vent covers
A.
Sheet metal screw 5/32" x 5/16" (4 mm x 8 mm)
3. Remove screws attaching damper...
Installation Instructions - Page 5

... C. Remove screws attaching B and C cover. A
J
A. Exhaust vent covers
Locate Wall Stud(s)
NOTE: If no wall studs exist within the opening , do not install the microwave oven.
Recirculation lighting cover
NOTE: Keep B for Wall and Roof venting, remove the charcoal filter from packaging upper foam (see item J in "Parts Supplied" section), attach both wall...
Installation Instructions - Page 7

...Centerline
4. A. Disconnect power to the upper cabinet. Metal cabinet B. NOTE: If replacing a range hood that the holes cut the holes of the upper cabinet. Holes...behind the microwave oven (as shown. Drill 3/8" (9.5 mm) holes at End Holes
Figure 4
B
A,D E C
REAR WALL
REAR WALL
A,D C E
F
A. See below install steps:
1. The "Rear wall" arrows must be purchased from Whirlpool...
Installation Instructions - Page 8

... mounting plate must attach to the
centerline of the opening. If installing on a minimum of cabinet D.
D A
C B
4 Corners
REAR WALL
REAR WALL
Mark Rear Wall
The microwave oven must
align with the front edge of "Mark Rear Wall." Note that its top is butted up against the back wall, find and clearly mark...
Installation Instructions - Page 9

...or use the door or door handle while the microwave oven is level. 7.
Drywall
5. Rotate microwave oven up toward upper cabinet. Wall Studs at the...inside upper cabinet near the 3/8" (9.5 mm) holes. 2. Securely tighten the lag screws. Spring toggle nut D. Check alignment of mounting plate, making sure it on the bolt from the back of the mounting plate. NOTE: If microwave oven...
Installation Instructions - Page 10

...:
■■ Check that a household fuse has not blown, or that the power supply cord is no gap between the upper cabinet bottom and the microwave oven.
11. Replace the fuse or reset the circuit breaker. If the problem continues, call an electrician.
■■ Check that a circuit breaker has not tripped. Installation...
Installation Instructions - Page 11
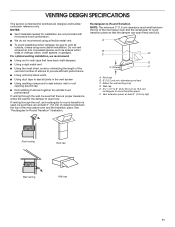
... Transition NOTE: The minimum 3" (7.6 cm) clearance must exist between the top of the microwave oven and the rectangular to round transition piece so that there is proper clearance within walls or...
Vent extension piece, at least 3" (7.6 cm) of clearance between the top of the microwave oven and the transition piece. NOTES:
■■ Vent materials needed for optimal hood performance
...
Installation Instructions - Page 12

... calculate the length of the system you need your authorized dealer or service center. You will need additional assistance, call , you need the microwave oven model number and serial number.
Replacement Parts
If any of the installation hardware needs to round transition piece must not exceed the equivalent of 140 ft (42.7 m) for...
Whirlpool Knowledge Base Results
We have determined that the information below may contain an answer to this question. If you find an answer, please remember to return to this page and add it here using the "I KNOW THE ANSWER!" button above. It's that easy to earn points!-
Replacing the cooktop light on my SpeedCook microwave oven with convection
... mounting screw, and gently open cover. Plug in my microwave oven? FSP replacement parts will need to order replacement parts, we recommend that you use only FSP replacement parts. How do I replace the cooking light in oven or reconnect power. Close bulb cover and replace mounting screw. How do I replace the oven light in your area, call the Whirlpool Customer eXperience Center... -
Reset the water filter indicator - Side by side refrigerator
If the indicator is reset. To purchase replacement water filters and receive a 10% discount on today's order, enter Promo Code F9A75Q4 in some models, will help you this it for 3 seconds. The status light will change from red to green or the status display will change from green to "Good" when the... -
When to change the water filter - Top freezer
When to change is needed. If a filter status light/indicator is not present, the filter should be replaced. If the water flow to the water dispenser or ice maker noticeably decreases before 6 months have passed, you may need to Flush a Refrigerator Water Filter To purchase replacement water filters and receive a 10% discount on...
Similar Questions

How Do I Remove And Replace The Halogen Bulb On The Bottom
(Posted by ruizc021 2 years ago)

Lcd Display For Clock/timer
my 7 mo old WML55011HS is having an issue with the LCD clock and timer display. Erratic and "jumps" ...
my 7 mo old WML55011HS is having an issue with the LCD clock and timer display. Erratic and "jumps" ...
(Posted by hammies95 2 years ago)

How Do I Change Bad Light In Microwave
How do I change the light in this microwave
How do I change the light in this microwave
(Posted by rcfries 2 years ago)

How Do I Replace The Light Bulb
model wmh1164xws-s whirlpool microwave how and with what do I replace the under the microwave light ...
model wmh1164xws-s whirlpool microwave how and with what do I replace the under the microwave light ...
(Posted by lwo 10 years ago)

The Display On My Whirlpool Gh7208xrs Is Blank.the Light Works Inside
(Posted by Anonymous-54967 12 years ago)