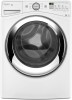
Whirlpool WFW86HEBW Support Question
Whirlpool WFW86HEBW Support Question
Find answers below for this question about Whirlpool WFW86HEBW.Need a Whirlpool WFW86HEBW manual? We have 5 online manuals for this item!
Question posted by elduda1 on August 16th, 2023
How To Replace Drain Pump On Wfw86hebw
Current Answers
Answer #1: Posted by HelpHero on August 16th, 2023 8:49 PM

Member since:
September 3rd, 2022 Points: 523,380

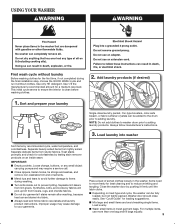
1. Start by unplugging the washing machine from the power source to ensure your safety.
2. Locate the access panel on the bottom front of the washing machine. It is usually secured with screws. Use a screwdriver to remove these screws.
3. Once you have removed the access panel, you will see the drain pump assembly, typically a circular-shaped component. Take note of the position of the pump and any connections before proceeding.
4. Before detaching any wires or hoses, place a towel or small bucket under the pump assembly. This will help catch any water that may spill out during the process.
5. Disconnect the wires connected to the drain pump. Take a picture or make a note of how the wires are connected for easier reassembly.
6. Next, remove the hoses from the drain pump. Loosen any clamps and carefully detach the hoses. Again, it is essential to have the towel or bucket to catch any remaining water.
7. Once the electrical connections and hoses are disconnected, you can now remove the drain pump from the washing machine. This may require you to unscrew any mounting screws or brackets that hold the pump in place. Take your time and be gentle during this step.
8. With the old drain pump removed, you can now install the new one. Align it properly and secure it in place with the mounting screws or brackets.
9. Reattach the hoses, ensuring they are tight and secure. Also, reconnect the wires to the drain pump, matching them to their respective terminals based on the picture or notes you took earlier.
10. After everything is securely attached, double-check that all connections are tight and in their correct positions.
11. Replace the access panel by screwing it back into place.
12. Finally, plug the washing machine back into the power source. Once you've completed these steps, your new drain pump should be successfully installed. It's a good idea to run a quick test cycle to ensure everything is functioning properly.
Please note that while these instructions are generally applicable, it's always wise to consult your Whirlpool Duet model's specific manual for any manufacturer-recommended guidance or precautions.
I hope this is helpful? PLEASE "ACCEPT" and mark it "HELPFUL" to complement my little effort. Hope to bring you more detailed answers.
Helphero
Answer #2: Posted by khanjee on August 16th, 2023 5:18 PM

Member since:
July 23rd, 2016 Points: 205,300
If your Whirlpool Duet Steam Washer's (MFW8740DW1) drain pump has gone out, then follow this easy six-step guide for the replacement procedure. The repair will take about 25-45 minutes to complete.
The drain pump forces water from the bottom of the washing machine to the drain hose. Drain pumps tend to fail over time due to mechanical or electrical failure. If water is getting trapped in the washer tub, then your drain pump needs to be replaced.
Always unplug washing machine before starting any repair.
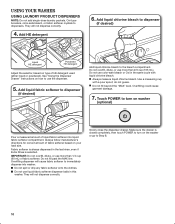
- Step 1 Drain PumpFor your own safety, be sure to unplug the washer before proceeding.
Add a commentAdd a comment - Step 2To ensure that no more water passes through the washer, shut off the water by turning both handles all the way to the left.
Please Accept my answer by providing you with the best possible solution. Would be more glade.
THANK YOU
Related Whirlpool WFW86HEBW Manual Pages


Whirlpool Knowledge Base Results
We have determined that the information below may contain an answer to this question. If you find an answer, please remember to return to this page and add it here using the "I KNOW THE ANSWER!" button above. It's that easy to earn points!-
Not draining, not spinning out water, wet loads - Top-load washer
... water; Straighten the hose for further details. enter your product model number in the search tool below to adequately pump the water out of the cycle. Top-load washer FAQs Knowledgebase search tips Use the U-shaped drain hose form on the drain hose, and secure the drain hose. The drainpipe (standpipe) height requirements are too wet after... -
Washer will not fill or start - Cabrio® washer with agitator
... a fuse has blown and replace it, if necessary. If the problem continues, call an electrician. HCR_005_web_ENV1 Straighten the hoses. The washer will start after the ...load size. Allow the cycle to drain the load. Not draining, not spinning out water, wet loads - Remove any accumulated film or particles from the washer. Is the indicator on the water. The washer... -
Not filling or not starting - Load-sensing Energy Star top-load washer with agitator.
... top-load washer with Dispensers in the knob. Why doesn't my load-sensing Energy Star top-load washer with agitator immediately fill with only one incoming source of the process for leaks. Filling will not properly operate with water when I start 4 to occur, call an electrician. Check to see if a fuse has blown and replace it...
Similar Questions

How to fix it.

whirlpool duet model wfw86he. In the middle of a cycle, it froze and the door lock light is flashing...


How do you take the front panel off to get at the drain pump? Model WFW86HEBW
