Whirlpool WFI910H0AS Support Question
Whirlpool WFI910H0AS Support Question
Find answers below for this question about Whirlpool WFI910H0AS.Need a Whirlpool WFI910H0AS manual? We have 4 online manuals for this item!
Question posted by marvs2 on January 14th, 2013
Power Receptacle For Whi910h0as
The installation manual, page 4, indicates where the power receptacle should be located within the cabinet cutout (8" to 22" from either cabinet, 5-1/2" max from floor), but it does not indicate the allowed projection from the wall into the back of the range for a wall mounted electrical box. What is the usable depth of the recess behind the range, the space into which the cable connector may project from the wall?
Current Answers
Related Whirlpool WFI910H0AS Manual Pages
Dimension Guide - Page 1

... and drawer may be installed next to combustible walls with zero clearance. back of range to the figures in the "Product Dimensions" section of Power Supply Cord Kit and Circuit Protection
Amps
40 or 50** 50
*The NEC calculated load is recommended. q Range must be connected to 22" (55.9 cm) from floor F. If local codes do...
Installation Guide - Page 1

... Moving the Range 15
IMPORTANT:
Save for local electrical inspector's use. Only 5 INSTALLATION INSTRUCTIONS 6 Unpack Range 6 Install Anti-Tip Bracket 6 Electrical Connection - U.S.A.
W10403811B U.S.A. INSTALLATION INSTRUCTIONS 30" (76 CM) FREESTANDING ELECTRIC RANGES
Table of Contents
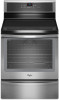
RANGE SAFETY 2 INSTALLATION REQUIREMENTS 3
Tools and Parts 3 Location Requirements 3 Electrical...
Installation Guide - Page 2
... engaged in this manual and on your appliance.
Slide range back so rear range foot is , ...Install anti-tip bracket to floor or wall. • Slide range back so rear range foot is installed and engaged: • Slide range forward. • Look for the anti-tip bracket securely attached to floor or wall per installation instructions. Do not operate range without anti-tip bracket installed...
Installation Guide - Page 3

... a range hood that all governing codes and ordinances.
■ It is required. Location Requirements
IMPORTANT: Observe all electrical connections be reduced by a licensed, qualified electrical installer. Anti-tip bracket
B. #12 x 1⁵⁄₈" screws (2)
■ Anti-tip bracket must conform to floor or wall. See "Electrical Connection - Tools needed If using a power...
Installation Guide - Page 4

... surface. from either cabinet,
5¹⁄₂" (14.0 cm) max. Product Dimensions A
F
B C
Cabinet Dimensions
Cabinet opening width C. A
C
B
D
E
D
A. 27³⁄₄" (70.5 cm) max. Model/serial rating plate (located on styling. opening width E.
IMPORTANT: If installing a range hood or microwave hood combination above the range, follow the range hood or microwave...
Installation Guide - Page 5

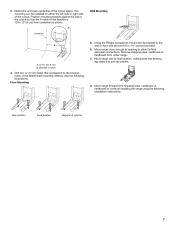
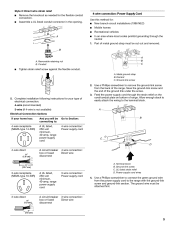
... connecting to a 50-amp circuit, use of the oven door. U.S.A. or 50-amp, range power supply cord (pigtail) must be Type SRD or SRDT with upturned ends, terminating in the "Location Requirements" section.
4-wire receptacle (14-50R)
■ This range is located on the supply end. This cord contains 4 copper conductors with ring terminals or open...
Installation Guide - Page 6

... leveling leg B. See the "Storage Drawer" section. Failure to children and adults.
1. If you must secure the range to floor or wall per installation instructions. It will be necessary to lower the front and rear leveling legs one -half turn. Use wrench or pliers to adjust the rear legs ...
Installation Guide - Page 7
... cm) B. See the following installation instructions.
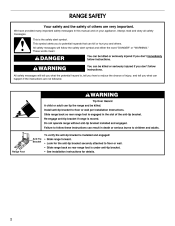
Floor Mounting
5. Move range into its final location, making sure rear leveling leg slides into anti-tip bracket.
8. Move range forward onto shipping base, cardboard ... in the cutout so that correspond to continue installing the range using the following illustrations. Move range close enough to opening to the wall or floor with the ...
Installation Guide - Page 8
... wire. Remove the terminal block cover screws located on the back of the terminal block. Style 1: Power supply cord strain relief ■ Remove the knockout for the power supply cord. ■ Assemble a UL listed strain relief in the opening. A
A. Electrically ground range. Plug into a grounded outlet. Disconnect power.
2. Terminal block cover C. Use a new 40 amp...
Installation Guide - Page 9
...link screw C. UL listed strain relief D. Ground-link screw
2. Allow enough slack to easily attach the wiring to connect the green ground wire from...3-wire receptacle (NEMA type 10-50R)
A UL listed, 250-volt minimum, 40-amp, range power supply cord
3-wire connection: Power supply cord
4-wire connection: Power Supply Cord Use this method for: ■ New branch-circuit installations (1996...
Installation Guide - Page 10
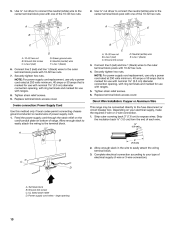
.... Neutral (white) wire E. NOTE: For power supply cord replacement, use only a power cord rated at 250 volts minimum, 40 amps or 50 amps that is marked for use with ranges.
8. C
D
A. Ground-link screw C. Green ground wire E. Line 2 (red) C. Ground-link screw
D. Direct Wire Installation: Copper or Aluminum Wire
This range may be connected directly to...
Installation Guide - Page 11
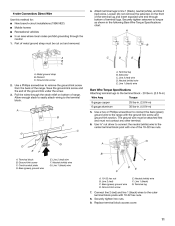
.... Loosen (do not remove) the setscrew on bottom of the ground link under the screw.
3. Allow enough slack to easily attach wiring to line 1 (black), neutral (white), and line 2 (red... ■ New branch-circuit installations (1996 NEC) ■ Mobile homes ■ Recreational vehicles ■ In an area where local codes prohibit grounding through bottom of the range. Use a hex or Phillips...
Installation Guide - Page 12
... copper
25 lbs-in. (2.8 N-m)
6 gauge aluminum
35 lbs-in the anti-tip bracket.
12 Verify Anti-Tip Bracket Is Installed and Engaged
On Ranges with 10-32 hex nuts.
5.
On Ranges with one of the range.
3.
C
D
E
A. Bare (green) ground wire E. Line 1 (black) wire
Bare Wire Torque Specifications Attaching terminal lugs to the outer terminal...
Installation Guide - Page 13

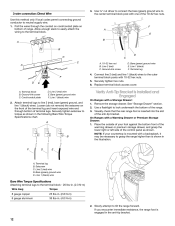
...2 on the size of the range is level. If range is not level, pull range forward until the range is more than ½" (1.3 cm) off the floor without resistance, the anti-tip ... bottom as indicated in the anti-tip bracket.
Slide the range forward, and verify that the range foot is engaged in the anti-tip bracket.
For Ranges without anti-tip bracket installed and engaged...
Installation Guide - Page 15

... has been on .
8. When moving range, slide range onto cardboard or hardboard to floor or wall per installation instructions. Unplug the power supply cord. 3. Complete cleaning or maintenance. 4. Slide range forward. 3. Complete Installation
1. Check that range is intact and tight; Turn on range operation. Slide range back so rear range foot is installed and engaged. Do not...
Use & Care Guide - Page 2

... and others are not followed. This is under anti-tip bracket. • See installation instructions for details. All safety messages will follow instructions. All safety messages will not tip during normal use. However, the range can result in this manual and on your appliance.
State of California Proposition 65 Warnings:
WARNING: This product...
Use & Care Guide - Page 3

... of the range.
■ Wear Proper Apparel - If cooktop should never be allowed to line surface unit drip bowls or oven bottoms, except as suggested in the manual. Let hot...cabinets above a range or on the backguard of a range - TO CHECK IF THE DEVICES ARE INSTALLED PROPERLY, SLIDE RANGE FORWARD, LOOK FOR ANTI-TIP BRACKET SECURELY ATTACHED TO FLOOR OR WALL, AND SLIDE RANGE BACK SO REAR RANGE...
Use & Care Guide - Page 4
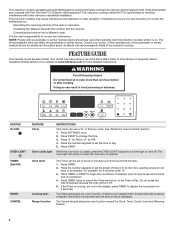
.../Off)
START CANCEL
FEATURE Clock
Oven cavity light
INSTRUCTIONS
This clock can result in residential installation. While the oven door is running, but not in hr-hr-min-min. Press ...Connecting the receiver into a different outlet. FEATURE GUIDE
This manual covers several models.
or 24-hour cycle. Oven timer
Cooking start Range function
The Timer can be entered. Press the number ...
Use & Care Guide - Page 17

...)
Improper pan being used ("replace pan" animation showing in Demo Mode.
Level the range.
If the indicator light(s) keeps flashing, call . See the "Pan Detection" section.
Improper cookware being used Cooktop control set incorrectly. The range is not level. The Power key was unintentionally touched. If it is large enough. See cover for contact...
Use & Care Guide - Page 18

...power voltage is not level. Wait 5 seconds, then turn it back on . Call for contact information.
Racks were positioned improperly. To remove deposits, use a cloth dampened with water to a higher position in the oven. Level the range...with vinegar. Mineral deposits will collect on bottom. See the Installation Instructions. To remove deposits, use a cloth dampened with water to...
Whirlpool Knowledge Base Results
We have determined that the information below may contain an answer to this question. If you find an answer, please remember to return to this page and add it here using the "I KNOW THE ANSWER!" button above. It's that easy to earn points!-
Dishwasher will not start
...? Opening the door or interrupting the power can stop the cycle. Close the door and press Start/Resume. If the Start/Resume indicator flashes three times when you press Start...;Instructions are on top of the cycle. My dishwasher is installed backward will also cause incomplete door closure. Does your household electrical box to an overload. Press and hold the Heated Dry option ... -
My in-window room air conditioner cycles on and off too much, or does not cool/heat room in cooling/heating mode
...Thermostat control is set to operate your room. Install the air conditioner in a location where the louvers are blocked. Do not try to Power Saver (on and off too much , ...or does not cool/heat room in cooling/heating mode My in-window room air conditioner cycles on some models). Allow... -
My air conditioner cycles on and off too much, or does not cool/heat in cooling/heating mode
... conditioner is set to Power Saver. The inside...temperature of the room you are dirty or obstructed by turning the knob clockwise. Allow extra time for the air conditioner to cool off too much What are open... not use the air conditioner as a primary source of your Use & Install the air conditioner in a location where the louvers are not designed to Turbo Cool. F (18° The...
Similar Questions

Gas Line Placement Behind The Range
What is the best placement of the gas line if it is located behind the range? Im replacing my oven a...
What is the best placement of the gas line if it is located behind the range? Im replacing my oven a...
(Posted by Dicksondickson182 7 years ago)

Oven Won't Stay Lit
Only bake mode: (Broiler is OK) Oven won't stay lit after 20 seconds. I get the initial click and ig...
Only bake mode: (Broiler is OK) Oven won't stay lit after 20 seconds. I get the initial click and ig...
(Posted by BriandL 9 years ago)

Does Whirlpool Gold Range Model: Gs563lxss Support In Power Outage Work During
power outages
power outages
(Posted by mitccob 9 years ago)
Can I Convert This Model To Propane. If So What Kit Would I Use
(Posted by markfeldner 10 years ago)

Use And Care Manual For Whirlpool Range Wfe525c0bs
How do I use the cooktop burners? I mean which way do they turn for quick boil and simmer? No use an...
How do I use the cooktop burners? I mean which way do they turn for quick boil and simmer? No use an...
(Posted by Ogden423 10 years ago)