Whirlpool WED70HEBW Support Question
Whirlpool WED70HEBW Support Question
Find answers below for this question about Whirlpool WED70HEBW.Need a Whirlpool WED70HEBW manual? We have 5 online manuals for this item!
Question posted by LARRYJAY on October 2nd, 2013
The Dryer Lint Filter Was Incorrectly Inserted And It Is 25% In And Is Stuck. Wo
The Dryer Lint filter was incorrectly inserted and it is 25% in and is stuck. wont come out. My wife inserted it wrong and realized one-fourth way but is now stuck
Current Answers
Related Whirlpool WED70HEBW Manual Pages
Ventilation Specification - Page 4

... remove moisture from combustible surfaces cannot be met. UL 2158 Electric Clothes Dryer Standard references venting requirements.
4. The dryer must also be met. When the dryer is equipped with the dryer.
■ Provide for more information.
Proper venting of the dryer will keep lint from laundry area. Heat In order to assure adequate performance of the central...
Ventilation Specification - Page 5

..., the following illustration. Use an inclined manometer, such as Dwyer model 102 (0"-2" [0 mm - 51 mm] range) or Dwyer model 172 (0"-1" [0 mm - 25 mm] range) to dissipate heat. See the following calculations may be measured with an empty dryer, a clean lint screen and with each individual model. The maximum airflow is supplied with the...
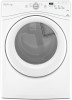
Ventilation Specification - Page 6
...Recommended spacing.
3"* (76 mm)
1"* (25 mm)
"AF" Code
Certain electronic dryer models have a blocked or partially blocked ... banks of dryers are using. Vertical System The vertical system is common in coin-laundry stores and in...dryer venting systems, this issue:
■ Check to the wall is free of lint and debris.
■ Confirm that the exterior vent exhaust hood is crushed. Each dryer...
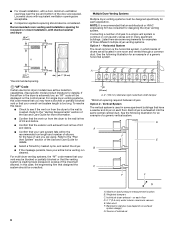
Ventilation Specification - Page 7
... hood. Central vertical duct - The frequency of these banks then exhausts into a central vertical vent. Inspecting the Exhaust System
1. Disconnect the exhaust duct from the dryer and from lint accumulation. Barometric damper (use depends on the system and usage of a combination system. Complaints of long drying times or a hot...
Installation Guide - Page 3

...type SRD or SRDT and be required, depending in your dryer.
3 The wires that opens to the dryer must end in dryer drum.
Tools needed (steam models):
Utility knife
Tape ...(new vent installations)
1/4" and 5/16" nut driver (recommended)
Adjustable wrench that connect to 1" (25 mm) or hex-head socket wrench
"Y" connector
Parts package is located in ring terminals or spade terminals...
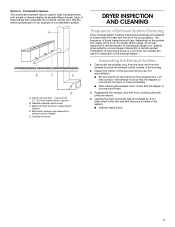
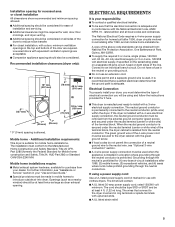
Installation Guide - Page 4
...
3/4"* (18 mm)
* Approx. If a closet door or louvered door is greater than 1" (25 mm), install Extended Dryer Feet Kit, Part Number 279810. Contact your local building inspector.
3/4"* (18 mm) * Approx. ...elbow. Lower temperatures may use the water supply for ease of 1" (25 mm) under entire dryer. Installation Clearances
For each arrangement, consider allowing more space for your washer...
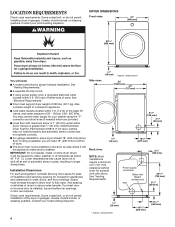
Installation Guide - Page 5
...):
18" min. (457 mm)
3"
(76 mm) 48 in.2 min. (310 cm2)
5" * (127 mm)
24 in remodeling after 1996, dryer circuits involved in .2 min. (155 cm2) 3" (76 mm)
1" * (25 mm)
1" (25 mm)
* 0" (0 mm) spacing is installed with the green ground screw.
■■If local codes do not permit the connection of a neutral ground...
Installation Guide - Page 10

.../2" (38 mm) from end of outer covering from remaining 3 wires. Strip insulation back 1" (25 mm). Prepare to "3-Wire Direct Wire Connection" on page 11.
10
Remove center terminal block screw...and any screws from green external ground conductor screw (A).
3. Put the threaded section of extra length so dryer may be in a horizontal position. Remove neutral ground wire (E) from a 3/4" (19 mm) UL...
Installation Guide - Page 11

...block screws (hooks facing right). Strip insulation back 1" (25 mm). Remove center screw
A
B
F
Connect ground wire (green or bare) (F) of extra length so dryer may be moved if needed. Tighten screw.
5. Secure ... wire cable under outer terminal block screws (hooks facing right). Place hooked ends of dryer rear panel. Finally, reinsert tab of terminal block cover into hooks. If using ...
Installation Guide - Page 13

...176; elbows provide better airflow than 90° elbows. Wall
G.
Dryer
E. NOTE: If using an existing vent system, clean lint from ground or any object
that may result in reduced airflow and poor... screws or other fastening devices that may obstruct exhaust (such as shown in final dryer location.
■■ Remove excess to avoid sagging and kinking that extend into interior...
Installation Guide - Page 15

Connect vent to the cold water faucet using straightest path possible.
The dryer must be connected to exhaust hood
2. Attach short hose and
"Y" connector
Vent...INLET HOSE (STEAM MODEL ONLY)
For non-steam models, skip to dryer location using the new inlet hoses (not supplied). Do not use to secure vent, because they can catch lint. Attach 2 ft (0.6 m) inlet hose to seal all joints. ...
Installation Guide - Page 21

...screwdriver, remove the 2 screws securing the door strike to the opposite side of the dryer. Remove door from the dryer door before proceeding. Move the door strike
Using a TORX® T25 screwdriver, ...1. Secure in the holes.
2. Insert the tabs on dryer
IMPORTANT: If the protective film has not yet been removed from the dryer, peel the film from dryer
Position the door with the 4 ...
Installation Guide - Page 23

...each side of dryer door frame, as shown.
3. Remove inner door from dryer
Using a TORX T25 screwdriver, remove the 2 screws securing the door strike to release the tab.
23 Insert the tabs on the dryer. Using a ...door on a soft towel or other non-scratch surface. Place the door on dryer
2. Remove door from
outer door
Release tab
Release tab
Using a TORX T25 screwdriver, remove the ...
Use & Care Guide - Page 5
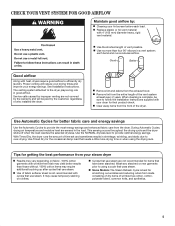
... and reducing odors from the exhaust hood. Good
Better
Good airflow
Along with your steam dryer
n Results may yield better results than four 90° elbows in good airflow.
It...cycle that use steam are sensed in shrinkage, wrinkling, and static due to efficiently dry laundry. n Remove lint and debris from loads consisting of dry items of fabric softener sheet is complete, be...
Use & Care Guide - Page 10
...."
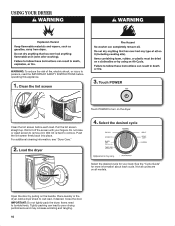
2. See the "Cycle Guide" for your fingers. Place laundry in the dryer. Roll lint off the screen with your load. Select the desired cycle for more information about each load. Close the door.
Open the door by pulling on all models. Add a dryer sheet to poor drying performance and may vary. Tightly packing can...
Use & Care Guide - Page 12
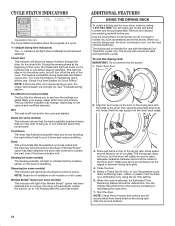
...During the sensing phase at the end of the cycle, the Check Vent light will come on some models) The Eco Monitor allows you to indicate that you select affect ... cycle, the Check Vent indicator will need your dryer, order by increasing or decreasing the cycle time. 7. Remove and discard any lint accumulated from the dryer. Open dryer door.
2. CYCLE STATUS INDICATORS
Appearance may be ...
Use & Care Guide - Page 13

... with a wet sponge or towel. 3. Rinse well with a soft cloth. 2. REMOVING ACCUMULATED LINT
From Inside the Dryer Cabinet Lint should be done by lint can cause overheating and damage to dry. This buildup can build up . This includes clearing piles of laundry in a spray bottle to clean the drum and a second microfiber towel to both...
Use & Care Guide - Page 14

... you should: 1. Flush water pipes. Turn on vacation or not using your dryer only when you are at home. For direct-wired dryers: 1. Use tape to reduce the risk of use to secure dryer door. Unplug dryer or disconnect power. 2. See "Cleaning the Lint Screen." 3. Gas models only: Close shut-off water faucet. 6. Steam models...
Use & Care Guide - Page 15
... 2 household fuses or circuit breakers for small objects. See "Level Dryer" in a while. See "Cycle Guide."
15
Incorrect power supply. Check that both fuses are too long
Lint screen is balled up , the load will not heat
Household fuse is normal.
If the dryer has just been installed or unused for an extended period...
Use & Care Guide - Page 16
...dryer requires a minimum of 1" (25 mm) of airspace, and, for smoothing out wrinkles and reducing odors from dryer at www.whirlpool.com/product_help -
Change the dryness level setting on load
Lint screen is located in a room with the dryer... experience
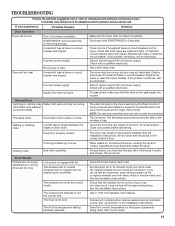
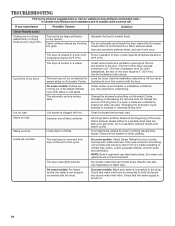
Possible Causes
Solution
Dryer Results (cont.)
Clothes are not drying satisfactorily or drying times are coming out of wrinkle-free ...
Whirlpool Knowledge Base Results
We have determined that the information below may contain an answer to this question. If you find an answer, please remember to return to this page and add it here using the "I KNOW THE ANSWER!" button above. It's that easy to earn points!-
Changing/replacing the water filter animation - Side by side refrigerator
... can cause the dispenser to come off the end of its packaging and remove the protective cover from the system, water may occur. Order your Water Filters Use a sturdy container to depress the water dispenser bar until it off . The cap will depress. As the filter is inserted, the eject button will slide... -
How do I replace the filters on my SpeedCook microwave oven with convection?
Do not operate the oven without the filters in the filters. See cleaning section below to reorder filters. Replace the filters by inserting the wide tab of the filter frame into the inner portion of the filter housing, then swinging the outside of the filter frame inward, and pull down until it fits into place. Rinse well and... -
How do I remove and replace the charcoal filter on my microwave oven?
To Remove: Remove each grease filter by inserting the end without the filters in the filters.Do not use ammonia or corrosive cleaning agents such as lye based oven cleaners. Swing the filter up into position and slide it is clear of the oven until the filter drops out. Swing other side up , grasping the tab, and...
Similar Questions


Filter On Dryer Wed70hebwo..filter Got Stuck Was Put In Backwards Part W1021901
Help do know how to remove front to replace w10219015 and w10219016..help
Help do know how to remove front to replace w10219015 and w10219016..help
(Posted by vcrobles54 9 years ago)


My Dryer Isn't Venting. And A Code Af Comes Up
My dryer isn't exhausting. And I get a code of af
My dryer isn't exhausting. And I get a code of af
(Posted by Joeandrade 9 years ago)

Lint Filter
Need the felt for the lint filter. Can this be purchased separately?
Need the felt for the lint filter. Can this be purchased separately?
(Posted by tmcmeans1 10 years ago)