Get support for Whirlpool WED6620HC

Whirlpool WED6620HC Support Question

Whirlpool WED6620HC Support Question

Find answers below for this question about Whirlpool WED6620HC.
Need a Whirlpool WED6620HC manual? We have 6 online manuals for this item!
Question posted by jessejlee on November 3rd, 2023

Instructions For How To Relocate Dryer Vent To The Bottom

Model WED6620H instructions for moving the vent to the bottom of the unit

Current Answers

Answer #1: Posted by Technicalproblemsolver on November 3rd, 2023 9:43 AM
Technicalproblemsolver

Member since:
September 25th, 2023

Points: 190,500
90
points
Sure, I'd be happy to help you with instructions on how to relocate the dryer vent to the bottom of your Whirlpool Model WED6620H dryer unit. Please keep in mind that these instructions are general guidelines, here are the steps to relocate the vent:

1. Disconnect the power: Before starting any work, ensure that the dryer is unplugged or the circuit breaker for the dryer is turned off.

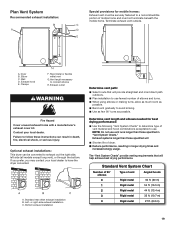
2. Assess the location: Determine the new location for the vent on the bottom of the dryer unit. Take into consideration the space available and make sure it's clear of any obstructions.

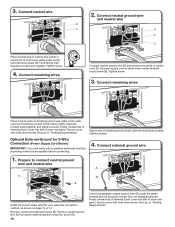
3. Remove the existing vent: Locate the current vent attachment on the back of the dryer and remove it. This may involve loosening screws or removing a clamp.

4. Clean the area: Clean the area where the new vent will be installed to remove any debris or lint that may have accumulated.

5. Prepare the new vent: If a new vent attachment is needed to be installed on the bottom of the dryer, ensure that you have the correct vent kit or adapter. This may involve purchasing a separate kit that is compatible with your specific model.

6. Install the new vent: Follow the manufacturer's instructions for installing the new vent attachment. This typically involves aligning the vent hole on the dryer with the attachment and securing it in place with screws or a clamp.

7. Check for proper airflow: Once the new vent is installed, it's crucial to check for proper airflow. Reconnect the dryer to power, turn it on, and make sure that there is unrestricted air movement through the vent.

8. Test the dryer: After verifying the airflow, run a short cycle on your dryer to ensure that it's working properly and that the vent is functioning as intended. Remember to always prioritize safety during any installation or maintenance tasks.

If you're uncertain about any step or lack experience, it's recommended to hire a professional technician to ensure the job is done correctly.


"Hi there,

I hope my response was helpful in addressing your question or concern. If you found it valuable, I kindly ask you to consider accepting my answer by clicking the designated button. Your support will not only acknowledge my efforts but also guide others in finding useful solutions. Thank you for your trust and I'm ready to assist you further if needed.

Best regards,
Technicalproblemsolver"

Related Whirlpool WED6620HC Manual Pages

Door Reversal Guide - Page 1

Move the door strike Using a T25® screwdriver, remove the two screws securing the door strike to remove. Rotate the strike 180° and attach to the opposite side of dryer... the latch plate in place. 2. Remove hinge Remove cover plate to the outer door. 5. DRYER DOOR REVERSAL INSTRUCTIONS Round Doors with Electrical Wiring: Tools Needed Minimum 8" (203 mm) long TORX®, T20®...
Installation Instructions - Page 3

... Electrical Code, Part 1, CSA C22.1. The dryer must be listed. I Installations and repairs must not exceed 4 feet (121.9 cm). 3 Follow the gas supplier's instructions. • If you cannot reach your gas...Do not touch any electrical switch; In the State of Massachusetts, the following installation instructions apply: I A flexible gas connector, when used, must be performed by the State of Massachusetts...
Installation Instructions - Page 4

... supplied (all parts are included. NOTE: Do not use leveling legs supplied with dryer if installing with dryer): ■■ Vent clamps ■■ Vent elbows and vent work Check that all models): Tape measure Pliers Utility knife Tin snips (new vent installations) Leveling legs (4) Parts needed (steam models): "Y" connector 2' (0.6 m) inlet hose Caulking gun and compound (new...
Installation Instructions - Page 5

...to the dryer must not be exposed to water, weather, or at end of 1" (25 mm) under entire dryer. DRYER DIMENSIONS Front view: Side view: Whirlpool® Models You will ...Extended Dryer Feet Kit, Part Number 279810. Check existing electrical supply and venting. See "Venting Requirements." ■■ A separate 15 or 20 A circuit for a gas dryer or 30 A circuit for an electric dryer. ...
Installation Instructions - Page 6

...: No other fuel-burning appliance can be large enough to allow door to introduce outside air into dryer. Custom under-counter installation: Mobile home - Back view: Recommended installation clearances (dryer only): Water inlet (Steam Models Only) Vent Gas *Approx. Space must conform to reduce noise transfer. ■■ For closet installation with equivalent ventilation...
Installation Instructions - Page 7

...9632; A UL Listed strain relief. 7 If using and follow the instructions provided for homes built after 1996, dryer circuits involved in ring terminals or spade terminals with flexible metallic conduit. ...10-gauge copper wires and match a 3-wire receptacle of the terminal block, the dryer cabinet is adequate. Grounding through the neutral conductor is adequate and in the neutral...
Installation Instructions - Page 8

... is properly installed and grounded in the "Assistance or Service" section of least resistance for electric current. The plug must be grounded. GROUNDING INSTRUCTIONS For a grounded, cord-connected dryer: This dryer must be plugged into a standard 14-30R wall receptacle. epresentative or personnel if you are in a risk of the equipment- The plug...
Installation Instructions - Page 10

... (not console panel) and gently lay dryer down on the pedestal model. Stand the dryer up. INSTALL LEVELING LEGS 1. GAS SUPPLY CONNECTION REQUIREMENTS ■■ Use an elbow and a 3/8" flare x 3/8" NPT adapter fitting between the flexible gas connector and the dryer gas pipe, as needed to connect the exhaust vent. 10 use TEFLON® tape...
Installation Instructions - Page 13

Finally, reinsert tab of terminal block cover into slot of dryer rear panel. Now go to neutral wire. Finally, reinsert tab of terminal block cover into slot of ...) 3 prong plug Spade terminals with hold -down screw. Secure cover with hold -down screw. Now go to "Venting Requirements." 3-Wire Power Supply Cord Connection Use where local codes permit connecting cabinet-ground conductor to...
Installation Instructions - Page 15

...wire ends into slot of direct wire cable under center screw of extra length so dryer may be moved if needed. If using 3-wire cable with ground wire, cut bare wire even ...direct wire cable wires under outer terminal block screws (hooks facing right). Now go to "Venting Requirements." 3-Wire Direct Wire Connection Use where local codes permit connecting cabinet-ground conductor to connect...
Installation Instructions - Page 16

...Squeeze hooked ends together and tighten screws. Now go to "Venting Requirements." Connect external ground wire 1. Squeeze hooked end together....Finally, reinsert tab of terminal block cover into slot of dryer rear panel. 3. Finally, reinsert tab of terminal block cover into slot of dryer rear panel. Now go to "Venting Requirements." Connect neutral wire 2. Prepare to an adequate ground...
Installation Instructions - Page 18

... performance. Dryer exhaust must not be connected or secured with a magnetic latch. Recommended Styles: Fire Hazard Use a heavy metal vent. IMPORTANT: Observe all joints. ■■ Exhaust vent must not be connected into interior of duct and catch lint. Review "Vent System Charts" and, if necessary, modify existing vent system to follow these instructions can result...
Installation Instructions - Page 19

...Dryer B. Standard rear offset exhaust installation B. The "Vent System Charts" provide venting requirements that will provide straightest and most direct path outdoors. ■■ Plan installation to use . Failure to follow these instructions...left side (all models except long vent), or through the bottom. Contact your local dealer to have the dryer converted. A. ...
Installation Instructions - Page 22

.... 2. Move dryer to the coupling can result. 6. Damage to final location Check that vent is secured to existing vent, make sure vent is clean. Screw on coupling by hand until it is in dryer. Turn on fill valve connector. Check for leaks around "Y" connector, faucet, and hoses. 22 5. Using pliers, tighten the couplings an additional 2/3 turn. Dryer vent...
Owners Manual - Page 5

...Instructions supplied with 4" (102 mm) diameter heavy, rigid vent material. EcoBoost™ option The EcoBoost™ option will reduce your drying times and improve your energy savings by the customer, regardless of who installed the dryer... laundry. n Cycles that use steam. each load. The venting system...plastic or foil vent material with your steam dryer (on some models) n Results ...
Owners Manual - Page 7

... the sensing phase at least 3 seconds. Should the Check Vent light illuminate, refer to the "Troubleshooting" section for the Regular/Normal cycle and is only available on that the moisture sensor on all models. The light will be cleared upon completion of the dryer. Appearance may continue to selected Automatic cycles. This indicator...
Owners Manual - Page 13

...clothes, or cause the dryer to both sides of laundry in the dryer. Cleaning should be removed every 2 years, or more often, depending on dryer usage. 2. From the Exhaust Vent Lint should be removed ...Do not run the dryer with your load is hard to dry drum OR U se a microfiber cloth and hot water in the Installation Instructions. Wet both the dryer and fabrics. Dry unstable...
Owners Manual - Page 15

... the solutions suggested here or visit our website at www.whirlpool.com/owners (in dryer. The exhaust vent or outside exhaust hood to the end of use two household fuses or circuit breakers. See the Installation Instructions. See the Installation Instructions. Dryer Results Drying times are too long and clothes are intact and tight, or...
Owners Manual - Page 17

... CONTROL LOCK or DAMP DRY SIGNAL (depending on the model) for 3 seconds to the wall is free of lint and debris. • Confirm that the exterior vent exhaust hood is in the Installation Instructions for reducing wrinkles and odors from dry loads consisting of the dryer. Touch any pad to clear the code from...
Specification Sheet - Page 1

...Fit Laundry Pedestals...Dryer Option Selections Dimensions Product Dimensions (H x W x D) Depth with Door Open 90° Maximum Vent Length Venting...Front Load Electric Dryer WED6620H Chrome Shadow WED6620HC Also available in...Instructions packed with Steam Help keep wrinkles from setting into clean, dry fabrics. Technical Details Drum Material Fuel Type Door Style Reversible Door Number of Dryer...

Whirlpool Knowledge Base Results

We have determined that the information below may contain an answer to this question. If you find an answer, please remember to return to this page and add it here using the "I KNOW THE ANSWER!" button above. It's that easy to earn points!

  • Display shows AF - Dryer
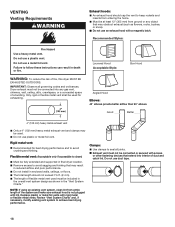
    ...;Installation Instructions for 5-10 minutes. Hold your hand under the outside exhaust hood Is the exhaust vent kinked, smashed or crushed? Box or louvered hoods are recommended. Run the dryer for ...details.   If the air movement is restricted. Is there a new exhaust vent system? The exhaust vent system may be too long or may be removed from moving out of the dryer...
  • My ice maker runs but doesn't produce ice
    ...? Call for service. Find a local service provider: Product Category Washer or Dryer Refrigerator or Freezer Dishwasher Electric Range, Oven or Cooktop Gas Range, Oven or Cooktop Microwave Trash Compactor Window Air Conditioner Hot Water Dispenser Vent Hood Ice Machine Commercial Laundry Vacuum Cleaner Central Vac Dehumidifier My ice maker runs but doesn't produce...
  • Damp loads or long drying times - Dryer
    ...blocking air flow? Closet doors must have for good air movement. See the Installation Instructions for Best Performance How Auto Dry and Timed Dry Work Is the lint screen clogged with... vent system slows moist air from the inside the dryer drum. This slows moist air from moving out of the dryer, which will result in the system reduces the amount of the dryer drum. A dryer ...

Similar Questions

Two Wires Inside The Dryer Vent
Inside the dryer there are 2 wires with clips to go on the vent. I do not know which wire goes on wh...
(Posted by denisebeery 2 years ago)
I Need A Stack Kit For A Front Loader Washer And Dryer By Whirlpool. Model # Lhw
Model # LHW0050PQ. Washer and dryer set, Is there a stack kit available?
(Posted by Anonymous-117739 10 years ago)
Ask a New Question
Use the box below to post a new question about this Whirlpool product .
Points & Prizes
  • You can earn points for nearly everything you do on HelpOwl.com
  • You can trade in those points for gift cards at leading retailers such as Amazon.com and Walmart
  • It's that simple!
See How it Works
Create a Free Account

Whirlpool Manuals

Find free Whirlpool WED6620HC manuals and user guides available at ManualOwl.com. Try out our unique manual viewer allowing you to interact with manuals from directly within your browser!

Whirlpool Reviews

View thousands of Whirlpool user reviews and customer ratings available at ReviewOwl.com.

Contact Information

Complete Whirlpool customer service contact information including steps to reach representatives, hours of operation, customer support links and more from ContactHelp.com.

Scoreboard Ratings

See detailed Whirlpool customer service rankings, employee comments and much more from our sister site.

Whirlpool Recalls

Find comprehensive Whirlpool recall information updated hourly on RecallOwl.com.