Whirlpool WED5500XW Support Question
Whirlpool WED5500XW Support Question
Find answers below for this question about Whirlpool WED5500XW.Need a Whirlpool WED5500XW manual? We have 4 online manuals for this item!
Question posted by Thibeauxjessica on May 7th, 2012
My Dryer Won't Power On At All It Worked Fine At Old House But Does Nothing Here
Wed5500xw about a year old I changed plug and breaker still nothing
Current Answers
Related Whirlpool WED5500XW Manual Pages
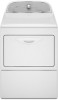
Dimension Guide - Page 1

...exhaust vent with elbow.
A timedelay fuse or circuit breaker is required. Rigid or flexible metal exhaust vent ...determine maximum exhaust length, add one 90° turn inside the dryer.
Because Whirlpool Corporation policy includes a continuous commitment to improve our ...elbows and turns. Do not have a 90° turn to change without notice. Do not use vent runs longer than specified in...
Installation Instructions - Page 2
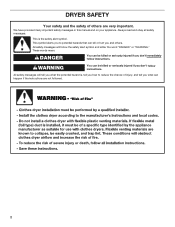
... , tell you how to potential hazards that can kill or hurt you don't follow the safety alert symbol and either the word "DANGER" or "WARNING."
DRYER SAFETY
Your safety and the safety of injury, and tell you don't immediately follow instructions.
Installation Instructions - Page 3

... are included. Tools needed : Check local codes.
For further information, please reference the "Assistance or Service" section of the Dryer User Instructions. Read and follow the instructions provided with clothes dryers. If using a power supply cord: Use a UL listed power supply cord kit marked for purchase from the dealer from whom you purchased your...
Installation Instructions - Page 4

...sleeping quarters.
A time-delay fuse or circuit breaker is suitable for mobile home installations. ■■ If you are using power supply cord, a grounded electrical outlet located ... hamper door
*Most installations require a minimum 5½" (140 mm) clearance behind the dryer for purchase from : National Fire Protection Association, One Batterymarch Park, Quincy, MA 02269....
Installation Instructions - Page 5

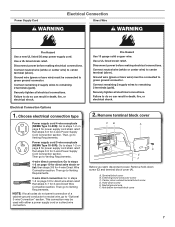
... 4 10-gauge solid copper wires and match a 4-wire receptacle of the terminal block, the dryer cabinet is permanently connected to the neutral conductor (white wire) within the dryer. The neutral conductor must be using a power supply cord:
Use a UL listed power supply cord kit marked for (1) new branch-circuit installations, (2) mobile homes, (3) recreational vehicles...
Installation Instructions - Page 6

... do so can result in leveling legs
Excessive Weight Hazard Use two or more people to connect the exhaust vent. Prepare dryer for electrical connection and to move and install dryer. To avoid damaging floor, use a wrench to finish turning legs until it is no longer visible.
diamond marking
1. Now stand the...
Installation Instructions - Page 7
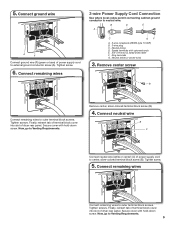
...copper wire. Ground wire (green or bare wire) must be used with either a power supply cord or a direct wire connection. Connect remaining 2 supply wires to green ...
Securely tighten all electrical connections. use a new ul listed 30 amp power supply cord.
Disconnect power before making electrical connections.
Power supply cord 3-wire receptacle (NEMA Type 10-30R): Go to "Optional ...
Installation Instructions - Page 8
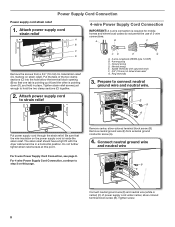
...A. 4-wire receptacle (NEMA type 14-30R) B. 4-prong plug C. Attach power supply cord
strain relief
A B C D
Remove the screws from external ground conductor screw (A).
4. Attach power supply cord
to hold in a horizontal position. Put the tabs... the dryer cabinet and be in place. Remove neutral ground wire (E) from a 3/4" (19 mm) UL listed strain relief (UL marking on the power supply cord...
Installation Instructions - Page 9
... wire
A
F
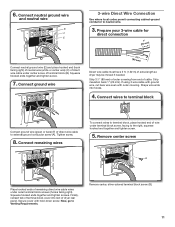
Connect ground wire (F) (green or bare) of dryer rear panel. B
D
E
A
C
GF
A. 3-wire receptacle (NEMA type 10-30R) B. 3-wire plug C. Ring terminals G. Secure cover with upturned ends E. 3/4" (19...neutral wire (white or center) (C) of dryer rear panel. Finally, reinsert tab of terminal block cover into slot of power supply cord to center, silver-colored terminal block...
Installation Instructions - Page 10
A
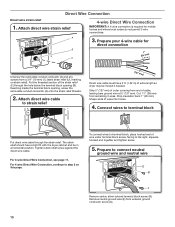
3. Attach direct wire cable
to strain relief
(127
5" mm)
Direct wire cable must have a tight fit with the dryer cabinet and be moved if needed. Shape ends of extra length so dryer may be in a horizontal position. Tighten strain relief screw against the direct wire cable. For 3-wire Direct Wire Connection, see page...
Installation Instructions - Page 11
... hooks.
4.
Connect ground wire
(893m½m" )
Direct wire cable must have 5 ft. (1.52 m) of dryer rear panel. Strip 31/2" (89 mm) of outer covering from end of terminal block (B). Tighten screw.
8. ... wire cable under center screw of cable. Shape wire ends into slot of extra length so dryer may be moved if needed. Connect wires to terminal block
AF Connect ground wire (green or...
Installation Instructions - Page 12
...-colored terminal block screw (B). Tighten screw.
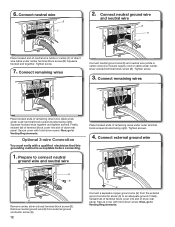
3. Connect remaining wires
Place hooked ends of dryer rear panel. Squeeze hooked ends together and tighten screws. Tighten screws.
4. Secure cover with... (B). Now, go to connect neutral
ground wire and neutral wire
Place hooked ends of dryer rear panel. Now, go to an adequate ground. Tighten screw.
7. 6. Connect neutral...
Installation Instructions - Page 13

... m).
Replace plastic or metal foil vents with lint.
WARNING: To reduce the risk of fire, this dryer MUST BE
EXHAUSTED OUTDOORS. Rigid metal vent: ■■ Recommended for more information.
13 Housecleaning problems ... and make sure exhaust hood is not plugged with rigid metal or flexible metal vents. Do not use a heavy metal vent.
Dryer exhaust must not be connected or secured ...
Installation Instructions - Page 14
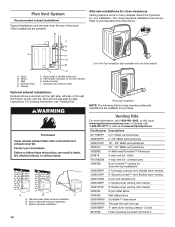
...C
D E A F G
Over-The-Top installation (also available with clamps
4396004
Dryer offset elbow
4396005
Wall offset elbow
4396006RW DuraSafe™ close -clearance installations are possible. ... kits for close clearances
Venting systems come in many varieties. A
B
C
A. Dryer B. Part Number Descriptions
8171587RP 0-5" Metal vent periscope
4396037RP 0"-18" Metal vent periscope...
Installation Instructions - Page 15
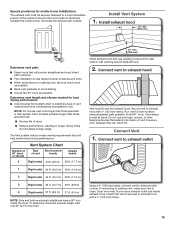
... all joints. Use clamps to exhaust hood
Vent must fit over dryer exhaust outlet and inside the dryer. Connect Vent
1. Dryer vent must fit over the exhaust hood. Special provisions for best drying... mm) clamp.
15 Vent System Chart
Number of 90° turns or elbows
Type of dryer.
■■ Reduce performance, resulting in Vent system chart. Exhaust systems longer than those ...
Owners Manual - Page 5

... load size, and dryness setting.
3 START/PAUSE BUTTON Press to help keep wrinkles from the dryer as soon as it .
4 OPTIONS AND SETTINGS
Temp Select a drying temperature based on the ...Timed Dry Will run the dryer for detailed descriptions of the cycle reduces wrinkling. Drying time and temperature will vary based on your laundry load. If you may vary.
1 POWER BUTTON Press to turn ON ...
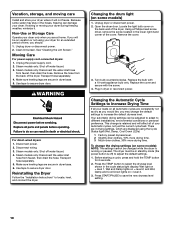
Owners Manual - Page 6
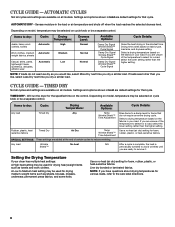
...Less Dry next time you are default settings for various loads, refer to dry:
Jeans, heavy work clothes. Settings and options shown in bold are unsure of certain cycles to select for a load,... cycle. TIMED DRY - NOTE: If you dry a similar load.
CYCLE GUIDE - Will run the dryer for that cycle. Line dry bonded or laminated fabrics. AUTOMATIC CYCLES
Not all models. Depending on model...
Owners Manual - Page 7
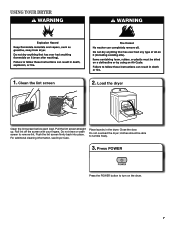
... screen before each load.
Do not overload the dryer; Press POWER
Press the POWER button to tumble freely.
3. Pull the lint screen straight up. Push the lint screen firmly back into place. Place laundry in the dryer.
clothes should be able to turn on the dryer.
7 USING YOUR DRYER
1. Roll lint off the screen with your fingers...
Owners Manual - Page 10
... not as dry as you would like, you will be in dryer base. 6. Steam models only: Shut off water faucet. 4. Remove the hose from the back of the cover. Disconnect wiring. 3. Unplug dryer or disconnect power. 2. Remove the cover.
3. Plug in the lower right-hand corner of the dryer. To change the default settings to secure...
Owners Manual - Page 11
....
Use 4" (102 mm) diameter vent material. Proper operation of the dryer requires 5" (127 mm).
Electric dryers require 240-volt power supply.
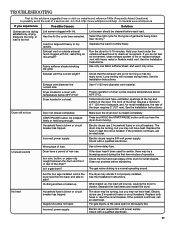
Unusual sounds
Dryer have ventilation openings at the top and bottom of operation.
When balled up . Electric dryers use 2 household fuses or circuit breakers. http://www.whirlpool.com/help - Separate the load to dry quickly...
Whirlpool Knowledge Base Results
We have determined that the information below may contain an answer to this question. If you find an answer, please remember to return to this page and add it here using the "I KNOW THE ANSWER!" button above. It's that easy to earn points!-
My electric range is not working.
... oven set ? My electric range is plugged in . My display is plugged in . Make sure that the breakers are set correctly. Is the Cooktop lockout feature set on my cooking appliance My range is not working . Find a local service provider: Product Category Washer or Dryer Refrigerator or Freezer Dishwasher Electric Range, Oven... -
Nothing will operate on my built-in electric convection oven
...not cooking? If dark, check that the door is power to the unit by entering your inputs as it ...fine. Consult your Use and Care Guide for instructions on turning it online by looking for tripped breakers... or blown fuses. Find Manuals & Guides: /shared.whirlpoolcorp.com/service/modelnumber.jsp','modelnumber',500,480);return false;" href="#"> Lookup Model # Nothing works... -
Preserving food during a power interruption
... found helpful Refrigerator not operating Refrigerator not working Refrigerator or freezer not cold enough FAQs Knowledgebase search tips Preventing freezer burn If the power will keep both refrigerator and freezer doors closed...locker nor dry ice is poor, dispose of it in your house goes out or turns off unexpectedly, call the power company and ask how long it , although the quality and ...
Similar Questions

Dryer Won't Shut Off.
My dryer is OFF but will not stop tumbling. I'm trying to find out what could be causing this??? Any...
My dryer is OFF but will not stop tumbling. I'm trying to find out what could be causing this??? Any...
(Posted by lmbutler73 8 years ago)

My Gas Dryer Model 1cwgd5200vq1 Doesn't Heat Changed Thermal Fuse Still Same Pro
(Posted by rquintana2 11 years ago)

Was Working Fine, Then Stopped Heating. This Was Sudden Onset
Dryer is 6 years old. Was working fine; then suddenly stopped heating. Its a whirlpoo WGD5500SQO Gas...
Dryer is 6 years old. Was working fine; then suddenly stopped heating. Its a whirlpoo WGD5500SQO Gas...
(Posted by rwtrkb 11 years ago)

Brand New And Won't Power Up.
We purchased a new Whirlpool Cabrio(Model: WED 5500XW0) and it will not turn on. There is power avai...
We purchased a new Whirlpool Cabrio(Model: WED 5500XW0) and it will not turn on. There is power avai...
(Posted by bean3459 11 years ago)