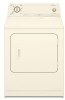
Whirlpool WED5300ST Support Question
Whirlpool WED5300ST Support Question
Find answers below for this question about Whirlpool WED5300ST.Need a Whirlpool WED5300ST manual? We have 4 online manuals for this item!
Question posted by djj270 on March 3rd, 2014
Does This Dryer Have A History Of Slow Drying Time?
I bought this dryer a couple of years ago and even new took at least an hour to dry a full load. Now several years later it is getting worse! I have serviced the dryer vent tubing and exhaust with marginal improvement. The buisness that sold the dryer has since closed. I asked a appliance store dealer who stated that this dryer was a very inexpensive model that only has single element? Any suggestions would be greatly appreciated!
Current Answers
Related Whirlpool WED5300ST Manual Pages
User Instructions - Page 1

..., 3-wire, 30 amp
PT400L
4 ft (1.2 m) dryer cord, 4-wire, 30 amp
PT600L
6 ft (1.8 m) dryer cord, 4-wire, 30 amp
8212614
Dryer vent lint brush
31682
All-purpose appliance cleaner
1903WH
Laundry supply storage cart
3404351
Drying rack - side swing door only
49971
Compact dryer stand - Additional help you obtain assistance or service if you need to order, call 1-800-442...
User Instructions - Page 2

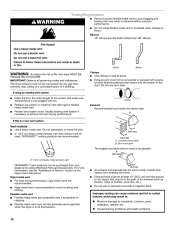
...; The interior of the dryer and exhaust vent should be killed or seriously injured if you and others are not followed. Always read and obey all instructions before or after each load. ■ Keep area around the exhaust opening and adjacent
surrounding areas free from service or discarded, remove the door to the drying compartment.
■ Do...
User Instructions - Page 3

...exhaust hood. 3. Use clamps to achieve maximum drying efficiency and shorten drying times. See the Installation Instructions for more information. Do not kink or crush flexible metal vent. Do not store or use a plastic vent... least every 2 years, or when installing your dryer in a new location. Clean exhaust vent periodically, depending on use plastic vent or metal foil vent. WARNING: For...
User Instructions - Page 4

...new cycle and temperature (if desired).
3. If your model does not have a drying rack, you are using the Auto Moisture Sensing Cycle, the dryness of the load is determined by using your model allows drying... SAFETY INSTRUCTIONS before each load. How Automatic Drying Works When you purchased your dryer has a Temperature selector, set to remove a load from the dryer as soon as gasoline,...
User Instructions - Page 5

...into place. Cleaning the Dryer Interior
1. From Inside the Exhaust Vent
Lint should be done by using an air cycle. Start the dryer. to remove residue buildup....drying time.
Every Load Cleaning
Style 1: 1. Roll lint off the screen with a soft cloth until stain is located in the door of the dryer door opening. Roll lint off the screen into the dryer during removal, check the exhaust...
User Instructions - Page 6
... drum may be on the back
wall of a service call... Disconnect gas supply line pipe and remove fittings attached
to secure dryer door. Replace the fuse or reset the circuit breaker... Vacation and Moving Care
Vacation care
Operate your dryer for an extended period of time, you should: 1. Electric Dryers
For power supply cord-connected dryers: 1. Changing the Drum Light
1. Remove the...
User Instructions - Page 7

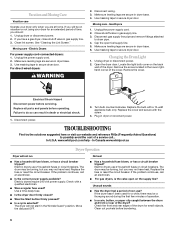
... use a metal foil vent. Long venting will bounce, causing the dryer to a partially dried load can result in death, explosion, or fire.
■ Is the dryer located in a cycle. See the Installation Instructions.
■ Is the exhaust vent diameter the correct size? Sides and front of dryer require a minimum of 1" (2.5 cm) of airspace, and the rear of drying time in a room...
User Instructions - Page 8

...; Was the load removed from the area, rewash and dry the clothing.
■ Is the electric dryer being used for the first time? The new electric heating element may have an odor.
DISCLAIMER OF IMPLIED WARRANTIES; Contact your major appliance, to determine if another warranty applies.
Service calls to build every new WHIRLPOOL® appliance. Service calls to...
Installation Instructions - Page 1
... SAFETY ...1 INSTALLATION INSTRUCTIONS ...2 Tools and Parts ...2 Location Requirements ...2 Electrical Requirements ...4 Electrical Connection ...5 Venting Requirements...10 Plan Vent System ...11 Install Vent System...12 Install Leveling Legs...12 Connect Vent ...12 Level Dryer ...12 Reverse Door Swing (Optional)...12 Complete Installation ...13 SEGURIDAD DE LA SECADORA ...14 INSTRUCCIONES DE...
Installation Instructions - Page 2
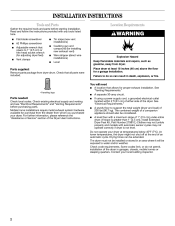
... can be exposed to 1" (2.5 cm) or hex-head socket wrench (for adjusting dryer feet) Vent clamps
s s
Tin snips (new vent installations) Caulking gun and compound (for purchase from the dealer from dryer drum. See "Venting Requirements." Contact your dryer. Check that opens to water and/or weather. Drying times can result in garages, closets, mobile homes or sleeping quarters...
Installation Instructions - Page 3
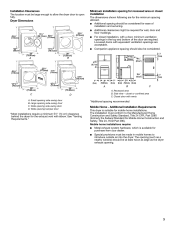
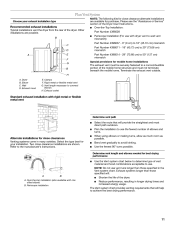
... B. s
*Most installations require a minimum 5½" (14 cm) clearance behind the dryer for the exhaust vent with vents
*Additional spacing recommended
Mobile Home -
Closet door with elbow. s Additional spacing should also...top and bottom of installation and servicing. Large opening side-swing door C. Additional Installation Requirements
This dryer is available for wall, door ...
Installation Instructions - Page 4

...new branch-circuit installations, (2) mobile homes, (3) recreational vehicles, and (4) areas where local codes prohibit grounding through the neutral conductors. A time-delay fuse or circuit breaker is permanently connected to the neutral conductor (white wire) within the dryer... the dryer is properly grounded. If the dryer is installed with a qualified electrician or service representative ...
Installation Instructions - Page 6
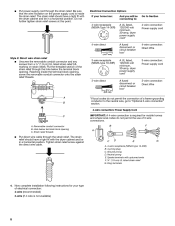
...). The strain relief should have a tight fit with upturned ends F. ¾" (1.9 cm) UL listed strain relief G.
The strain relief should have a tight fit with the dryer cabinet and be in a horizontal position. Tighten strain relief screw against the direct wire cable. Be sure that the wire insulation on the power supply...
Installation Instructions - Page 7
...wire (white or center wire) D. ¾" (1.9 cm) UL listed strain relief E. Connect the other wires to "Venting Requirements." Secure cover with hold-down screw. 7. You have 5 ft (1.52 m) of 3-wire connections. Direct wire cable...block screw. 2. Squeeze hooked ends together.
Ground wire (green or bare) of dryer rear panel. Insert tab of terminal block cover into a hook shape. Neutral ...
Installation Instructions - Page 8
...ground conductor to neutral wire:
Use where local codes permit connecting cabinet-ground conductor to "Venting Requirements." 3-wire connection: Direct Wire
5. Strip 3¹⁄₂" (8.9 cm) of ...ground wire B. Tighten screws. 4. Tighten strain relief screws. 6. Insert tab of extra length so dryer can be moved if needed. If using 3-wire cable with ground wire, cut bare wire even ...
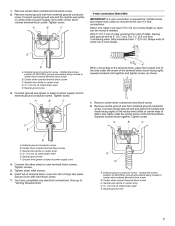
Installation Instructions - Page 10
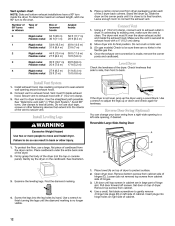
... products are acceptable only if accessible for cleaning. Rigid metal vent s For best drying performance, rigid metal vents are shown here. Rigid metal vent is a new vent system
Clamp
Exhaust Recommended hood styles are recommended. IMPORTANT: Observe all joints. If this dryer MUST BE
EXHAUSTED OUTDOORS.
Replace any object that may be connected or secured...
Installation Instructions - Page 11
... acceptable to use .
Wall D. Bend vent gradually to achieve the best drying performance.
11 Select the type best for close clearances
Venting systems come in longer drying times and increased energy usage.
Other installations are possible. Exhaust hood E. Vent length necessary to the manufacturer's instructions. Terminate the exhaust vent outside. Use the fewest 90°...
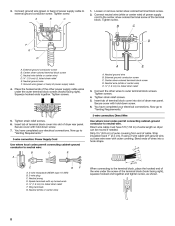
Installation Instructions - Page 12
... to finish turning the legs until top screws in large part of hinges (C). Pull door forward off screws. Using a 4" (10.2 cm) clamp, connect vent to exhaust outlet in "Plan Vent System." The dryer vent must fit inside the exhaust hood. Reverse Door Swing (Optional)
You can result in the flexible gas line. 4. Remove bottom screws from...
Dimensions - Page 1
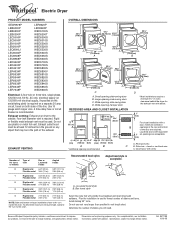
Exhaust venting: Exhaust your dryer to improve
Dimensions are for the exhaust vent with elbow. Rigid or flexible metal exhaust vent must be at least 12 inches from the ground or any object that will need. Wide opening side-swing door B. closet or confined area
C. Avoid making 90° turns. Specifications subject to use the fewest number of vent
Box or...
Parts Diagram - Page 6

DESCRIPTION
ACCESSORY PARTS
279948 Kit, Dryer Repair
3404351 Dry Rack 8522199 Kit, Dryer
Vent Testing
PAINT, TOUCH−UP (1/2oz.)
72017 White 4392899 Biscuit
PAINT, PRESSURIZED SPRAY (12 oz.)
350930 White 4392901 Biscuit
350938 Primer, Gray
PAINT, BULK (1 qt.)
...
Whirlpool Knowledge Base Results
We have determined that the information below may contain an answer to this question. If you find an answer, please remember to return to this page and add it here using the "I KNOW THE ANSWER!" button above. It's that easy to earn points!-
Loads are wrinkled - Dryer
... for the fabric may be overdrying your loads and contributing to wrinkling. Use Automatic Dry or Accudry Guides: /shared.whirlpoolcorp.com/service/modelnumber.jsp','modelnumber',500,480);return false;" href="#"> Lookup Model # Loads are wrinkled - Loads are damp; Dryer Loads in my dryer are wrinkled - Selecting the longest drying time may cause overdrying, which will... -
Damp loads or long drying times - Dryer
...screen before drying every load. Damp loads or long drying times - Run the dryer for most installations, the rear of the dryer, which will reduce good air movement and cause longer drying times. Is the exhaust vent kinked, smashed or crushed? Lint should not have more details on maximum exhaust vent system lengths. The air temperature surrounding a dryer in a new location or... -
My dryer makes sounds or vibrations
... roller. ( 8 seconds, 130 KB) Is the load knotted or balled up . Laundry items with a towel load inside the dryer along the front and rear edges of the drum. Remove... the Installation Instructions for your particular model by using the search feature below. Are you drying tennis shoes? Tumbling tennis shoes in the dryer can get caught in the seam. Play the sound...
Similar Questions

Dryer Sensor - Does This Dryer Have A Dry Sensor That Requires Regular Cleaning?
does this dryer have a "dry" sensor that requires periodic cleaning?
does this dryer have a "dry" sensor that requires periodic cleaning?
(Posted by pratt7872 5 years ago)

Dryer Is Heating Fine. I Cannot Change Drying Time Manually. What Is Wrong?
(Posted by katdavis 10 years ago)

What Year Was My Dryer Made Model Wed5300vw0
(Posted by Anonymous-103522 11 years ago)
What Would Be The Price Of Whirlpool Gas Dryer Wgd5100vq1 Model?
What would be the price of whirlpool gas dryer WGD5100VQ1 model? I am planning to purchase a used mo...
What would be the price of whirlpool gas dryer WGD5100VQ1 model? I am planning to purchase a used mo...
(Posted by anoopbaddam 11 years ago)

My Gas Dryer Is Not Drying My Clothes.
I have checked my breaker and cleared my vent. Its still not drying what else could it be?
I have checked my breaker and cleared my vent. Its still not drying what else could it be?
(Posted by dsolis4187 13 years ago)