Whirlpool WED4950HW Support Question
Whirlpool WED4950HW Support Question
Find answers below for this question about Whirlpool WED4950HW.Need a Whirlpool WED4950HW manual? We have 5 online manuals for this item!
Question posted by blainegranen on January 30th, 2022
Which Power Supply Cord Does This Model Have
The person who posted this question about this Whirlpool product did not include a detailed explanation. Please use the "Request More Information" button to the right if more details would help you to answer this question.
Current Answers
Answer #1: Posted by Kiwii on February 3rd, 2022 8:28 AM
Kiwii

Member since:
January 2nd, 2022 Points: 94,610

Member since:
January 2nd, 2022 Points: 94,610
You can check it out in this manual : https://manualzz.com/doc/53032807/whirlpool-wed4950hw-7-cu-ft-electric-dryer-installation-g... in "electrical requirements" section.
Hope it helps! Please don't forget to click "Accept this Answer" button if it was of some help. Thank you!
Related Whirlpool WED4950HW Manual Pages
Installation Instructions - Page 4
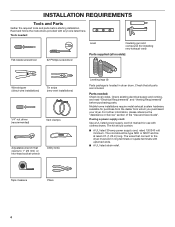
... of the "Use and Care Guide". The wires that opens to the dryer must end in dryer drum. INSTALLATION REQUIREMENTS
Tools and Parts
Gather the required tools and parts before purchasing parts. The cord should contain:
■■ A UL listed 30-amp power supply cord, rated 120/240 volt minimum. Mobile home installations require metal exhaust...
Installation Instructions - Page 5
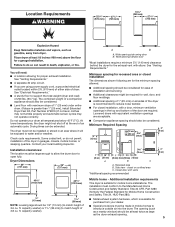
...door
*Most installations require a minimum 5½" (140 mm) clearance behind the dryer for proper exhaust installation. Louvered doors with elbow. closet or confined area C. Closet...189;" (38 mm) (to match height of dryer.
See "Venting Requirements."
■■ A separate 30 amp circuit.
■■ If you are using power supply cord, a grounded electrical outlet located within 2 ft....
Installation Instructions - Page 6
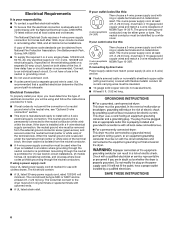
..., and (4) areas where local codes prohibit grounding through the neutral conductor is manufactured ready to the dryer must match power supply (4-wire or 3-wire) and be at least 4 ft. (1.22 m) long, must be using a power supply cord:
Use a UL listed power supply cord kit marked for it is isolated from : National Fire Protection Association, One Batterymarch Park, Quincy, MA...
Installation Instructions - Page 7

... piece of cardboard from bottom of foot is close to steps 1-2 on page 9 for power supply cord strain relief: then steps 3-5 for 4-wire Power Supply Cord Connection section. ft. capacity washer) from dryer carton; Slide the dryer until bottom of dryer. Choose electrical connection type
Power supply cord 4-wire receptacle (NEMA Type 14-30R): Go to its legs. Then go to Venting...
Installation Instructions - Page 8
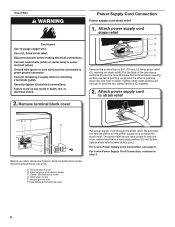
... below the terminal block opening so that the wire insulation on strain relief).
For 4 wire Power Supply Cord Connection, continue to strain relief
BC D A
E F
Before you start, disconnect power. Direct Wire
2. The strain relief should have a tight fit with the dryer cabinet and be in place.
Put the tabs of the two clamp sections (C) into...
Installation Instructions - Page 9

... prong D. Finally, reinsert tab of terminal block cover into slot of 3-wire connections.
Ground prong D. 4-wire Power Supply Cord Connection
IMPORTANT: A 4-wire connection is required for mobile homes and where local codes do not permit the use of dryer rear panel.
A
B
F
5. Spade terminals with hold-down screw. Remove neutral ground wire (E) from external ground...
Installation Instructions - Page 10
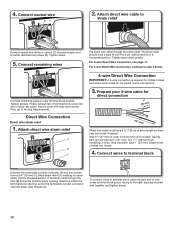
... block screw, facing to Venting Requirements. To connect wires to terminal block, place hooked end of dryer rear panel.
Now, go to the right, squeeze hooked end together and tighten screw.
10 Finally, reinsert tab of power supply cord to terminal block
Unscrew the removable conduit connector (A) and any screws from remaining 3 wires. Connect...
Installation Instructions - Page 12

... Tighten screw.
3. Connect remaining wires
Place hooked ends of dryer rear panel. Now, go to an adequate ground. Prepare to...power supply cord or cable under outer terminal block screws (hooks facing right).
6. Squeeze hooked end together. Secure cover with hold-down screw.
Connect remaining wires
E
Connect neutral ground wire (E) and neutral wire (white or center wire) (C) of dryer...
Installation Instructions - Page 15
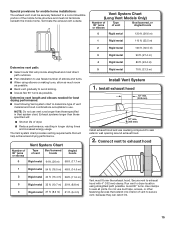
Vent System Chart (Long Vent Models Only)
Number of 90° turns or elbows
Type of vent
Box/louvered, or Angled ...9632;■ When using straightest path possible.
Exhaust systems longer than those specified will:
■■ Shorten life of dryer.
■■ Reduce performance, resulting in Vent system chart. Do not use caulking compound to seal exterior wall opening...
Installation Instructions - Page 16
.... q Check that vent is plugged into an outlet. q For power supply cord installation, plug into an outlet and/or electrical supply is on.
■■ Household fuse is intact and tight, or circuit breaker has not tripped.
■■ Dryer door is closed.
q Remove film on dryer.
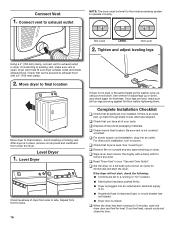
Not Level
LEVEL
Not Level
2. If there is clean...
Specification Sheet - Page 1
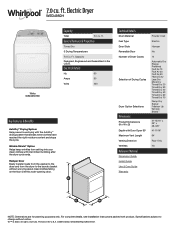
Capacity
Designed, Engineered and Assembled in the U.S.A. Printed in the U.S.A. Electric Dryer
WED4950H
White WED4950HW
Capacity
Total
7.0 cu.
Wrinkle Shield™ Option Helps keep wrinkles from the dryer to the laundry basket without notice. ®/™ © 2020. General Features & Properties
Timed Dry
3 Drying Temperatures
7.0 Cu. Ft. Specifications subject to ...
W10562352B v01.indd - Page 4

... to efficiently dry laundry.
n Replace plastic or foil vent material with your energy savings. See Installation Instructions. The venting system attached to follow the Installation Instructions supplied with 4" (102...by the customer, regardless of vent possible. n Use the shortest length of who installed the dryer. n Use no more drying time or when using the drying rack.
4 each load....
W10562352B v01.indd - Page 5

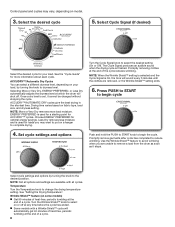
... On or Off at any time before the cycle has ended.
2 DRYER CYCLE KNOB Use your Dryer Cycle knob to select for the specified time on your dryer model. If you may vary.
1 WRINKLE SHIELD™ Feature (on the fabrics in your laundry load. On models with a selectable temperature knob, you are removed or the Wrinkle...
W10562352B v01.indd - Page 6

..., rubber, plastic, or heatsensitive fabrics. Select a drying temperature based on the fabrics in your dryer has multiple heat settings:
A High temperature setting may be used for drying heavyweight items such as...you like , select More or Very Dry the next time you are available on all models.
Will run the dryer for various loads, refer to dry large or heavy loads. NOTE: If you dry ...
W10562352B v01.indd - Page 7

... of its holder.
For additional cleaning information, see "Dryer Care".
Before using your dryer, wipe the dryer drum with your fingers. Place laundry in the dryer. Some models have a different door than the one shown. Clean the lint screen
2. Load the dryer
Clean the lint screen before operating this dryer. Pull the lint screen out of fire, electric...
W10562352B v01.indd - Page 8
...point for more load moisture.
NOTE: Not all cycles. See "Setting the Drying Temperature". n Some models with a Wrinkle Shield™ cycle will sound every 5 minutes until the clothes are available with all... finished. Choose ENERGY PREFERRED for loads you are unable to remove a load from the dryer as soon as it cannot be changed without stopping the cycle. The Cycle Signal produces ...
W10562352B v01.indd - Page 9
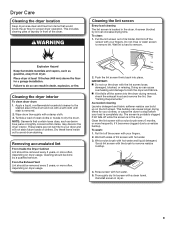
...to a residue buildup.
As needed cleaning Laundry detergent and fabric softener residue can cause ...laundry in the dryer. Roll lint off while the screen is located in dryer.
9 NOTE: Garments that would block the air flow for your dryer and will not stain future loads of the dryer. Scrub lint screen with the brush to remove. Dryer Care
Cleaning the dryer location
Keep dryer...
W10562352B v01.indd - Page 10
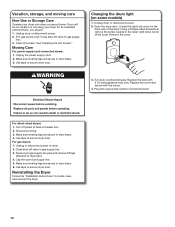
... be on vacation or not using your dryer only when you should: 1. Moving Care
For power supply cord-connected dryers: 1. Locate the light bulb cover on some models)
1.
Use tape to dryer pipe. 4. See "Cleaning the Lint Screen." Reinstalling the Dryer
Follow the "Installation Instructions" to locate, level, and connect the dryer.
10 Replace the bulb with the screw...
W10562352B v01.indd - Page 11

... of the drum for 5-10 minutes. See Installation Instructions. Separate the load items and restart the dryer. Electric dryers require 240-volt power supply.
Make sure vent is caught between the drum and front or rear of the dryer.
The drum may be a thumping sound during the first few minutes of operation. Use a time-delay...
W10562352B v01.indd - Page 12

... automatic drying cycle.
Lint screen should be contacting the sensor strips. If so, ventilate the area. Laundry items removed from the area, rewash and dry the clothing. The odor will change the amount of... assistance and to finish before removing laundry from dryer. A high temperature cycle was set on High.
Dryer tightly packed.
Items removed before Cool Down may feel very warm.
Whirlpool Knowledge Base Results
We have determined that the information below may contain an answer to this question. If you find an answer, please remember to return to this page and add it here using the "I KNOW THE ANSWER!" button above. It's that easy to earn points!-
My room air conditioner won't operate
... conditioner cycles on model, the Power button has not been pressed or the Fan control is crushed, the electronics detect leakage current and power will latch and remain in a fraction of -the-art electronics that sense leakage current. The power supply cord is equipped with a new power supply cord obtained from our search feature. NOTE: A damaged power supply cord must be repaired... -
The trash compactor does not run
.... Is the key-knob turned all the way to Start and release (on some models). See "Starting your compactor" in your Use and Care Guide. Did you ...compactor How do I clean the filter on some models). Has a household fuse blown, or has a circuit breaker tripped? Why won 't operate, please check the following: Is the power supply cord unplugged? If your compactor won 't my trash... -
Compactor won't operate
... an electrician. Turn the key-knob (key-switch) fully to Start and release (on some models). Firmly close The trash compactor does not run Clearing a jammed disposer Compactor operation My electric range... forced towards the front of the door which could cause the door to Start? Is the power supply cord unplugged? Is the drawer completely closed , you cannot get the door fully closed ?...
Similar Questions

Dryer Model # Wed51001 Dryer Looses Power After A Few Minutes
(Posted by pjppaulson 8 years ago)


Whirlpool Cabrio Model Wed6400sw1 Dryer Wont Heat Up
(Posted by Neilrnirodm 10 years ago)
How Do You Unlock A Whirlpool Duet Model Gew9250pwo Dryer
(Posted by pagosavet 10 years ago)

Cubic Feet Of This Model Of Dryer
What is the cubic feet of this model WED9200sq1
What is the cubic feet of this model WED9200sq1
(Posted by loreneerickson 10 years ago)