Whirlpool WED4800XQ Support Question
Whirlpool WED4800XQ Support Question
Find answers below for this question about Whirlpool WED4800XQ.Need a Whirlpool WED4800XQ manual? We have 4 online manuals for this item!
Question posted by mranalletti on April 7th, 2013
Which Way Do You Turn The Dryer Cycle Knob. Clockwise, Or Counter Clockwise?
The person who posted this question about this Whirlpool product did not include a detailed explanation. Please use the "Request More Information" button to the right if more details would help you to answer this question.
Current Answers
Related Whirlpool WED4800XQ Manual Pages
Owners Manual - Page 2
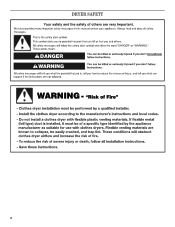
DRYER SAFETY
2
Owners Manual - Page 4

...™/Automatic Dry cycles to the dryer plays a big role in a vent system; The Energy Preferred cycle will be sure to efficiently dry laundry. With Timed Dry, the dryer runs the amount of...savings and enhanced fabric care from the entire length of who installed the dryer. During ACCUDRY™/Automatic Dry cycles, drying air temperature or moisture level are not covered by the customer...
Owners Manual - Page 5

...on the fabrics in your Dryer Cycle Knob to 40 minutes of heat-free, periodic tumbling at the end of a cycle.
Turn the WRINKLE SHIELD™ knob to select for your load.... ACCUDRY™ cycles.
3 WRINKLE SHIELD™ Feature (on the fabrics in your laundry load.
If you may vary.
1 DRYER CYCLE KNOB
Use your load. On models with a selectable temperature knob, you are ...
Owners Manual - Page 6
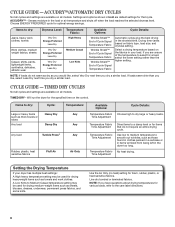
... or in items wrinkled from being left in the dryer too long. If you dry a similar load. NOTE: If loads do not require an entire drying cycle. CYCLE GUIDE -
Use low to medium temperature to dry:...setting for various loads, refer to dry large or heavy loads. TIMED DRY CYCLES
Not all models.
Will run the dryer for drying medium-weight items such as thick towels or robes
Any load
Heavy...
Owners Manual - Page 7
....
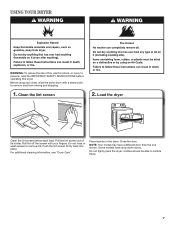
1. Roll lint off the screen with your dryer, wipe the dryer drum with a damp cloth to persons, read ...Dryer Care".
Load the dryer
Clean the lint screen before operating this dryer. Push the lint screen firmly back into place.
Do not tightly pack the dryer; Before using your fingers. NOTE: Your model may have drop down doors.
Place laundry in the dryer. USING YOUR DRYER...
Owners Manual - Page 8
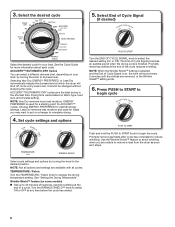
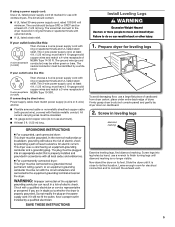
... load, by turning the knob to remove a load from the dryer as soon as it cannot be changed without stopping the cycle. Wrinkle Shield™ feature (on some models)
n Get up to
begin cycle
End O
of Cycle Signal produces an audible sound when the drying cycle is set, it stops.
8 Turn the WRINKLE SHIELD™ knob to select the...
Owners Manual - Page 9
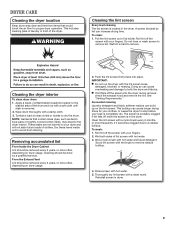
..., if it becomes clogged due to dry the drum. This includes clearing piles of laundry in the dryer. Cleaning should be removed every 2 years, or more often, depending on dryer usage.
2. Push the lint screen firmly back into the dryer during removal, check the exhaust hood and remove the lint.
Roll lint off the...
Owners Manual - Page 10

... supply line. 5. Remove the cover.
3.
Use tape to locate, level, and connect the dryer.
10 Reinstalling the Dryer
Follow the "Installation Instructions" to secure dryer door. See "Cleaning the Lint Screen." Open the dryer door. Turn bulb counterclockwise. Turn off valve to dryer. 2. Use tape to dryer pipe. 4. Changing the drum light (on the back wall of the...
Owners Manual - Page 11

...
Lint screen clogged with lint, restricting air movement. See "Cycle Guide." Fabric softener sheets blocking the grill. Make sure vent is not too long or has too many turns.
Check that the exhaust vent is not crushed or kinked.
PUSH to START knob until you do not feel air movement, clean exhaust system...
Owners Manual - Page 12
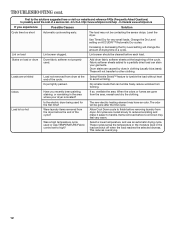
... easier to a partially dried load can tumble freely reduce wrinkles from the dryer before removing laundry from dryer at the beginning of the cycle? Allow Cool Down cycle to possibly avoid the cost of a service call...In U.S.A. Lint screen should be gone after the first cycle. When the odors or fumes are caused by dyes in...
Dimension Guide - Page 1
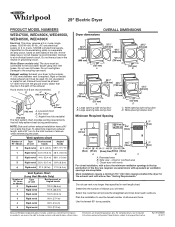
.... W10096987 02/2011
Do not use the fewest number of elbows when referemcing the chart. Do not overtighten.
Exhaust venting: Exhaust your dryer to the total number of elbows and turns. Rigid or flexible metal exhaust vent must be at least 12" (305 mm) from the ground or any object that will...
Installation Instructions - Page 2
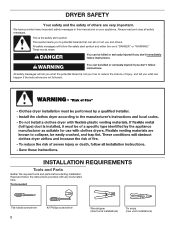
... the instructions provided with any tools listed here. This symbol alerts you to reduce the chance of others . Always read and obey all safety messages.
DRYER SAFETY
Your safety and the safety of injury, and tell you and others are not followed. WARNING
You can happen if the instructions are very...
Installation Instructions - Page 3

...: Use a UL listed power supply cord kit marked for proper exhaust installation. For further information, please reference the "Assistance or Service" section of an automatic cycle.
At lower temperatures, the dryer might not shut off at least 4 ft. (1.22 m) long.
1/4" nut driver (recommended)
Vent clamps
Adjustable wrench that connect to the...
Installation Instructions - Page 4

...exhaust vent with a 3-wire electrical supply connection. Additional installation requirements
This dryer is suitable for the minimum spacing allowed.
■■ Additional spacing should... permanently connected to an individual branch circuit. See "Venting Requirements."
If the dryer is installed with equivalent ventilation openings are acceptable.
■■ Companion appliance ...
Installation Instructions - Page 5
... more people to the dryer must match power supply ...ground wire), covered with clothes dryers. Screw in ring terminals or ...that connect to move and install dryer. If your outlet looks like ...dryer.
Now stand the dryer on cardboard.
2. Failure to ...dryer body (not console panel) and gently lay dryer down on its final location. Slide the dryer... of cardboard from dryer carton; Screw legs...
Installation Instructions - Page 7
.... For 4 wire Power Supply Cord Connection, continue to hold in a horizontal position.
CD
E
G
A. 4-wire receptacle (NEMA type 14-30R) B. 4-prong plug C. Spade terminals with the dryer cabinet and be in place. The strain relief should have a tight fit with upturned ends F. 3/4" (19 mm) UL listed strain relief G. E Remove center, silver-colored...
Installation Instructions - Page 8
...-colored terminal block screw (B). Neutral prong D. Remove center screw
B
Connect remaining wires to Venting Requirements. Finally, reinsert tab of terminal block cover into slot of dryer rear panel. Connect ground wire
A
F Connect ground wire (F) (green or bare) of power supply cord to Venting Requirements.
8 Tighten screw.
6. Neutral (white or center wire...
Installation Instructions - Page 14
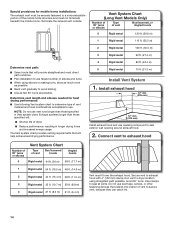
... and must fit over the exhaust hood. NOTE: Do not use fewest number of elbows and turns. ■■ When using straightest path possible. Avoid 90° turns. Run vent to dryer location using elbows or making turns, allow as much room
as possible. ■■ Bend vent gradually to avoid kinking. ■■...
Installation Instructions - Page 15
... cycle) for
20 minutes and start , check the following: ■■ Controls are set in place, remove corner posts and cardboard from side to
remove any tape remaining on power. For direct wire installation, turn on dryer.
Dupont De Nemours and Company.
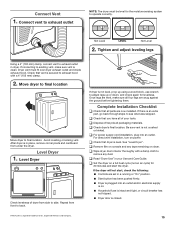
15 Connect Vent
1. Move dryer to final location
Move dryer to back. After dryer...
Installation Instructions - Page 16
.... Place towel on opposite side of dryer cabinet.
q When the dryer has been running for 5 minutes, open the dryer door and feel for the dryer. If you feel heat, turn off screws. If there is first used. Loosen (do not feel heat, cancel cycle and close the door. Large Side-Swing Door
1. The odor will go...
Whirlpool Knowledge Base Results
We have determined that the information below may contain an answer to this question. If you find an answer, please remember to return to this page and add it here using the "I KNOW THE ANSWER!" button above. It's that easy to earn points!-
What does the Moisture Control on my dehumidifier do and how do I operate it?
... does the Moisture Control on my dehumidifier do and how do I operate it is operating? Turn the control knob clockwise for less drying. Turn control knob counterclockwise for more drying. Does my dehumidifier need to maintain average humidity conditions. Turn control knob to "dry" to be serviced? NOTE: For the first few days of moisture in the... -
How does the dual-size element work on my electric ceramic glass cooktop?
...dual element combines both the inner and outer elements and is in and turn knob to cook using different sizes of cookware. Why is my cooktop not ...the same way as a regular element. The single element can be used in and turn the control knob counterclockwise from the OFF position to anywhere between HI and LO. To Use SINGLE: Push in and turn the control knob clockwise from the... -
How does the dual-size element on my ceramic-glass electric cooktop work?
... cooktop? The single element can be used in and turn knob to anywhere between Hi and Lo. Push in and turn the control knob counterclockwise from the Off position to Off when finished. ... and outer elements and is my cooktop not working Baked goods undercooked in and turn the control knob clockwise from the Off position to cook using different sizes of my electric modular downdraft ...
Similar Questions

Heat Comes Out, But Dryer Drum Does Not Come On, And No Motor Noise
could this be the motor, or switch / worked fine two days ago, now today when I turn on the dryer, I...
could this be the motor, or switch / worked fine two days ago, now today when I turn on the dryer, I...
(Posted by shervan 9 years ago)

Dryer Stops Before Clothes Are Dry
dryer stops before clothes are dry
dryer stops before clothes are dry
(Posted by shannonbolt 9 years ago)

Knob Not At Off When Clothes Done- Can Hear Ticking. Is It A Problem?
on energy preferred setting- after alarm beeps indicating clothes dry, knob not at off & can hea...
on energy preferred setting- after alarm beeps indicating clothes dry, knob not at off & can hea...
(Posted by Trmls17 9 years ago)

Dryer Over Heating
My dryer seems to be consistantly getting hotter each time a cycle is going. I have turned the tempa...
My dryer seems to be consistantly getting hotter each time a cycle is going. I have turned the tempa...
(Posted by focusworks08 10 years ago)

Dryer Whirlpool Wed4800xq
Is there a removeable panel on this dryer to allow it to pass through the door opening? thx
Is there a removeable panel on this dryer to allow it to pass through the door opening? thx
(Posted by ron4bc 10 years ago)