Whirlpool GSF26C5EXW Support Question
Whirlpool GSF26C5EXW Support Question
Find answers below for this question about Whirlpool GSF26C5EXW.Need a Whirlpool GSF26C5EXW manual? We have 4 online manuals for this item!
Question posted by ladybug23438 on September 27th, 2012
How Do I Remove The Water/ice Dispenser Face Plate
HOW DO I REMOVE THE WATER/ICE DISPENSER FACE PLATE SO I CAN THEN REPLACE THE DISPENSING PADS THAT YOU PUSH TO GET WATER AND ICE THRU THE DOOR
Current Answers
Related Whirlpool GSF26C5EXW Manual Pages
Dimension Guide - Page 1

... an ice maker, allow extra space at the back for 1⁄2" (1.25 cm) of installation, cleaning, or removing a light bulb, turn the control (Thermostat, Refrigerator or Freezer control depending on the model) to OFF and then disconnect the refrigerator from the electrical source.
handle
1
D overall
E F
90˚
90˚
Handle and door style will fall...
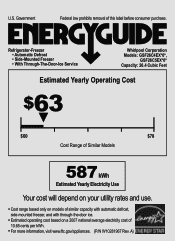
Energy Guide - Page 1
A) Government
Federal law prohibits removal of
10.65 cents per kWh.
• For more information, visit www.ftc.gov/appliances. (P/N W10281967 Rev. U.S.
Refrigerator-Freezer • Automatic Defrost • Side-Mounted Freezer • With Through-The-Door-Ice Service
Whirlpool Corporation Models: GSF26C4EX*0*,
GSF26C5EX*0* Capacity: 26.4 Cubic Feet
Estimated Yearly Operating Cost
$63 ...
Use & Care Guide - Page 2
.... ■ Disconnect power before servicing. ■ Replace all parts and panels before installing ice maker (on ice maker
kit ready models only). ■ Use a sturdy glass when dispensing ice (on some models). ■ Do not hit the refrigerator glass doors (on some models). These products can result in accordance with warm water when they will sit for cleaning...
Use & Care Guide - Page 3

...Door Removal
6 Top Right Hinge
A
A
Do Not Remove Screws A
3 Wiring Connection
A A
Do Not Remove Screws A
7 Bottom Hinge
AB
CD
EF
A. Alignment Screw
3 Unplug refrigerator or disconnect power. Routing Plate C. Wiring Plugs
2 Water Dispenser... installation. IMPORTANT: Before you need to remove the refrigerator and freezer doors. Face of your home, measure the doorway of...
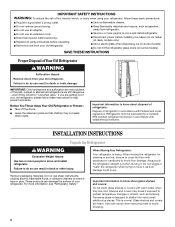
Use & Care Guide - Page 4
... top hinges are replaced when reinstalling the hinges. Open both water tubes through the hinge. Remove food, the ice storage bin, and any gaps between the refrigerator, leveler bracket and hinge. See Graphic 2. ■ Press the colored outer ring against the face of obstructions, then gently pull one water tube through the door hinge. 5. The water tubing and wiring...
Use & Care Guide - Page 5

... the product. This will be taut. See Graphic 9. 3.
Handle Installation and Removal
Style 1 - See Graphic 3.
■ Gently route the large wiring bundle (with the setscrews facing the freezer. See Graphic 3. Replace the ice storage bin and any adjustable door or utility bins.
9. Move the refrigerator into a grounded 3 prong outlet.
This makes it easier to the screw...
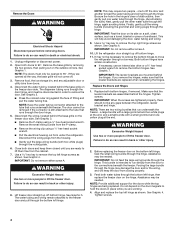
Use & Care Guide - Page 6
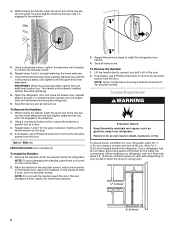
...-turn . Slide-on the freezer door. Remove the handles, which are packed inside the refrigerator. this extra tightening.
8. To Remove the Handles: 1. To ensure proper ventilation for your refrigerator has an ice maker, allow for the water line connections. When installing your model) to allow the doors to do so can damage the door. Repeat steps 1 and 2 for 1" (2.54...
Use & Care Guide - Page 7
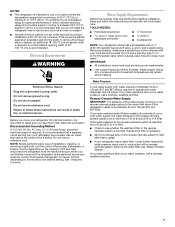
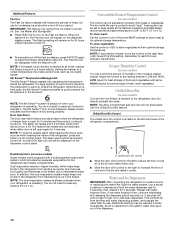
...remove the crisper pans is desired, an additional 18" (45.72 cm) of cabinet width is required, so a total cabinet opening width of between 60°F (15°C) and 90°F (32°C). Replace the filter if necessary.
■ Allow the storage tank on the model) to operate the water dispenser and ice maker.
Water...tubing. NOTES: ■ This refrigerator is intended for use an ...
Use & Care Guide - Page 8
...D
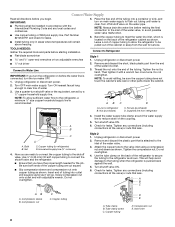
A. Ferrule (purchased) D. Bulb B. Tube clamp B. Connect Water Supply
Read all directions before you turn the ice maker OFF. 1. Bend the copper tubing to the refrigerator as shown.
Nut
C. Check for leaks. Remove and discard the short, black plastic part from refrigerator
A B
C
D
A.
Line to clear line of the refrigerator cabinet as shown. Style 2 1. Leave a coil of...
Use & Care Guide - Page 9
....
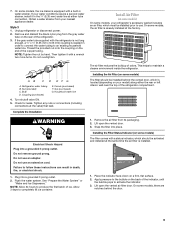
5. Check for leaks. Do not remove ground prong. Flush the water system. NOTE: Allow 24 hours to completely fill ice container. Allow 3 days to produce the first batch of the indicator, until
the bubble pops to maintain a cleaner environment inside the refrigerator. This helps to activate the indicator. 3.
REPLACE
MONTHS
1. Apply pressure to the bubble...
Use & Care Guide - Page 10
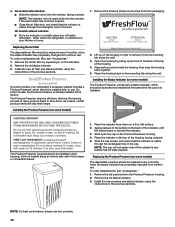
... the mounting tab along an interior side wall of the housing, facing outward. 5. Place both pouches inside the refrigerator, or elsewhere in the top of the crisper or convertible drawer....installed. Remove the old pouches from white to red. On models with water for 15 minutes.
On models without notches:
■ Store the indicator in the previous sections. To order a replacement air ...
Use & Care Guide - Page 11

...off automatically and enter "sleep" mode when the control buttons and dispenser pads have finished viewing (and adjusting if desired) the refrigerator set points, press and hold the LOCK and FILTER
buttons at...Press LOCK to raise the set point, or press FAST ICE to lower the set point.
■ When you first install your refrigerator and freezer controls are set point range for the freezer ...
Use & Care Guide - Page 12
... food starts to freeze, move the control to depress and hold the water dispenser pad for 5 seconds, then release it colder. Convertible Drawer Temperature Control
(on some models) Some models come equipped with the Chilled Door Bin feature. Water and Ice Dispensers
IMPORTANT: After connecting the refrigerator to press any setting between adjustments. The alarm sound will repeat...
Use & Care Guide - Page 13
... controls and dispenser pads.
This may continue to make the ice dispense faster or in 8 seconds or less, the water pressure to the refrigerator meets the minimum requirement.
■ If it takes longer than 8 seconds to dispense 1 cup of water, the water pressure to cubed, a few seconds after removing the glass from the dispenser decreases, it appears that your dispenser lights are...
Use & Care Guide - Page 14
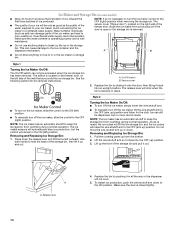
...the covering panel up from producing ice if the door is open or the storage bin is removed.
■ Do not use ...dispenser will raise the wire shutoff arm to the OFF (arm up ) position and listen for bin removal instructions.
■ To turn off the ice maker, lift the wire shutoff arm to the ON (left side of the water supplied to the OFF (right) position. Replace the bin by pushing...
Use & Care Guide - Page 15
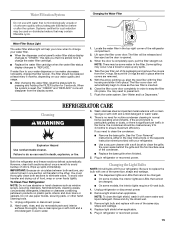
...: NOTE: Do not use paper towels, scouring pads, or other . See the "Door Removal" instructions, either in the User Instructions or the separate instruction sheet provided with your refrigerator. Replace light shield when applicable. 5. The filter should be used on your water filter.
■ When the dispenser control panel's water filter status display changes to "ORDER," this tells...
Use & Care Guide - Page 16
... 3 prong outlet.
See the "Door Removal" instructions, either compartment more quickly. fans/compressor adjusting to this reduction, you may be heard when ice melts during
defrost cycle ■ Popping - Push bin or shelf back in the User Instructions or the separate instruction sheet provided with your old model. The refrigerator may run even longer if...
Use & Care Guide - Page 17
... to begin . Remove ice from food? This can cause discolored or off-flavored ice.
■ Ice stored too long? Turn the water shutoff
valve fully open ?
Wash ice bin. Allow 24 hours for ice production to NIGHT LIGHT or AUTO? Change the ice button from "crushed" to enter refrigerator. See "Water and Ice Dispensers."
■ Is the dispenser light set the dispenser light to...
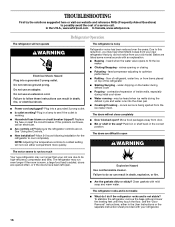
Use & Care Guide - Page 18
... source line.
■ New installation? Close the door firmly. Allow 24 hours after installation for the
water supply to cool completely.
■ Recently dispensed large amount of water.
■ Refrigerator connected to a water supply and the supply shutoff valve turned on? The first glass of water after releasing the dispenser lever/pad.
■ New installation? ■ Has the...
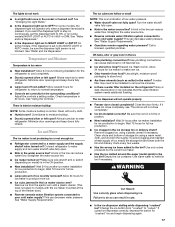
Use & Care Guide - Page 19

...
50,000/L min. 107 to 22°C).
See "Water and Ice Dispensers" or "Water Dispenser."
■ These contaminants are subject to check the status of unknown quality without notice.
■ The water system must be used on disinfected waters that operational, maintenance, and filter replacement requirements be carried out for water leaving the system, as advertised.
■ Use...
Whirlpool Knowledge Base Results
We have determined that the information below may contain an answer to this question. If you find an answer, please remember to return to this page and add it here using the "I KNOW THE ANSWER!" button above. It's that easy to earn points!-
Water dispenser not working/stopped - Bottom freezer/French door refrigerator
... 9 ounces of continuous dispensing, the dispenser will need to the dispenser. Why has my water dispenser slowed or stopped? The water pressure to the reverse-osmosis system should deliver at least 40-60 psi (275-414 kPa). If the refrigerator also has a water filter, remove it for a problem with Ice bin in some households. French Door with the filter by... -
Operating the dispenser controls (Measured Fill dispensing system control with a display screen) - Side by side refrigerator
...is not similar to dispense. You can dispense water by side refrigerator To dispense water, press a sturdy container against the water dispenser pad or place the container below the water dispenser and press the Water button. To stop dispensing ice, remove the container from the dispener pad or press the Water button a second time. Side by side refrigerator Ice dispenser not working... -
Operating the fast fill dispensing system controls - Side by side refrigerator
... to change from red to green ("Replace" to "Good") when the system is not similar to change your water dispenser or ice maker noticeably decreases. While dispensing water, the digital display will help you know when to your refrigerator's control type, see Operating the dispenser controls - In addition to the size of water in ounces or liters. Operating the...
Similar Questions

Ice Maker Works Fine But No Water From Door
Ice maker works fine but no water from door
Ice maker works fine but no water from door
(Posted by rmoff13 1 year ago)

Ice Maker Issue
My ice maker has quit working but the water dispenser is working. How can I fix it?
My ice maker has quit working but the water dispenser is working. How can I fix it?
(Posted by Tlroberts 6 years ago)

Ice Maker Not Making Ice. Built Into Freezer Door. Everything In Place Water Is
(Posted by jdf7734 9 years ago)

How To Replace Ice Maker In Whirlpool Refrigerator Model Gsf26c5exy00
(Posted by afifsewcut 10 years ago)

How Do I Remove Water/ice Dispenser Front Panel?
Whirlpool Model#ED5FBGXWS00
Whirlpool Model#ED5FBGXWS00
(Posted by april78 12 years ago)