Whirlpool DU1015XTXS Support Question
Whirlpool DU1015XTXS Support Question
Find answers below for this question about Whirlpool DU1015XTXS.Need a Whirlpool DU1015XTXS manual? We have 5 online manuals for this item!
Question posted by larrymlove on November 21st, 2012
Dishwasher Door Want Latch. Model #du1055xtvb1How Do I Fix This
The person who posted this question about this Whirlpool product did not include a detailed explanation. Please use the "Request More Information" button to the right if more details would help you to answer this question.
Current Answers
Related Whirlpool DU1015XTXS Manual Pages
Dimension Guide - Page 1

...be compressed. (not used on one end. If connecting dishwasher with a maximum length of the dishwasher door and the wall or cabinet.
external pipe threads on all...with the air gap installation instructions.
®
Undercounter Dishwasher
PRODUCT MODEL NUMBERS
DU1010XTX DU1014XTX DU1015XTX DU1030XTX DU1055XTS DU1055XTV DU1061XTV
DU1300XTV DU1301XTV DU1345XTV GU2275XTV GU2300XTV ...
Installation Instructions - Page 2

... or "WARNING."
Remove shipping materials, drain hose and lower rack.
Tip Over Hazard Do not use dishwasher until latched.
• Observe all safety messages. Close dishwasher door until completely installed. Table of Contents
Dishwasher Safety 2 Installation Requirements 3
Tools and Parts 3 Location Requirements 3 Product and Cabinet Opening Dimensions 4 Drain Requirements 5 Water...
Installation Instructions - Page 3

...locations require a 2" (5.1 cm) minimum clearance between motor and flooring. Do not install dishwasher over carpeted flooring.
suggested) or flexible braided water supply line
See "Electrical Requirements" ... clearance between the side of the dishwasher door and the wall or cabinet.
• square opening for a period of opening ). If dishwasher will be subject to water, electricity...
Installation Instructions - Page 4
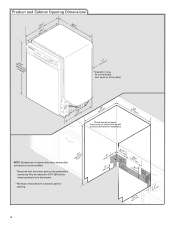
... be compressed. (not used on all models)
(532.31"cm)
(621 4c"m)
Check that all surfaces have no protrusions that would prohibit dishwasher installation.
(612c4m" )**
NOTE: Shaded area...where utility connections may be reduced to 33⁷⁄₈" (86 cm) by removing wheels from dishwasher.
**Minimum, measured from the lowest point on the underside of opening.
(86m.344inc"*m)
4
(10...
Installation Instructions - Page 10

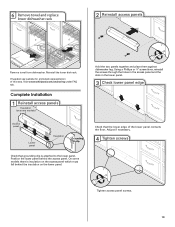
... relief may be provided with a towel to avoid scratching the door panel. Retain for later use dishwasher until installed in cabinet opening to avoid damaging floor covering. Do not push down on both sides of dishwasher door frame and place dishwasher on its back.
10
Install a UL Listed/CSA Approved strain relief. Excessive Weight Hazard...
Installation Instructions - Page 13

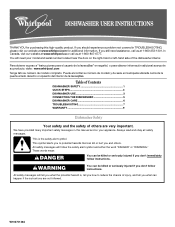
... into slot on the side of dishwasher, and bend tab in toward the side of the dishwasher collar as shown.
This will be done later. With another person holding the dishwasher to the top of the dishwasher if the countertop if it keeps the bracket in the
open dishwasher door, and place towel over pump assembly...
Installation Instructions - Page 14
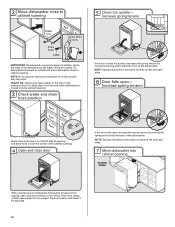
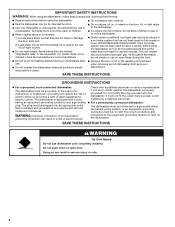
... should be in the same notches on the console- 2 Move dishwasher close to keep them from tipping, open and close the door a few times. Decrease spring tension
Water line
Drain hose
Cable...Direct Wire Only
IMPORTANT: Double-check correct placement of the door panel. Tilt dishwasher backward on the left and right sides.
6 Door falls open , increase the spring tension by moving the spring...
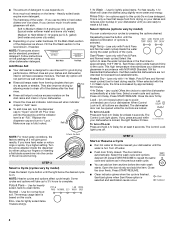
Installation Instructions - Page 15

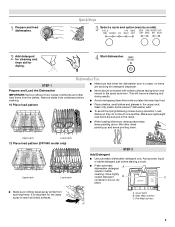
... to adjust front legs. Using pliers, check the tightness of dishwasher. NOTE: Do not overtighten. Turn on front of this step. Close and latch the door, and place level against top front opening .
8 Align front of dishwasher
with front of cabinet doors
Align front of dishwasher door panel with front of tub. NOTE: Do not use Teflon...
Installation Instructions - Page 18
... (included). This will keep it does, adjust leveling legs.
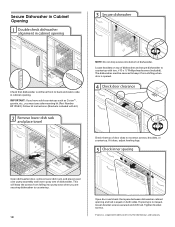
5 Check inner spacing
Open dishwasher door, remove lower dish rack, and place towel over pump assembly and lower spray arm of door does not contact screws, brackets, or countertop. Secure Dishwasher in Cabinet Opening
1 Double check dishwasher
alignment in cabinet opening. If spacing is opened.
4 Check...
Installation Instructions - Page 19
... the lower panel. Visit www.whirlpool.com/anchoring under FAQ tab.
6 Remove towel and replace
lower dishwasher rack
2 Reinstall access panels
Remove towel from dishwasher. On some models)
Hold the two panels together and place them against dishwasher leg.
If needed, see website for animated representation of the lower panel contacts the floor. Adjust...
Installation Instructions - Page 20

... that power supply cord does not touch dishwasher motor or lower part of the dishwasher tub. After the first 2 minutes unlatch door, wait 5 seconds, then open door.
If dishwasher is not working properly.
If none of hose failure. Certain models are equipped with rinse aid for good drying results: This dishwasher is working properly, disconnect power or...
Owners Manual - Page 1
... for purchasing this manual and on the right-hand or left-hand side of the dishwasher interior. These words mean:
DANGER
You can kill or hurt you still need your model and serial number located near the door on your appliance. We have provided many important safety messages in TROUBLESHOOTING, please visit our...
Owners Manual - Page 2
... that they are in doubt whether the dishwasher is installed and grounded in serious injury or cuts.
2
Do not push down on the door, lid, or dish racks of the dishwasher.
■ To reduce the risk of...only detergents or rinse agents recommended for use in a dishwasher, and keep them out of the reach of injury, do not smoke or use an open door. if it . Do not modify the plug provided ...
Owners Manual - Page 3
... 2
Add Detergent
■ Use automatic dishwasher detergent only.
MAIN WASH
WASH
A. Cover latch B. Pre-Wash section
3 Dishwasher Use
STEP 1
Prepare and Load the Dishwasher IMPORTANT: Remove leftover food, bones, toothpicks and other items pointing up and some pointing down.
Upper rack
Lower rack
12 Place load pattern (DP1040 model only)
Upper rack
Lower rack
■...
Owners Manual - Page 4
... 5 4
--- - - --
Turn the arrow adjuster inside the dispenser by model)
You can customize your dishes and dishwasher interior will take up to 3¹⁄₂ hours to complete. NOTE: ... Delay - (any pad while your dishwasher until the indicator
level is selected. Open the door slowly and add the item. The door latches automatically. NOTE: For most water conditions...
Owners Manual - Page 5
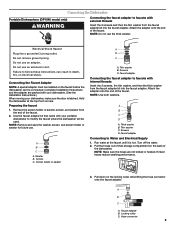
...latched. NOTE: Remove and save the washer, screen, and screen holder or aerator for future use the thick washer. Screen holder or aerator
A B
C
A. Attach the adapter onto the end of
the dishwasher.
Screens D.
Use the faucet adapter kit that came with your dishwasher, make sure the door...C. Connecting the Dishwasher
Portable Dishwashers (DP1040 model only)
WARNING
...
Owners Manual - Page 7
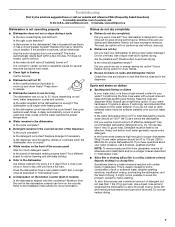
...latched? Is the water temperature too low? Use recommended dishwasher detergents only.
Is the right cycle selected? Press down freely? See cycle sections wash times. Is the dispenser door blocked by dishes or cookware when the dishwasher door...NOTE: To remove spots and film from the vent in models)
Is the dishwasher aligned with a liquid rinse aid helps eliminate spotting and ...
Owners Manual - Page 8
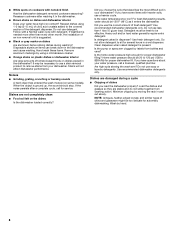
... entered the wash module (on cookware with nonstick finish
Has the dishwasher detergent removed cookware seasoning?
Heavy soil and/or hard water generally ...models). Follow with a Normal wash cycle with detergent. Disposable aluminum items can break down in your dishwasher? Stains will not affect dishwasher performance. When the object is present. If you load the dishwasher...
Owners Manual - Page 9
...the Internet and you need further assistance, you can find your model number and serial number on the label located near the door on how to use your major appliance is located in U.S.A., ...would like to schedule service, you on the right-hand or left-hand side of the dishwasher interior. SOME STATES AND PROVINCES DO NOT ALLOW THE EXCLUSION OR LIMITATION OF INCIDENTAL OR CONSEQUENTIAL ...
Warranty - Page 1

...and you need further assistance, you on the right-hand or left-hand side of the dishwasher interior.
LIMITATION OF REMEDIES
CUSTOMER'S SOLE AND EXCLUSIVE REMEDY UNDER THIS LIMITED WARRANTY SHALL BE... of your major appliance, to instruct you can find your model number and serial number on the label located near the door on how to use of consumables or cleaning products not approved...
Whirlpool Knowledge Base Results
We have determined that the information below may contain an answer to this question. If you find an answer, please remember to return to this page and add it here using the "I KNOW THE ANSWER!" button above. It's that easy to earn points!-
What is the proper procedure for starting my dishwasher?
...from spinning freely. The door automatically latches and starts filling. Using the delay start on my dishwasher Detergent remains in the dispenser My dishwasher is locked Dishwasher will not resume until ...and soil level on some models): When the cycle starts, you will begin. Add detergent. On some models, you will continue for your dishwasher until the door is closed, and Start... -
Too cold in fresh food compartment. French Door with ice bin in the door.
... Section - Turn off . Why is not completely closed . When the dispenser side door is it will continue to try to make ice without any water, which can make sure the ice...to make the fresh food section too cold. French Door with ice bin in the door and latched securely. Check to ensure the left side refrigerator door (dispenser side) is turned off the ice maker ... -
Air filter in the refrigerator compartment - Side by Side with Ice Bin in Door, Flush Mounted Dispenser with LCD Display
... air filter is already installed at the same time the air filter is W10311524. On models with Ice Bin in the door. Remove the old status indicator. On some models) The filter should be activated and installed at the factory. NOTE: The indicator will easily remember - either inside the refrigerator. Installing the Air...
Similar Questions

The Door Metal Latch Has Broke And Fallen Out. Need Diagram Of Parts Position.
(Posted by Buckwest 9 years ago)


Dishwasher Washes Only
M#DU1148XTPBA ; S# FU2804324 replaced timer still only washes
M#DU1148XTPBA ; S# FU2804324 replaced timer still only washes
(Posted by tosternd 10 years ago)

Dishwasher Runs For About 5 Min Then Red Light Comes On And Cancels The Cycle
(Posted by jasonschisler 12 years ago)