Waring MX1050XTXP Support Question
Waring MX1050XTXP Support Question
Find answers below for this question about Waring MX1050XTXP.Need a Waring MX1050XTXP manual? We have 4 online manuals for this item!
Question posted by Anonymous-154603 on September 24th, 2015
Clean The Blade Assembly
How do you remove the blade assembly for cleaning on MX1050XT11
Current Answers
Answer #1: Posted by TechSupport101 on September 25th, 2015 7:05 AM
TechSupport101

Member since:
May 24th, 2013 Points: 12,171,305

Member since:
May 24th, 2013 Points: 12,171,305
Please see 'Cleaning and Sanitizing instructions' off the manual here https://www.helpowl.com/manuals/Waring/MX1050XTXP/224479 for the best walk through on cleaning and caring for the blender.
Related Waring MX1050XTXP Manual Pages
Instruction Manual - Page 2
... two-piece cover. A rubber scraper may result in water or other liquids.
4. This appliance is not intended for examination, repair, or electrical or mechanical adjustment.
7. Blades are sharp. NOT FOR WATERJET CLEANING.
16. Never remove blender jar from outlet when not in the blender jar or any blending container may be used only when the...
Instruction Manual - Page 3
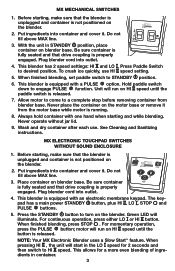
... to STANDBY position.
6. For continuous operation, press either LO or HI button. See Cleaning and Sanitizing instructions. Place container on the blender.
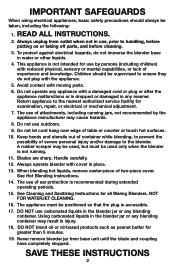
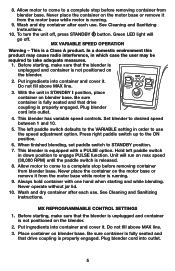
2. MX Mechanical SwitchES
1. MX ELECTRONIC TOUCHPAD SWITCHES WITHOUT SOUND ENCLOSURE
1. Do not fill above MAX line.
3. This blender has 2 speed settings: HI and LO . Wash and dry container after each use...
Instruction Manual - Page 4
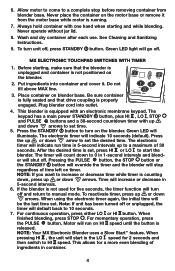
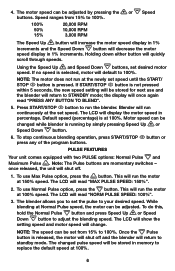
... STOP button or the STANDBY button will override the timer and the blender will stop before removing container from the motor base while motor is released. Note: If unit... has been turned off . 6. Allow motor to come to 0 in 1-second intervals and blender will turn off , press STANDBY button. See Cleaning...
Instruction Manual - Page 5
...come to engage pulse function. See Cleaning and Sanitizing Instructions. Do not fill above MAX line.
Plug blender cord into container and cover it from blender base.
Place container on max ...be required to a complete stop before removing container from the motor base while motor is running .
9. Never place the container on blender base. Wash and dry container after ...
Instruction Manual - Page 6
...seconds, the new speed setting will default to standby mode. The changed pulse speed will be changed while blender is selected, motor will be adjusted by simply pressing Speed Up or Speed Down button.
6. 4. ...NORM PULSE SPEED: 100%".
3. If no speed is running by pressing the or Speed buttons. Blender will run continuously at 100% speed. Motor speed can be set from 15% to run at ...
Instruction Manual - Page 7

... Program buttons. time = 30 seconds Section 2: speed = 100%; REPROGRAMMABLE STATIONS
1. Once the blender counts down to meet their needs. For example,
can add 4 new programs to 0, the ...running time. The factory-set values.
The LCD will run any of the above preset programs, blender must be in standby mode.
3. The motor will show time remaining.
time = 20 seconds ...
Instruction Manual - Page 8
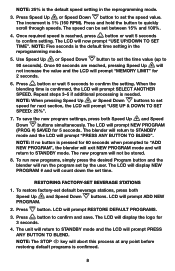
... ANY BUTTON TO BLEND". To run new programs, simply press the desired Program button and the blender will return to set between 15% and 100%.
4. RESTORING FACTORY-SET BEVERAGE STATIONS
1. Press .... The LCD will display the logo for 60 seconds when prompted to "ADD NEW PROGRAM", the blender will exit new program mode and will run the program set the speed value. buttons. Use Speed...
Instruction Manual - Page 9
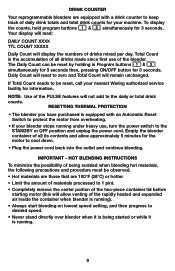
... 100°F (38°C) or hotter.
• Limit the amount of materials processed to 1 pint.
• Completely remove the center portion of the rapidly heated and expanded air inside the container when blender is running .
9 The Daily Count can be reset by holding in Program buttons
&
simultaneously for 3 seconds then, pressing ON...
Instruction Manual - Page 10
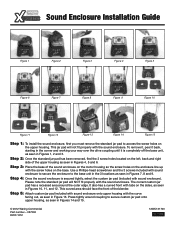
..., peel it is secured tightly, select the custom jar pad (included with sound enclosure). Step 2: P lace the base of the blender. INSTALLING THE SOUND ENCLOSURE
NOTE: If you have finished removing the standard jar pad OR if your way over the drive coupling until it back, starting in the corner and working...
Instruction Manual - Page 11
.... Open sound enclosure and remove blender container. 2. Remove front portion of the blade assembly.
TURNING OFF YOUR BLENDER
Whether your blender and follow these steps: 1.
The following washing, rinsing, and sanitizing solutions, or their equivalents, may be used again within a period of 1 hour.
• Wash and rinse container after each use.
• Clean and sanitize motor base prior...
Instruction Manual - Page 12
... from running into motor base by wringing all excess moisture from blade assembly by an authorized service representative.
12 To Wash and Rinse Container: 1. REMOVE CONTAINER FROM MOTOR BASE. Scrub and flush out the container interior and lid to air-dry before using clean rinse water in fresh washing solution. Empty container. 2. Fill container...
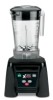
Spec Sheet - Page 1
WARING® COMMERCIAL HI-POWER BLENDERS
Features
• Heavy-duty 3.5 peak input HP motor
• Great for smoothies, bar drinks, soups, salsas, sauces, desserts, dressings and more
• Up to 45,000 RPM (bare motor speed)
• One-piece dishwasher-safe removable jar pad
• Limited 3 Year Motor and 2 Year Parts and Labor...
Spec Sheet - Page 2

...Blenders
• Great for smoothies, bar drinks, soups, salsas, sauces, desserts, dressings, and more
• Heavy-duty 3.5 peak input HP motor
• U p to 45,000 RPM (bare motor speed)
• One-piece dishwasher-safe removable...
MX1000XTS
Heavy-duty 64-oz. stainless steel container
• Easy-to -clean electronic membrane keypad with high, low, and pulse functions
• Sound ...
Spec Sheet - Page 3

.... BPA-free copolyester container
CAC93
48-oz. stainless steel container
MX1200XTX
SE1000 Large sound enclosure
Retrofits all blenders in Waring® Commercial
Xtreme Series
MX1300XTX
MX1500XTX
• Variable speed controls available from 1,500 to -clean electronic membrane keypad with blue backlit LCD screen
• Max pulse with the following jars, sound enclosures...
Spec Sheet - Page 4

...7464 • Fax (860) 496-9008 www.waringcommercialproducts.com
13WC130264 PG-30236
@WaringProducts1 BPA-free copolyester container
64-oz. containers
Replacement Blade Assembly
Spanner Wrench
Hi-Power Blender Series
Listings
ETL, NSF
Horsepower (Peak Input)
3.5
Warranty
Limited 3 Year Motor and 2 Year Parts and Labor
Std Pkg.
1 1 1 1 1 1 1 1 1 1 1 1 1 1 1 1 1 1
Std Pkg.
1
1
1 1
1
1 1
Ship...
Sound Enclosure Installation Guide - Page 1
...on the enclosure line up
with the screw holes on the left, back and right
side of the blender.
The correct custom jar pad has a recessed area around coupling to secure custom jar pad onto ...upper housing, as seen in Figures 7, 8 and 9. Step 2: Once the standard jar pad has been removed, find the 3 screw holes located on the base. Use a Phillips-head screwdriver and the 3 screws included...
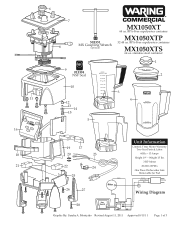
Parts List and Exploded Diagram - Page 1
...
Limited 3 Year Motor Warranty Two Year Parts & Labor 60Hz - 13 Amps
Height 19" - Weight 15 lbs. 3 HP Motor
30,000+ RPM's One Piece Dishwasher Safe
Removable Jar Pad
Brown Green/Yellow
Blue
Wiring Diagram
Key
Main Board
28
Board
M- Montysko Revised August 11, 2011 Approved 8/11/11
Page 1 of 3 BPA-Free...
Parts List and Exploded Diagram - Page 2

Catalog
Model
MX1050XT MX1050XT11
MX1050XTP MX1050XT21
MX1050XTS MX1050XT31
Illustration # Part #
1
026425-E
2
026424
3
503347
4
503346
5
503348
6
028538
7
026442
8
028100
9
026437
10
028032-09
11
028541
12
026439
13
026453
14
...
Parts List and Exploded Diagram - Page 3

...Holder Nut
Notes for 503346 :
Torque 100-125 in flats.
Kit
30 35
031060
Blending Assy. Catalog
Model
MX1050XT MX1050XT11
MX1050XTP MX1050XT21
MX1050XTS MX1050XT31
Illustration #
29 30 31 32 33 34 35 36 37 38 39 40
Part #
...06790 Tele. 1-800-269-6640 Fax 860-496-9017 www.waringproducts.com
Description
Blade Assy. Stainless Steel Container
Revised August 10, 2011
Page 3 of 3
Similar Questions

How Does The Blade Assembly Go Together?
I took the blade assembly apart to replace the bearings. I don't remember in which order the bearing...
I took the blade assembly apart to replace the bearings. I don't remember in which order the bearing...
(Posted by qerobinson 9 months ago)
Where Can I Get A Diagram Of The Different Parts Making Up The Blade Assembly ?
Where can I get a diagram of the different parts making up the blade assembly ?
Where can I get a diagram of the different parts making up the blade assembly ?
(Posted by qerobinson 9 months ago)

Looking Down Into Bowl Which Way Does Blade Rotate
(Posted by gilbertperfecto 3 years ago)

Blades Won't Spin
Hello I have a waring blender model #mx1100xt41 blender turns in but blades don't spin all the time
Hello I have a waring blender model #mx1100xt41 blender turns in but blades don't spin all the time
(Posted by Albers1981 4 years ago)

Blender Won't Turn On With Switch
The blender toggle switch won't turn blender on. I've only used blender about ten times.
The blender toggle switch won't turn blender on. I've only used blender about ten times.
(Posted by maryjmichels 8 years ago)