2010 Volvo XC60 Support Question
2010 Volvo XC60 Support Question
Find answers below for this question about 2010 Volvo XC60.Need a 2010 Volvo XC60 manual? We have 1 online manual for this item!
Question posted by pekens on February 3rd, 2014
How To Replace Light Bulb In 2010 Volvo Xc60
The person who posted this question about this Volvo automobile did not include a detailed explanation. Please use the "Request More Information" button to the right if more details would help you to answer this question.
Current Answers
Related Manual Pages
Owner's Manual - Page 1

VOLVO XC60
Owner's Manual
Web Edition
Owner's Manual - Page 6

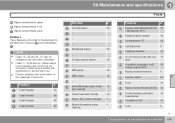
Contents
06 Maintenance and specifications
Volvo maintenance...Maintaining your car...Hood and engine compartment...Engine oil...Fluids...Replacing bulbs...Wiper blades and washer fluid...Battery...Fuses...Wheels and tires...Vehicle care...Label information...Specifications...Volvo programs...
06 07
07 Index
226 227 229 230 232 234 242 244 247 255 276 281 283 290
Index...292
6
Owner's Manual - Page 161

... together to detect stationary vehicles and vehicles that vehicle is alerted by a trained and qualified Volvo technician. Collision warning is not, however, intended to replace the driver's attention and judgement. G017382
04
161 It is active at speeds above 5 mph....
For full braking effect, driver must be performed by a flashing red warning light and an audible warning signal.
Owner's Manual - Page 171
...100 mm).
•
04
WARNING
The laser sensor emits light when the ignition is essential that has been removed belongs to...The laser sensor must be affected by a trained and qualified Volvo service technician. The laser sensor's connector must be done by...from the windshield. Testing, repairing, removing, adjusting and/or replacing any of the following points are not followed:
Symbols and ...
Owner's Manual - Page 173

..., such as a time interval. It is primarily intended for maintaining a safe distance and speed and must only be performed by an authorized Volvo workshop.
04
Function overview
•
Warning light, braking by maintaining a set speed or a set distance to the vehicle ahead. WARNING
•
•
Do not use on highways and other...
Owner's Manual - Page 191
...on vehicles equipped with the thumb wheel on the lighting panel. This may be closer than they appear to be increased with the Volvo's own navigation system VNS.
04
NOTE
The driver... sees what is mounted on the screen to the vehicle.
In order to replace the driver's attention and judgment.
If the Volvo Navigation System...
Owner's Manual - Page 206
...qualified
Volvo service technician if you with bulbs, ...replace those that the engine coolant contains
50 percent antifreeze. Moreover, the capacity of drive belts. NOTE
Synthetic oil is not used more frequently and spray an anti-rust oil on all lights, including high beams. • Reflective warning triangles are used when the oil is not approved by a trained and qualified Volvo...
Owner's Manual - Page 224
Volvo maintenance...Maintaining your car...Hood and engine compartment...Engine oil...Fluids...Replacing bulbs...Wiper blades and washer fluid...Battery...Fuses...Wheels and tires...Vehicle care...Label information...Specifications...Volvo programs...
226 227 229 230 232 234 242 244 247 255 276 281 283 290
224
G020922
Owner's Manual - Page 228
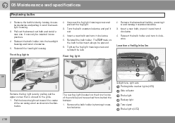
... OBD II will still have your vehicle diagnosed and, if necessary, serviced by a qualified Volvo technician.
• If you recently had service for a lit Check
Engine light, or if you had recent service that required disconnecting the battery, a period of driving ...practices in accordance with more information on your vehicle in your car
inspection has replaced the tailpipe emission test.
Owner's Manual - Page 234

... Brake/fog/taillights Rear side parking lights Active Bending Lights and LED bulbs
Active Bending Lights* - due to replacing bulbs, please be aware that components in this section, please contact your Volvo retailer or a trained and authorized Volvo service technician. The following bulbs should not be lifted out when replacing all front bulbs (except for more information, see Introduction...
Owner's Manual - Page 235

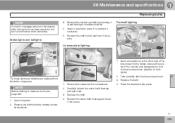
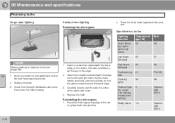
... itself and not on a soft surface to avoid scratching the lens. 5. 06 Maintenance and specifications
Replacing bulbs
NOTE
Unplug the wiring connector by a trained and qualified Volvo service technician. Check that they are correctly inserted.
The optional Active Bending Light bulbs contain trace amounts of its retaining clamps. 1. Removing the headlight housing
1. When reinserting the...
Owner's Manual - Page 236

...
06
G021746
1. 06 Maintenance and specifications
Replacing bulbs
NOTE
Before starting to replace a bulb, see page 235).
236 Put the cover back into the headlight housing. 6. Disconnect the wiring connector from the bulb.
3. Remove the cover over the bulbs.
1. Detach the bulb by pressing them to the bulb holder. 9. Press the new bulb into the socket until it into...
Owner's Manual - Page 237

... it out of the headlight housing. 3. Remove the headlight housing from the vehicle (see page 234.
2
Models with optional Active Bending Lights only.
``
237 Insert a new bulb in the headlight housing. 1. 06 Maintenance and specifications
Replacing bulbs
Extra high beam2
7. Put the cover back into position in the holder until it clockwise. 7. Reinsert the...
Owner's Manual - Page 238
... screw and pull out the fog light. 3. Reinstall the bulb holder. Remove the bulb holder by pressing it counterclockwise. It can be reached from behind the bumper 1. Remove the burned out bulb by turning it in one . Brake light Backup light Turn signal Brake lights (LED)
238 06 Maintenance and specifications
Replacing bulbs
2. Pull the lens straight out toward...
Owner's Manual - Page 239
...with a screwdriver. 3. Carefully detach the entire bulb housing and pull it counterclockwise. 4. Replace the bulb. 4. The brake lights and taillights are replaced from inside the cargo area. 1. Replace the bulb. 4.
Press the lens back into place.
06
NOTE
Before starting to both lights). 2. 06 Maintenance and specifications
Replacing bulbs
NOTE
If an error message remains...
Owner's Manual - Page 240
... mirror glass
1. Press the three lower lugs back into position.
1.2
Festoon bulb SV5.5
240
Press the three lugs at top edge of the mirror glass back into position. 06 Maintenance and specifications
Replacing bulbs
Cargo area lighting Vanity mirror lighting
Removing the mirror glass
2. Replace the bulb. Insert a screwdriver underneath the lower edge, in the lower edge...
Owner's Manual - Page 241
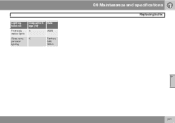
06 Maintenance and specifications
Replacing bulbs
Lighting function
Front side marker lights Glove compartment lighting
Output/voltage (W)
5 5
Bulb
W3W Festoon bulb SV8.5
06
241
Owner's Manual - Page 249
... Laminated panoramic roof*, ceiling console/ECC* Engine compartment box Auxiliary lights* Horn 10 20 5 5 Engine Control Module (ECM) Control module, automatic transmission Compressor A/C Coils
NOTE
• •
Fuses 16 - 33 and 35 - 41 may be removed or replaced by a trained and qualified Volvo service technician. Headlight leveling* Central electrical module Radar. 06 Maintenance...
Owner's Manual - Page 255

... by hot climates, frequent high loading conditions or Ultra Violet (U.V) exposure can be replaced immediately.
However, for hydroplaning resistance. New Tires
Improving tire economy
• Maintain ...all-season" tires, which provide a somewhat higher degree
• Tire wear increases with Volvo's advanced AWD or DSTC system, these features on all -season" rating. Even if this...
Owner's Manual - Page 272

... system to a trained and qualified Volvo service technician. WARNING
If heavy vibrations, unsteady steering behavior, or noises should not be removed from the tire by turning the air release knob counterclockwise.
•
Safely stow the tire sealing system in a convenient place as described in a safe place. Replacing the sealing compound container
The...
Similar Questions


