Toshiba 32C120U Support Question
Toshiba 32C120U Support Question
Find answers below for this question about Toshiba 32C120U.Need a Toshiba 32C120U manual? We have 2 online manuals for this item!
Question posted by PhallELV on April 4th, 2014
How To Connect Wii To Toshina 32c120u Tv
The person who posted this question about this Toshiba product did not include a detailed explanation. Please use the "Request More Information" button to the right if more details would help you to answer this question.
Current Answers
Related Toshiba 32C120U Manual Pages
User Guide - Page 9
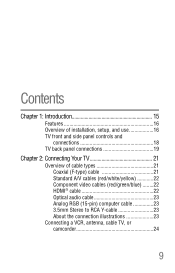
Contents
Chapter 1: Introduction 15
Features 16 Overview of installation, setup, and use 16 TV front and side panel controls and
connections 18 TV back panel connections 19
Chapter 2: Connecting Your TV 21
Overview of cable types 21 Coaxial (F-type) cable 21 Standard A/V cables (red/white/yellow 22 Component video cables (red/green/blue) ........22 HDMI® ...
User Guide - Page 17
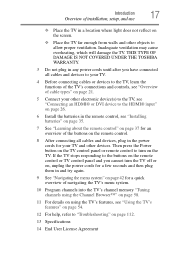
... responding to the buttons on the remote control or TV control panel and you have connected all cables and devices, plug in a location where light does not reflect on the screen.
❖ Place the TV far enough from walls and other objects to allow proper ventilation. THIS TYPE OF DAMAGE IS NOT COVERED UNDER...
User Guide - Page 18
... volume level.
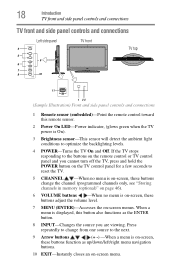
7 MENU (ENTER)-Accesses the on-screen menus. 18
Introduction
TV front and side panel controls and connections
TV front and side panel controls and connections
Left side panel
4
5 9
6
7
8
10
TV front
TV top
11
1 23
(Sample Illustration) Front and side panel controls and connections
1 Remote sensor (embedded)-Point the remote control toward this button also functions...
User Guide - Page 19
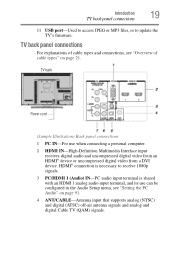
... an HDMI® device or uncompressed digital video from a DVI device.
Introduction
19
TV back panel connections
11 USB port-Used to access JPEG or MP3 files, or to receive 1080p signals... 3 PC/HDMI 1 (Audio) IN-PC audio input terminal is necessary to update the TV's firmware. TV back panel connections
For explanations of cable types" on page 91. 4 ANT/CABLE-Antenna input that supports...
User Guide - Page 20
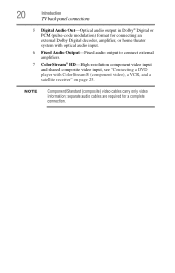
NOTE
Component/Standard (composite) video cables carry only video information; 20
Introduction
TV back panel connections
5 Digital Audio Out-Optical audio output in Dolby® Digital or PCM (pulse-code modulation) format for a complete connection.
separate audio cables are required for connecting an external Dolby Digital decoder, amplifier, or home theater system with optical audio ...
User Guide - Page 24
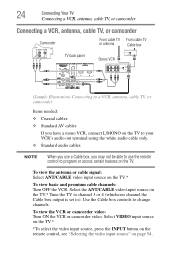
... control, see "Selecting the video input source" on the TV.*
To view basic and premium cable channels: Turn OFF the VCR.
24
Connecting Your TV
Connecting a VCR, antenna, cable TV, or camcorder
Connecting a VCR, antenna, cable TV, or camcorder
Camcorder
AUDIO OUT
L
R
VIDEO
TV back panel
From cable TV From cable TV
or antenna
Cable box
Stereo VCR
IN CH 3 CH...
User Guide - Page 25
.... Connecting Your TV
25
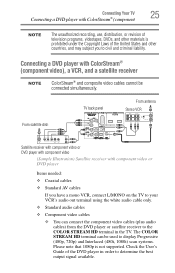
Connecting a DVD player with ColorStream® (component
NOTE
The unauthorized recording, use, distribution, or revision of television programs...connected simultaneously. Connecting a DVD player with component video or DVD player
Items needed:
❖ Coaxial cables
❖ Standard AV cables
If you to civil and criminal liability. From satellite dish
TV back panel...
User Guide - Page 27
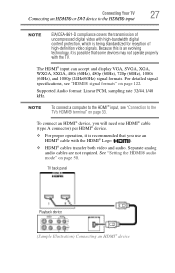
...; For proper operation, it is being standardized for reception of high-definition video signals.
NOTE
To connect a computer to the HDMI® input, see "HDMI® signal formats" on page 122. TV back panel
Playback device (Sample Illustration) Connecting an HDMI® device Supported Audio format: Linear PCM, sampling rate 32/44.1/48 kHz...
User Guide - Page 29
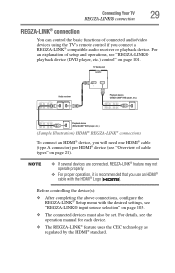
... 21). For an explanation of cable types" on page 101.
Before controlling the device(s):
❖ After completing the above connections, configure the REGZA-LINK® Setup menu with the HDMI® Logo (
). TV back panel
Audio receiver
Playback device (REGZA-LINK® DVD player, etc.)
Playback device (REGZA-LINK® DVD player, etc...
User Guide - Page 30
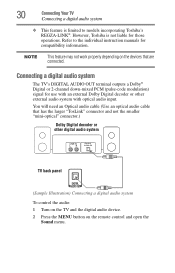
... limited to the individual instruction manuals for use with an external Dolby Digital decoder or other digital audio system
TV back panel
(Sample Illustration) Connecting a digital audio system To control the audio: 1 Turn on the TV and the digital audio device. 2 Press the MENU button on the devices that has the larger "TosLink" connector...
User Guide - Page 32
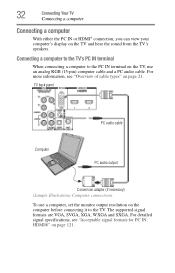
TV back panel
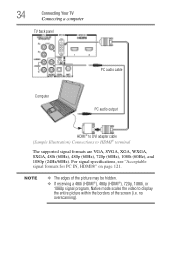
PC audio cable
Computer
PC audio output
Conversion adapter (if necessary) (Sample Illustration) Computer connections
To use an analog RGB (15-pin) computer cable and a PC audio cable.
The supported signal formats are VGA, SVGA, XGA, WXGA and SXGA. Connecting a computer to the TV's PC IN terminal
When connecting a computer to the TV. For detailed...
User Guide - Page 34
... IN, HDMI®" on page 121. NOTE
❖ The edges of the screen (i.e.
no overscanning). 34
Connecting Your TV
Connecting a computer
TV back panel
PC audio cable
Computer
PC audio output
HDMI® to DVI adapter cable (Sample Illustration) Connections to display the entire picture within the borders of the picture may be hidden.
❖ If...
User Guide - Page 40
To open the Installation menus (illustrated below and on the remote control or TV control panel.
Icon Picture
Sound
Item Mode Picture Settings Noise Reduction Game Mode Theater Settings Digital Audio Selector Audio Settings Audio Setup
Option...4
Menu Layout and Navigation
Main menu layout
The tables below ), press MENU on the next pages provide a quick overview of your TV's menu system.
User Guide - Page 42
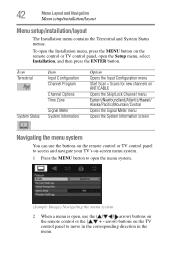
... the Signal Meter menu
Opens the System Information screen
Navigating the menu system
You can use the buttons on the remote control or TV control panel to access and navigate your TV's on-screen menu system.
1 Press the MENU button to move in the corresponding direction in the menu. arrow) buttons on the...
User Guide - Page 54
...
Selecting the video input source
To select the video input source to view: 1 Press the INPUT button on the remote control or TV control
panel. 2 Do one of the following:
❖ Press 0-4. ❖ Repeatedly press the ( / arrow) buttons on the remote
control, and then press the ENTER button to change ...
User Guide - Page 55
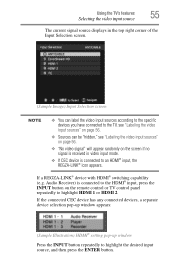
...NOTE
❖ You can label the video input sources according to the specific devices you have connected to the TV, see "Labeling the video input sources" on page 56.
❖ Sources can be "...CEC device is connected to the HDMI® input, press the INPUT button on the remote control or TV control panel repeatedly to highlight HDMI 1 or HDMI 2.
Audio Receiver) is connected to highlight the...
User Guide - Page 62
...that cannot be repeated in the History List, but instead is selected that are shifted to the left side. 62
Using the TV's features
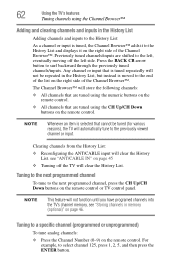
Tuning channels using the Channel Browser™
Adding and clearing channels and inputs in the History List
Adding channels and inputs ... example, to the next programmed channel, press the CH Up/CH Down buttons on the remote control or TV control panel.
User Guide - Page 90
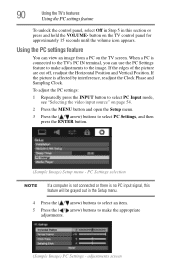
... Setup menu.
3 Press the ( / arrow) buttons to make the appropriate adjustments.
(Sample Image) PC Settings - When a PC is connected to the TV's PC IN terminal, you can view an image from a PC on the TV control panel for approximately 15 seconds until the volume icon appears.
PC Settings selection
NOTE
If a computer is not...
User Guide - Page 91
...can output or mute sound from center.*
Helps to your computer when connecting it to reduce noise and sharpen the picture. Using the TV's features
91
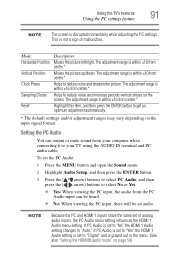
Using the PC settings feature
NOTE
The screen is within... within ±16 from center.*
Moves the picture up/down. This is within ±10 from your TV using the AUDIO IN terminal and PC audio cable. If PC Audio is set the PC Audio:
1...
User Guide - Page 100

...features are set, the feature that is connected to external input to listen to select On or Off, and press EXIT.
One minute before the TV switches to select On or Off, and ... to automatically turn itself off after 4 hours if you do not operate the TV either from the remote control or the TV control panel.
1 From the Preferences menu, highlight Energy Saving Settings and press ENTER.
2...
Similar Questions

Can You Hook Up Analog Connections To Toshiba 32c120u Tv
(Posted by JTWka 9 years ago)


How To Connect Wii To Toshiba 32hl833b?
how to connect wii to toshiba 32hl833b?
how to connect wii to toshiba 32hl833b?
(Posted by jimobewsher 10 years ago)