Thermador T36BT810NS Support Question
Thermador T36BT810NS Support Question
Find answers below for this question about Thermador T36BT810NS.Need a Thermador T36BT810NS manual? We have 2 online manuals for this item!
Question posted by Anonymous-152629 on July 10th, 2015
Dorr Adjust
can the doors be adjusted for alignment
Current Answers
Answer #1: Posted by lawDaimy on July 11th, 2015 12:38 AM
lawDaimy

Member since:
August 20th, 2014 Points: 149,240

Member since:
August 20th, 2014 Points: 149,240
Related Thermador T36BT810NS Manual Pages
Use and Care Manual - Page 3

... 5 Connecting the appliance 5
Water connection 5 Electrical connection 6 Getting to know your appliance 7 2 door model 7 3 door model 8 Controls 9 Switching the appliance on 10 Operating tips 10 Set the language 10 Setting the temperature unit 10 Setting the temperature 10 Refrigerator compartment 10 Freezer compartment 10 Special functions 11 Setup mode 11 Vacation mode 11...
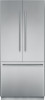
Use and Care Manual - Page 4
...
Risk of children! The appliance requires a 3-pole socket. You could damage the refrigerant tubes.
General regulations
The appliance is not liable if you switch ON the appliance... manufacturer is suitable ■ for refrigerating and freezing food, ■ for making ice, ■ for the next owner.
Otherwise, parts and door seal will become porous.
■...
Use and Care Manual - Page 7
... may differ.
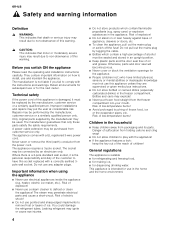
2 door model
en-us
A Refrigerator compartment B Freezer compartment
1 Light switch 2 Controls 3 Glass shelf 4 Light (LED) 5 Fruit and vegetable container 6 "Cool-fresh" container 7 Ice maker 8 Ventilation 9 Water filter 10 Butter and cheese compartment 11 Door shelf 12 Storage compartments for large bottles 13 Ice cube container 14 Drawer 15 Door drawer
7 Getting to...
Use and Care Manual - Page 8
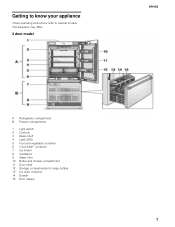
en-us 3 door model
A Refrigerator compartment B Freezer compartment 1 Light switch 2 Controls 3 Glass shelf 4 Light (LED) 5 Fruit and vegetable container 6 "Cool-fresh" container 7 Ice maker 8 Ventilation 9 Water filter 10 Butter and cheese compartment 11 Door shelf 12 Storage compartments for large bottles 13 Ice cube container 14 Drawer 15 Door drawer
8
Use and Care Manual - Page 10
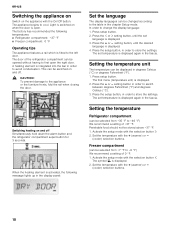
...: +37 °F ■ Freezer compartment: 0 °F
Operating tips
The appliance features a rail which is open the right door. Setting the temperature
Refrigerator compartment
(can be changed according to the table in degrees Celsius (°C) or degrees Fahrenheit (°F). 1. Freezer compartment
(can be displayed in the chapter Setup ...
Use and Care Manual - Page 12

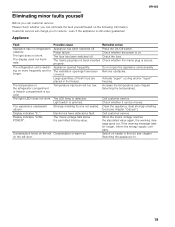
... order to reset
the setting. 4. ECOis displayed in the appliance. Remedial action Press the alarm button and close the door. The display goes out.
Cause One door of food in the appliance. The refrigerator compartment is the ideal storage location for ready products and bottled products.
12
Arranging food in the appliance
■...
Use and Care Manual - Page 18

...or appliances. Use the height-adjustable feet or place packing underneath them correctly, if required. refrigeration units, fan).
The appliance is not level Please align the appliance with a spirit ...the appliance in direct sunlight or near a heat source (e.g. Bubbling, humming or gurgling noises Refrigerant is flowing through the tubing. Use the coldness of the frozen food to cool down ...
Use and Care Manual - Page 19
... have detected a fault. Appliance
Fault
Possible cause
Remedial action
Appliance has no refrigeration capacity. The display does not illuminate.
Power failure. The mains plug has ...is secure. Call customer service.
The refrigeration unit is jammed.
Activate "super" cooling and/or "super" freezing.
Condensation forms on the left door. Check the fuse.
Light switch is...
Use and Care Manual - Page 22

... bear the costs for use, incorrect operation, work performed by unauthorized customer service (including in-house repairs or testing the inner life of the appliance); (3) Adjustments, changes or modifications of any type; (4) Nonobservance of electrical, sanitary or building regulations, provisions or laws of the state, country, region, city or district, including...
Installation Manual - Page 1

T36BT810NS T36BT820NS
9000650369
Installation Manual - Page 4

... angle 23
4 Attaching an edge protection 15 4. Attaching the strips 22 8. Attaching an alternative anti-tip-device 15
3. Aligning the appliance in the installation enclosure 19
2. Attaching the toe kick panel 21 5. Adjusting the door spring 22 Special installation 23
Preparing to connect the water 23 Connecting the water to the drawer 22...
Installation Manual - Page 7
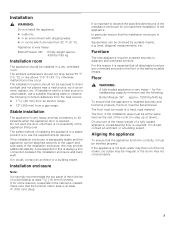
...temperature should be levelled properly. The installation location should not be irregular or the doors may provide additional stability. If the appliance is essential that the appliance functions correctly,... it is not level, water may flow out of the appliance.
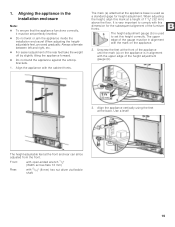
Aligning the appliance
To ensure that all attachable furniture are less than 32 °F (0 &#...
Installation Manual - Page 10
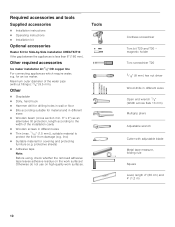
... in wall or floor
Bits according suitable for material and in different sizes Open end wrench 1/2" (Width across flats 13 mm) Multigrip pliers Adjustable wrench Cutter with adjustable blade Metal tape measure, folding rule Square Level, length 2' (60 cm) and 4' (1,2 m)
10 for Side-by-Side installation XHEATKIT10 If the gap between...
Installation Manual - Page 12
...61550; Care should be taken when closing the door. Risk of damage to a suitable installation location with suitable means of the refrigerator compartment has to the following table:
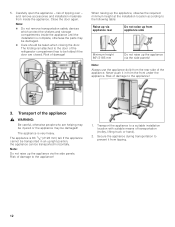
Raise up... 5.
Transport of the appliance.
Carefully open the appliance - risk of damage! Close the door again. Never push it from inside the appliance until the installation is very heavy. The ...
Installation Manual - Page 13
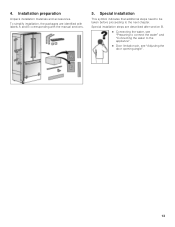
Installation preparation
Unpack installation materials and accessories. Special installation
This symbol indicates that additional steps need to be taken before proceeding to the appliance".
Door limitation pin, see "Preparing to connect the water" and "Connecting the water to the next chapter. Special installation steps are identified with labels A and B corresponding ...
Installation Manual - Page 17
...the middle of the freezer compartment drawer.
6. Take care not to the installation enclosure adjust height adjustable wheels before you move the appliance into the socket. 2. Do not unscrew the screws... door will no longer be damaged! 5. Put the mains plug into the installation enclosure. 1. Loosen and unscrew nuts on the left and right fixing brackets. The appliance may be aligned....
Installation Manual - Page 19
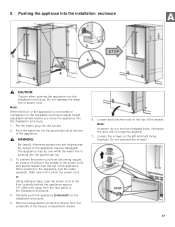
... or jam the appliance inside the
installation enclosure!
The mark (a) attached at the front and rear can all be adjusted from the front. The upper edge of the height adjustment gauge (b).
3. Aligning the appliance in alignment with this mark at the back. Front:
with open-ended wrench 1/2" (Width across flats 13 mm)
Rear:
with...
Installation Manual - Page 21
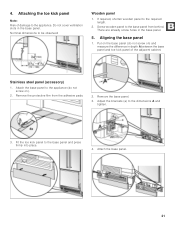
... base panel and toe kick panel of damage to be observed:
Wooden panel
1. Stainless steel panel (accessory)
1. Adjust the brackets (a) to the base panel and press firmly into place.
4. Remove the base panel. 3. Aligning the base panel
1. Attach the base panel.
21 4. Attaching the toe kick panel
Note: Risk of the adjacent...
Installation Manual - Page 22
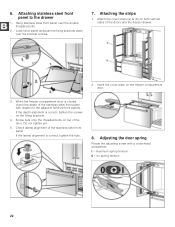
... panels. Hang stainless steel front panel over the bracket screws.
7. Adjusting the door spring
Rotate the adjusting screw with respect to the drawer
1. 6. Attach the cover strips (a) & (b) on top of the stainless steel front panel with a cross-head screwdriver. Check lateral alignment of the doors and the freezer drawer.
2. Attaching the strips
1. When the freezer...
Installation Manual - Page 23
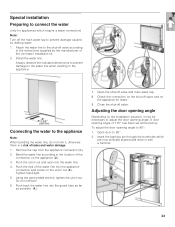
... is a risk of the water line into the guard tube as far as possible (4.).
7. Adjusting the door opening angle. Remove the cap from the appliance connection (1.). 2. Using the open-ended wrench, ... Tighten hand-tight. 5. Open door to prevent damage caused by the manufacturer of the
connection on
the appliance for appliances which
are now vertically aligned and drive in the appliance....
Similar Questions

Part Number For Water And Carbon Air Filters
Part number for water and carbon air filters for the Thermador Refrigerator T36BT810NS
Part number for water and carbon air filters for the Thermador Refrigerator T36BT810NS
(Posted by cs61078 8 years ago)

I Need The Part Numbers For The Refrigerator Doors Please
(Posted by aerikson 8 years ago)

Any Problems With This Refrigerator?
Any problems with this refrigerator?
Any problems with this refrigerator?
(Posted by diannebrob 10 years ago)

Replace Door Gasket
Where best to buy replacement door gasket for thermador T36IT71FNS And how best to replace them (ste...
Where best to buy replacement door gasket for thermador T36IT71FNS And how best to replace them (ste...
(Posted by Rendam2000 10 years ago)

How To Install Finger Guard On Refrigerator Door
how to install finger guard on refrigerator door
how to install finger guard on refrigerator door
(Posted by nbrubenstein 11 years ago)