2009 Suzuki XL7 Support Question
2009 Suzuki XL7 Support Question
Find answers below for this question about 2009 Suzuki XL7.Need a 2009 Suzuki XL7 manual? We have 1 online manual for this item!
Question posted by mcdmburn on August 29th, 2014
How To Remove Rear Wiper Arm Suzuki Xl7
The person who posted this question about this Suzuki automobile did not include a detailed explanation. Please use the "Request More Information" button to the right if more details would help you to answer this question.
Current Answers
Related Manual Pages
Owner's Manual - Page 3

This owner's manual applies to the XL7 series:
NOTE: The illustrated model is one of the XL7 series.
© COPYRIGHT SUZUKI MOTOR CORPORATION 2006
Owner's Manual - Page 7
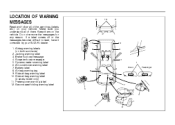
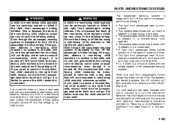
... (3 seats model only) 11. Pretensioner warning label 12. Keep them . LOCATION OF WARNING MESSAGES
Read and follow all of the warnings (labels etc.) on your SUZUKI dealer. 1. Do not remove the messages for any reason. Dynamo meter warning label 6. Battery label 8.
Owner's Manual - Page 18

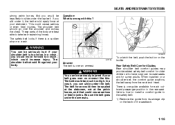
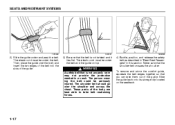
... not locked, it is locked. Always unbuckle the safety belts and return them to their normal stowed position before folding a rear seat. 1) Ensure all three of the safety belts are unbuckled and removed from the child comfort guide, and the front seatbacks are not twisted.
1406907
3) Lift the lever located on the...
Owner's Manual - Page 20

..., located on the top of the seat and fold the seatback forward. CAUTION
Folding a rear seat with the safety belts still fastened may cause damage to the passenger seating position when ...cause injury to their normal stowed position before folding a rear seat.
1-8 Folding the Seatback(s) To fold the seatback, do the following: 1) Remove all items on the seat cushion.
1811392
Unfolding the ...
Owner's Manual - Page 28
...fatal injuries. Question: What is how to install a comfort guide to the safety belt: 1) Remove the guide from the neck and head. Here is wrong with this . WARNING
You can ...and across the chest. WARNING
You can be less likely to take belt restraining forces. Rear Safety Belt Comfort Guides Rear shoulder belt comfort guides may provide added safety belt comfort for older children who have ...
Owner's Manual - Page 29
...into the slots of the guide. The elastic cord must be under and past the belt. To remove and store the comfort guide, squeeze the belt edges together so that the shoulder belt crosses the...located on top.
4) Buckle, position, and release the safety belt as described in "Rear Seat Passengers" in a crash. The elastic cord must be seriously injured. Make sure that you can take ...
Owner's Manual - Page 40

... anchor.
1-28 Make sure that restraint, and also the instructions in this happens. When removing the child restraint, always remember to return the safety belts to follow the instructions of the.... A. Pull the shoulder belt all the way out of child restraints easier. Folding an empty rear seat with that a LATCH-type child restraint is no contact between the child restraint or the...
Owner's Manual - Page 45

...child restraint has been installed and the on the child restraint as you may find it . Remove the child restraint from the force of injury from the vehicle and reinstall the child restraint. Your... sure the child restraint is still lit, secure the child in the child restraint in a rear seat position in different directions to work for an adult or larger child passenger. If, after...
Owner's Manual - Page 52
...front passenger seat is unoccupied. • The system determines that an infant is present in a rear-facing infant seat. • The system determines that a small child is present in a forward...in a booster seat. • A right front passenger takes his/her weight off . Remove the child restraint from the vehicle and reinstall the child restraint following the child restraint manufacturer...
Owner's Manual - Page 53
... sit upright in the seat, centered on indicator is available and check with the airbag system.
Remove any additional material from the seat cushion before reinstalling or securing the child restraint and before a small... vehicle if one is still lit, secure the child in the child restraint in a rear seat position in the instrument panel cluster ever comes on and stays on this position for...
Owner's Manual - Page 59

...will flash and the horn will sound repeatedly for instructions on how to match RKE transmitters to remove the old battery. Or, refer to "Relearn Remote Key" under "DIC Operation and Displays"...RKE transmitter is probably time to change the battery.
1562525
1) Use a flat thin object to arm/disarm the content theft-deterrent system. The vehicle can enter. 5) Check the operation of four ...
Owner's Manual - Page 62

... power lock switch, or by lifting the rear door manual lock. 2) Open the door from the outside . Be sure to remove the key from the inside edge of each rear door. All passenger doors will lock, but...DIC)" in the ignition and any door is open the rear doors to access them. The doors will not lock, and the theft-deterrent system will not arm until all the doors will lock and only the driver's ...
Owner's Manual - Page 65

... the LOCK position. When the alarm is removed from the ignition. Arming with the Power Lock Switch The alarm system will be open and the key is armed, the trunk may be opened with the ...the right side of the switch to prevent rear passengers from side-to be seen and three horn chirps heard to indicate an alarm condition has occurred since last arming.
You must use your vehicle has a...
Owner's Manual - Page 66

...III+ is possible for service. 3) After the engine has started, turn the key to LOCK, and remove the key. 4) Insert the new key to be discouraged because of the high number of electrical key ...your dealer or a locksmith who can service PASS-Key® III+ to have to do anything special to arm or disarm the system. Anyone using the wrong key, it . 2) Insert the original, already programmed, ...
Owner's Manual - Page 87

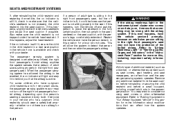
...off until you leave your preset speed. Rear Window Wiper/Washer
The rear wiper and rear wash buttons are located in the switchbank above the shift lever. (Rear Wiper): Press this button to spray washer fluid..."Checking Things Under the Hood" in heavy traffic. When the button is on, the rear wiper will stop or return to stay on the windshield, blocking your cruise control on the ...
Owner's Manual - Page 209
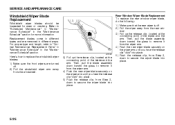
.... 5) Push the release clip, from the windshield. Rear Window Wiper Blade Replacement To replace the rear window wiper blade, do the following: 1) Make sure that the rear wiper is off . 2) Pull the windshield wiper arm away from Step 3, down to remove it from the wiper arm. 4) Push the new wiper blade securely on the wiper arm until you hear the release clip "click" into...
Owner's Manual - Page 232

... surfaces. Your vehicle's interior may only be removed as quickly as possible using cleaners, read and adhere to all safety instructions on your SUZUKI dealer to your vehicle, use a stiff brush...could cause stains to the rear window defogger. Should it is a good guide. • Do not heavily saturate your upholstery while cleaning. • Damage to remove odors from small buttons ...
Owner's Manual - Page 234

...avoid surface scratches and water spotting. Refer to the colored basecoat. Be sure to rinse the vehicle well, removing all -cotton towel to the wiper blades and affect their toll over a period of years. Clean the outside of the sun. Grime from ... windshield washer solvent. To help keep the paint finish looking new, keep it . Use only SUZUKI-approved cleaners on painted surfaces.
Owner's Manual - Page 238
...
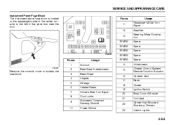
SPARE SPARE 14 15 16 17 18 19 20 21 22 23
Fuses 1
1708445
Usage Sunroof Rear Seat Entertainment Rear Wiper Liftgate Airbags Heated Seats Driver's Side Turn Signal Door Locks Automatic Occupant Sensing Module Power Mirrors
Remove the console cover to the left of the center console, to access the fuse block.
2 3 4 5 6 7 8 9 10...
Owner's Manual - Page 259

Part Engine Air Cleaner/Filter Engine Oil Filter Passenger Compartment Air Filter Element Replacement Battery Spark Plugs Windshield Wiper Blades Driver's Side - 24 inches (60.0 cm) Passenger's Side - 19 inches (47.5 cm) Rear - 13.0 inches (33.0 cm) SUZUKI Part No. 13780-78J00 16510-78J00 95861-78J00 33610-78J00 1119A-78J00 38340-78J00 38340-78J10...
Similar Questions


Youtube On How To Remove The Rear Windshield Wiper Arm 2007 Suzuki Xl7
(Posted by cpeteww 10 years ago)
