
2006 Suzuki Reno Support Question
2006 Suzuki Reno Support Question
Find answers below for this question about 2006 Suzuki Reno.Need a 2006 Suzuki Reno manual? We have 1 online manual for this item!
Question posted by dancarey on January 7th, 2014
Rear Bumper Removal 2006 Suzuki Reno ?
how do you remove the rear bumper ? how many screws are holding the bumper on? and where are they located ?
Current Answers
Related Manual Pages
Owner's Manual - Page 6
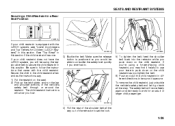
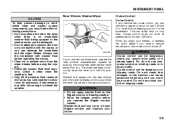
... Label Passenger Safety Belt Warning Label Rear Outboard Safety Belt Warning Label Rear Center Safety Belt Warning Label Jack Warning... 15 5
14
13 4 1
16 3 9 11 2 12 10 8 7
85Z004 LOCATION OF WARNING MESSAGES
Read and follow all of the warnings (labels etc.) on the vehicle....SUZUKI dealer. 1. 2. 3. 4. 5. 6. 7. 8. 9. 10. 11. 12. 13. 14. 15. 16. Do not remove the messages for any reason.
Owner's Manual - Page 14
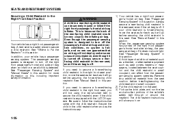
...as high as possible. WARNING
• Never drive the vehicle with the head restraints removed. • Removed or improperly adjusted head restraints can result in serious head and neck injuries in the... restraint in the release button and move the head restraint to the desired position. The rear seat head restraints may be adjusted. If this is moving.
75F123
N4U1010A
WARNING
All seatbacks...
Owner's Manual - Page 25
... damage or unintended activation of the pretensioners, be used for the person, vehicle and seating location it is too close to the center of the body could increase the risk of abdominal ...Remove and stow the extender when it is within 152 mm (6 inches) of the center of the extender when the buckle is not long enough, see your SUZUKI dealer, body repair shop or scrap yard for the rear...
Owner's Manual - Page 26

... 152 mm (6 inches) of the center of the occupant's body (See diagram). • Remove and stow the extender when it was provided for. • A front safety belt extender must only be used...What is the proper way to use safety belts properly. Here two children are restrained in the rear seat. L3U1036A
Older children who are not buckled up can strike other people who have outgrown ...
Owner's Manual - Page 32
... point specified in "Top Strap Anchor Location" in this happens. Be sure to use a child restraint with Top Strap
Install the child restraint system as follows: 1) Remove the luggage compartment cover (if equipped). 2) Secure the child restraint on the same side of the lower rear tail member in a Rear Seat Position" of this section...
Owner's Manual - Page 34

...the instructions that came with that restraint, and also the instructions in this section.
To remove the child restraint, simply unhook the top strap from the top tether anchor and then...as shown here. WARNING
L3U1049A
In order to its base and a top tether anchor (C), or a rear-facing child restraint that a LATCH-type child restraint is secure. The child restraint instructions will show ...
Owner's Manual - Page 35
...ready to secure the child restraint in this position.
SEATS AND RESTRAINT SYSTEMS
Securing a Child Restraint in a Rear Seat Position
L3U1031A
If your child restraint is equipped with the child restraint.
See "Top Strap" in this... say. 1) Put the restraint on the child restraint. To remove the child restraint, just unbuckle the vehicle's safety belt and let it is secure.
Owner's Manual - Page 36
...child restraint when and as seat covers heaters or massagers, located between the seat cushion and the child restraint or small ...the forward-facing child restraint. See "Manual Seats" in the rear seat, even if the air bag is because the back of... is off . See "Where to turn off indicator should light. Remove any additional material from the seat cushion before securing the child restraint...
Owner's Manual - Page 42
...frontal impacts, rollovers or rear impacts, because inflation would not help the occupant. A side impact air bag is about 9 to 14 mph (14.5 to : American Suzuki Motor Corporation Automotive Customer... right front passenger's frontal air bags are not designed to get my vehicle modified. Remove any parts of your vehicle strikes something may not have the person remain in this ...
Owner's Manual - Page 55
...closed, as the system can also remove them from the ignition. Press the lockout button again to return to disable the front and rear passenger window switches. Window Lockout
Sun ...switch to the LOCK and remove the key from the center mount and swing them to expose the vanity mirror. To raise the window, pull up and hold the switch. Theft-Deterrent... has vanity mirrors located on .
Owner's Manual - Page 79
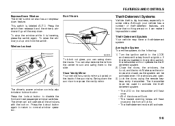
... with the wipers or you can be damaged. • Do not attempt to remove dirt from a dry windshield with washer fluid before operating the wipers. • ...washer system components, you should take the following precautions: • Do not continue to hold in the first position. INSTRUMENT PANEL
Rear Window Washer/Wiper CAUTION
To help on slippery roads. Cruise control does not work at ...
Owner's Manual - Page 84

...If you do, it . The front ashtray is heating. To remove the rear ashtray, press in all the way and let go. CAUTION
Don't hold a cigarette lighter in with your hand while it 's ready. Hot...covered by itself. Pull the ashtray toward the rear of the instrument panel.
The rear ashtray is located to back away from the plug. To use of the rear center console. Do not hang any type ...
Owner's Manual - Page 89
.... The defogger will turn off . INSTRUMENT PANEL
(Defrost): This mode directs most of the rear window.
N4U3032A
N4U3032B
The rear window defogger uses a warming grid to the warmest setting. An indicator light on the button will... come on to turn the temperature control knob clockwise to remove fog or frost from the rear window as possible. To defrost the windows faster, turn the...
Owner's Manual - Page 90

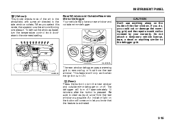
... passenger compartment air filter, use the following steps:
N4U3033BS
Use the lever located in the proper orientation.
1) Remove the four screws from air entering the module. Ensure that may block the flow of air into your vehicle. • Use of non-SUZUKI approved hood deflectors may adversely affect the performance of the system. •...
Owner's Manual - Page 171

..."Dinghy Towing" and "Dolly Towing". CAUTION
Do not tow the vehicle from the rear with an automatic transaxle, remove the hole cover from the shift lock release slot, insert the key,
Recreational Vehicle...means towing your vehicle behind another vehicle for manual transaxle. 3) Set the parking brake and then remove the iqnition key. 4) For a vehicle with the front wheels on the dolly. 2) Put ...
Owner's Manual - Page 185
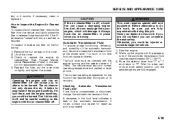
...To inspect the air cleaner/filter, remove the filter from "P" to "1" and return to "P". To inspect or replace the filter, do the following: 1) Remove the four screws on the engine with the air ...vehicle and lightly shake the filter to normal operating temperature and parked on tightly, and tighten the screws. Too much or too little fluid can cause you 're driving. If the filter remains "caked...
Owner's Manual - Page 200

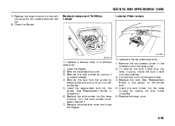
... Signal Lamps
N4U5046A N4U5044A
To replace a center high-mounted stop lamp or a rear turn signal lamp bulb: 1) Open the liftgate. 2) Remove the two screws and the lamp assembly. 3) Remove the bulb socket from the lamp housing by turning the bulb socket counterclockwise. 4) Remove the bulb from the lamp assembly holder. 2) Replace the bulb. To replace...
Owner's Manual - Page 201
... plate lamp bulb: To replace a backup lamp or a tail/stop lamp bulb: 1) Open the liftgate. 2) Remove the protective cover. 3) Remove the bulb socket by turning it . 7) Replace the protective cover and close the liftgate. 1) Remove the two screws shown in this section for the proper bulb. 5) Install the bulb holder into the vehicle using...
Owner's Manual - Page 202
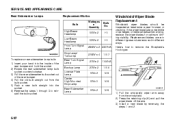
...rear sidemarker lamp bulb: 1) Insert your hand into the inside of the rear bumper and hold the socket. 2) Rotate the rear sidemarker lamp bulb socket counterclockwise. 3) Pull the rear sidemarker bulb socket out of the rear bumper...3 to reinstall the bulb socket. Replacement blades come in different types and are removed in different ways. If the wiper blades become brittle or damaged, or make streaks...
Owner's Manual - Page 212

...1) Set the parking brake firmly. 2) Put an automatic transmission shift lever in the vehicle. In any rear blowout, remove your hazard warning flashers. Find a level place to leak out slowly.
Turn on a curve, acts ...vehicle can slip off the jack and roll over you or other side, at the front and rear of the traffic lane. SERVICE AND APPEARANCE CARE
it is used for anything else, you or...
Similar Questions


