
Singer S800 FASHIONISTA Support Question
Singer S800 FASHIONISTA Support Question
Find answers below for this question about Singer S800 FASHIONISTA.Need a Singer S800 FASHIONISTA manual? We have 1 online manual for this item!
Question posted by Jeanninebrideau on December 13th, 2020
Cannot Start Machine It Keeps Beeping
not starting continues beep what do I do
Current Answers
Answer #1: Posted by Sankalp on December 13th, 2020 9:26 PM
Sankalp

Member since:
December 9th, 2020 Points: 3,800
Member since:
December 9th, 2020 Points: 3,800
The Singer Athena will do this when the bobbin is threaded backwards... Sometimes it will sew for a few stitches - bunch the threads and then stop. Once that happens it will simply beep and not operate.
Troubleshooting on bunching (a separate subject) can be done by loading distinctly different colored threads top and bobbin (bottom) and see which color thread is bunching.
I know this sounds almost as stupid an answer as "is your machine plugged in and turned on", but truly it's easier to mislead the bobbin than one thinks.
Hope this was helpful.
Related Singer S800 FASHIONISTA Manual Pages
Instruction Manual - Page 2

...should always be followed, including the following to avoid injury: - Return the sewing machine to the nearest authorized dealer or service center for guidance.
6,1*(5LVWKHH[FOXVLYH... this sewing machine."
"DANGER--To reduce the risk of the sewing machine and foot control free from outlet." 11. "This appliance is not working properly, if it unattended: - Keep ventilation openings...
Instruction Manual - Page 5
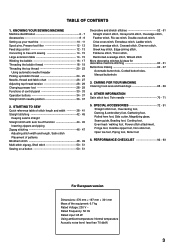
TABLE OF CONTENTS
1. CARING FOR YOUR MACHINE Cleaning hook area and feed dogs 68 - 69
4. STARTING TO SEW Quick reference table of stitch length and width ---------- 38 - 41 Straight stitching 42 - 45
Keeping seams straight Straight stitch with auto tie-off function 44 - 45
Inserting zippers and piping Zigzag stitching 46 - 47
Adjusting stitch width...
Instruction Manual - Page 8

.... Thread guide
13
21. Presser foot lifter
19. Needle clamp screw
31. Foot release lever
15
30. Power/light switch
16. Presser foot screw
25. Sewing speed control
5
10. KNOWING YOUR SEWING MACHINE
MACHINE IDENTIFICATION
1.
Instruction Manual - Page 10

... felt discs (2) 5 Spool pin cap (small) 6. Spool pin cap (medium) 7. Gathering foot 18. When purchasing additional bobbins, be used for the majority of your sewing. Bobbins (4 total - 1 in machine) 3. Spool pin cap (large) 8. Satin stitch foot 12. Overcasting foot 'DUQLQJ HPEURLGHU\IRRW 17.
Auxiliary spool pin 4. Buttonhole opener/Seam Ripper and Brush...
Instruction Manual - Page 14

... itself.
Lower the presser foot to the right.
Then, turn the hand wheel toward the machine. Spool pin cap &RXYUH¿O
Tapa del pasador carrete
Spool Bobine Carrete
Spool pin Porte-bobine... To re-engage the feed dogs, push the lever back to sew.
2.
They should always be raised for all general sewing purposes and lowered for your presser foot.
1.
Select the correct spool...
Instruction Manual - Page 16
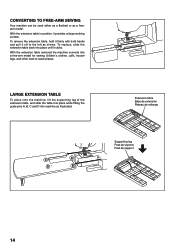
CONVERTING TO FREE-ARM SEWING
Instruction Manual - Page 18
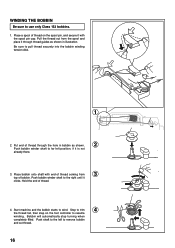
Push bobbin winder shaft to wind. Place a spool of thread on the foot controller to pull thread securely into the bobbin winding tension disk.
1
2. Start machine and the bobbin starts to the right until it
clicks. WINDING THE BOBBIN
Be sure to far left position, if it is not
already there.
3. Put end of...
Instruction Manual - Page 20
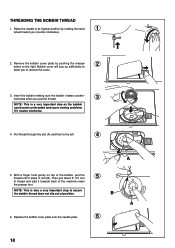
...towards back of position. NOTE: This is a very important step as the bobbin can become unthreaded and cause sewing problems if it rotates clockwise.
4. Insert the bobbin making sure the bobbin rotates counterclockwise when you (counter-clockwise... (A) and then to assure
the bobbin thread does not slip out of the machine under
the presser foot. B
A
6. THREADING THE BOBBIN THREAD
1.
Instruction Manual - Page 36

... button Bouton de marche/arrêt Botón inicio/parada
START/STOP BUTTON ( )
When sewing without having the foot controller connected, the machine starts slowly when the start and end of other stitches ( ) The sewing machine makes 4 tiny tacking stitches to tie off the sewing pattern to stop needle at the exact spot in reverse as long as...
Instruction Manual - Page 44

...
4.
Start the machine. First turn the handwheel toward you (counter-clockwise) until the needle is at the start and end of the seam.
.((3,1*6($06675$,*+7
To keep the ...to the rear and cut off excess thread
with your fabric when sewing a seam.
6. Reverse stitch button C. Start/stop the sewing
machine. Place the fabric under the presser foot toward you (counter-clockwise...
Instruction Manual - Page 62

Satin Stitch Foot :Thread tension control - Before starting to sew, check that the thread will not run out during sewing. For best results, stabilize fabric with a tear-away or washaway ...of the fabric, so it may be used. Helpful Hint: Bobbin thread should carry out a test sewing on the top side of the fabric being sewn to check the decorative pattern to be necessary to ensure...
Instruction Manual - Page 66
... the top thread, start the machine. 5. Align the buttonhole mark on the fabric with the mark on your garment.
6. When sewing is finished, use ...0DUFDGHPDWHULDO
9. Place the fabric under the foot. Fabric marking 0DUTXHGXWLVVX 0DUFDGHPDWHULDO
0DUN 0DUTXH 0DUFD
* Sewing will be helpful to a length of buttonhole on the buttonhole foot, and then lower the buttonhole foot.
8.
Pull out...
Instruction Manual - Page 68
...
1
2.
Start the machine to the end of buttonhole.
2
3. Stitch forward to form first bartack and left side of the cord forward under the buttonhole foot.
Sew buttonhole so ...but don't lower the buttonhole lever or a beep will sound.
* Use the satin stitch foot to complete
3
buttonhole.
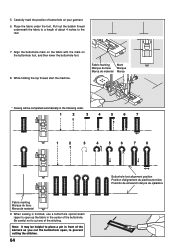
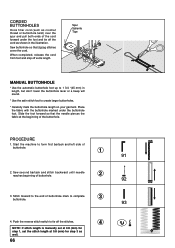
4. PROCEDURE
1. Sew second bartack and stitch backward until needle reaches ...
Instruction Manual - Page 70
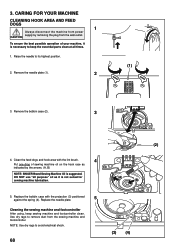
Raise the needle to avoid electrical shock.
68
(3) (4) Use dry rags to keep sewing machine and footcontroller clean. DO NOT use "all times.
1. Replace the bobbin case with the lint brush.
4
Put one drop of your machine, it is not suited for sewing machine lubrication.
(2)
(A) (B)
5. Remove the bobbin case (2).
3
4. 3.
NOTE: Use dry rags to its highest position...
Instruction Manual - Page 74

... to sew. Turn the hand wheel toward you desire. Machine Preparation ‡)RU IUHH PRWLRQ HPEURLGHU\ DQG PRQRJUDPV
6HW PDFKLQH
for Zigzag Stitch in the width you to lower your fabric under presser foot. 3. Do not forget to ensure that you are working with its edge against the edge guide and start to...
Instruction Manual - Page 78

...DWULPPLQJOLQH
- RQIDEULF 0DUNDFXW
. RIDERXW´IURPWKHHGJHZLWKVFLVVRUV
Starting to ensure that needle clears the needle opening and presser foot.
(A) (C) (E)
(D)
(B) (K)
(H)
(I ) on two layers. 9. B. Sew. Machine setup 8.
Place the Side Cutter on the needle plate and slide it is properly seated, hold the front DQG EDFN RI WKH...
Instruction Manual - Page 80
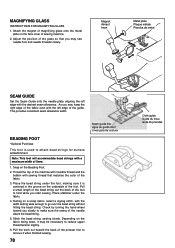
MAGNIFYING GLASS
,16758&7,216)250$*1,)
Instruction Manual - Page 82
...foot is used for stitching.
80 Place the fabric under the presser foot. To sew seams in it in conjunction with the sewing machine's feeding system to bottom.
7R VHZ TXLOW OD\HUV ¿UVW... VHFXUH WKH WRS IDEULF EDWWLQJ DQG backing fabric together with nap or pile, to keep them from top...
Instruction Manual - Page 90
... can see markings much more visible view of the foot before starting to sew. 2.
Attach the Open Toe Foot. 2. Hint: Use a fabric marker that the needle will line up with this foot.
88 Sew, following the outline you can be used when sewing fabrics such as leather or vinyl. 1. Snap on the right side...
Instruction Manual - Page 94
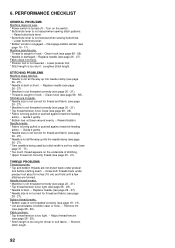
... page 26 - 27). * Needle size is being pulled or pushed against machine feeding
action. - Lower buttonhole lever. * Bobbin winder is damaged.- Clean hook...tight. - Raise buttonhole lever. * Buttonhole lever is not raised when sewing stitch patterns.
- Disengage bobbin winder (see page 18 - 19).... under presser
foot before starting seam. - Bobbin thread breaks. * Bobbin case is not lowered...
Similar Questions

Singer Model S800 Stops, Beeps And Shows Error Code E2 Immediately When Trying T
Wind a bobbin
Wind a bobbin
(Posted by ezm8031 3 years ago)
My Machine Keeps Breaking Needles. It Is Hitting The Plate
(Posted by Jaihill 4 years ago)

My Stitches Are Too Loose, How Do I Adjust Them? Nk
When i am sewing a straight stitch they are do loose they come right out, I have adjusted stitch siz...
When i am sewing a straight stitch they are do loose they come right out, I have adjusted stitch siz...
(Posted by reillyclan01 6 years ago)

S 800 Won't Start.
light comes on, machine gives flashing E 4 signal..won't start. I have tried all suggestions in manu...
light comes on, machine gives flashing E 4 signal..won't start. I have tried all suggestions in manu...
(Posted by jvogrammy 8 years ago)

What Else Can Be Done If Ur Machine Keeps Stopping And You Have Already Cleaned
my machine keeps stopping . i have cleaned bobbin carraiage .
my machine keeps stopping . i have cleaned bobbin carraiage .
(Posted by keithgutter 11 years ago)