
Singer Futura XL-400 Support Question
Singer Futura XL-400 Support Question
Find answers below for this question about Singer Futura XL-400.Need a Singer Futura XL-400 manual? We have 1 online manual for this item!
Current Answers
Answer #1: Posted by nanzy on July 2nd, 2021 12:59 AM
nanzy

Member since:
May 26th, 2021 Points: 110,250

Member since:
May 26th, 2021 Points: 110,250
Answer #2: Posted by SonuKumar on July 3rd, 2021 5:15 AM
SonuKumar

Member since:
May 9th, 2021 Points: 16,622,780
Member since:
May 9th, 2021 Points: 16,622,780
I'm presuming that you are getting repeated error 06 codes to write in. Before I start, though, you also get that error code if your bobbin is out of thread. The thread sensor thinks your thread has broken because your thread is not seated at all, or not seated enough, between your tension disks, which are on the right side of your tension dial. Take the cover off the thread path (page 52 in your user's manual), lower your presser foot, and turn the tension dial to zero. Use UNWAXED dental floss, and floss between those disks. Chances are there is loose threads and/or lint between the disks, preventing the thread from seating properly. When threading, make sure that your presser foot is UP (tension disks are spread to accept thread), and apply tension to your thread, both at the top and bottom, to make sure your thread gets between those disks. Thread it a few times with the cover off, if necessary; you don't need to have it on to embroider, although you can't use your needle threader with it off.
Please respond to my effort to provide you with the best possible solution by using the "Acceptable Solution" and/or the "Helpful" buttons when the answer has proven to be helpful.
Regards,
Sonu
Your search handyman for all e-support needs!!
Related Singer Futura XL-400 Manual Pages
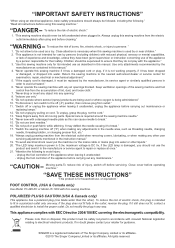
Instruction Manual - Page 2
...
cover
before carrying out maintenance or
replacing lamps." 12.
If in accordance with this sewing machine. "Read all moving parts.
"Do not allow to ensure that on cord. "T... qualified electrician to persons: " 1. "Keep fingers away from the accumulation of the sewing machine and foot control free from all instructions before
servicing. If the plug does not fit ...
Instruction Manual - Page 5

...Using buttonhole foot, Procedure, Corded buttonholes Buttonholing with Futura Multi hoop 88 - 95 Helpful messages when embroidering 96 - 97
4. STARTING TO SEW Quick reference table of stitch length and width ----------... 104 - 105 Special accessories 106 - 107 Helpful messages 108 - 109
For European version
Sewing machine Dimensions: 567 mm × 240 mm × 317 mm Mass of the equipment: ...
Instruction Manual - Page 10

....
8
2
3
4
5
6
8
9
10
11
13
14
15
17
18
20
21
22
23 Vinyl bag 20. Satin foot
15. Bobbins 21. Embroidery software CD
19
FUTURA embroidery is "system" of your
7
Sewing machine is another
12
very useful foot and should be sure they are Class I5 J.
16
FOR EMBROIDERY
19. Needles
2. To install the...
Instruction Manual - Page 12
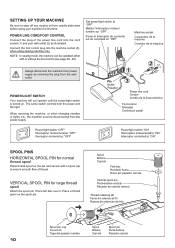
...machine socket Connecteur de la machine Conector de la máquina
2 1
Pin Butée Pasador
3
Power line cord Cordon Cordón de la linea eléctrica
Foot control Rhéostat
XL...servicing the machine, or when changing needles or lights, etc., the machine must be operated either
with a spool cap to wipe off any surplus oil from needle plate area before using sewing machine only. ...
Instruction Manual - Page 24

... the foot holder. 3.
BOBBIN TENSION
The bobbin tension has been correctly set thread tension at the factory, so you are sewing. The tension is largely determined by the balanced tension of the machine. If, when you start to adjust it. You will always obtain a nicer stitch and less puckering when the upper...
Instruction Manual - Page 28

...sewing is available for the selected pattern. Stitch length and width/needle position controls
*Auto/Default settings Your sewing machine... width or straight stitch needle postition according to the Control will light in orange without blinking and a beep will automatically sew at the Auto / Default Position.
*Manual settings Once you have determined the Auto / Default position you can be ...
Instruction Manual - Page 30
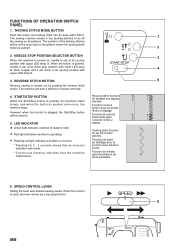
... points Función de remate para terminación de otras puntadas.
6. LED INDICATOR
Green light indicates machine is operating.
Flashing red light indicates a problem or an error. * Flashing for tie-off
1
the sewing on , needle is turned on all patterns. TACKING STITCH MODE BUTTON
Push this button and tacking stitch can...
Instruction Manual - Page 34
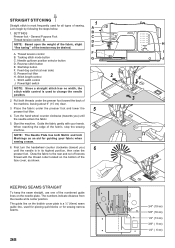
... keep the seam straight, use one of the fabric, stop button F. Start/stop the sewing machine. Guide the fabric gently with the thread cutter located on the bottom of
3
the machine, leaving about 6" (15 cm) clear.
3. Start the machine. When reaching the edge of the numbered guide lines on the bobbin cover plate is...
Instruction Manual - Page 56

...order.
1
2
3
4
5
6
7
Fabric marking Marque du tissu Marca de material
9. When sewing is finished, use a buttonhole opener to a length of the bartack threads.
54
Buttonhole foot alignment ...the top thread, start the machine. Carefully mark the position of the buttonhole. Fabric marking Marque du tissu Marca de material
mark Marque Marca
* Sewing will be completed automatically in ...
Instruction Manual - Page 60

... and down, and check that the drive lever is in its highest position.
1. Turn hand wheel toward you to machine CAUTION before changing presser foot.
* Raise presser foot lifter. 3. PREPARATION FOR EMBROIDERY SEWING
BEFORE ATTACHING EMBROIDERY UNIT ATTACHING EMBROIDERY FOOT
Foot holder Support du pied Sujetador prensatelas
Always be sure to touch...
Instruction Manual - Page 64
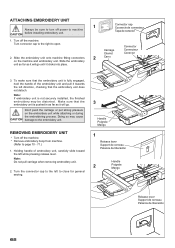
... in as far as it clicks into place. Turn connector cap to the right to close for general sewing.
3
Handle Poignée Mango
1
Release lever Support de cerceau Palanca de liberación
Handle
2... de connecteur Tapa de conector
1. Don't push the carriage or put strong pressure on the machine and embroidery unit. Holding handle of the embroidery unit and pull it towards the left direction,...
Instruction Manual - Page 74
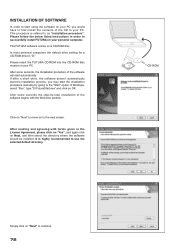
...INSTALLATION OF SOFTWARE
In order to start using the software on to the next screen. The FUTURA software comes on your PC you may start automatically. In most personal computers the default ... software should be installed. Please follow the below listed instructions in order to successfully install FUTURA on a CD-ROM disc. This procedure is highly recommended to first install the contents...
Instruction Manual - Page 76

... the Futura software. Boot up protocol. Now you are prompted to select the Program Folder where the shortcut for a short while until this happens. Simply click on your sewing machine.
The installation procedure is . CORRECT START-UP PROCEDURE WHEN EMBROIDERING
The following steps must be stored.
Turn on your hard disk, an error message...
Instruction Manual - Page 78
... and thread being used.
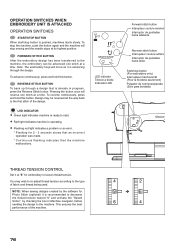
LED INDICATOR Green light indicates machine is ready to start /stop sewing and the needle stops at a time. This ensures the best
performance... SWITCHES
START/STOP BUTTON When start .
Red light indicates machine is operating.
Flashing red light indicates a problem or an error. * Flashing for 2 - 3 seconds shows that an incorrect operation...
Instruction Manual - Page 84

...atrás
82
Upper thread is supplied with the accessories over .
2. HELPFUL INFORMATION FOR EMBROIDERING WITH FUTURA
1. Restart the embroidery machine and continue embroidering. Computer screen says thread is broken, machine lights are missing
If the embroidery machine detects that the thread is not broken. Step back through the embroidery data. Embroidering direction Direction...
Instruction Manual - Page 86
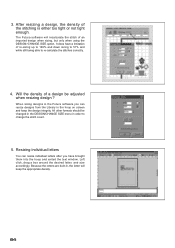
...will recalculate the stitch of a design be changed in the DESIGN/CHANGE SIZE menu in the Futura software you have a limitation of the stitching is either too tight or not tight enough.... the letters are built-in the hoop on screen and keep the appropriate density.
84 The Futura software will keep the design integrity. All other formats should be adjusted when resizing design ? ...
Instruction Manual - Page 90

...points (A, B, and C) are input, they inform the machine exactly as to how the fabric is slightly askew, this system will compensate for it and sew accordingly. Please try to hoop the fabric as accurately as ...select Hoop and then select Multiple. 2. Multi-Hoop
Multi-Hooping is a special feature in the Futura software that will allow embroidery data which is too large for the hoop, it can be ...
Instruction Manual - Page 92

...or individual design elements and arrange them in the hoop area on the "Transmit to the machine for sewing one section at a time. The design data is built into the hoop, aligning cross... numbered hoops will appear as the design parts flow out of the embroidery data that is sent to Machine" tool on the tool bar.
5. The example shown uses lettering and designs from the Design Library ...
Instruction Manual - Page 104
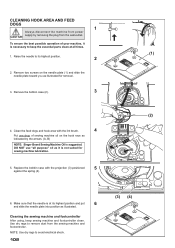
... (3) positioned
5
against the spring (4).
(2)
(A) (B)
6. Use dry rags to its highest position and put
6
and slide the needle plate into position as illustrated for sewing machine lubrication.
5. Cleaning the sewing machine and footcontroller
After using, keep the essential parts clean at its highest position.
2
2.
CLEANING HOOK AREA AND FEED DOGS
1
Always disconnect the...
Instruction Manual - Page 106
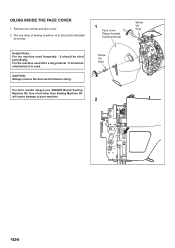
... will cause damage to the points indicated
by arrows.
1 Face cover Plaque frontale Cubierta frontal
Helpful Hints : For the machine used frequently : It should be oiled periodically.
Use of sewing machine oil to your machine.
CAUTION: Always remove the dust and lint before it is used after a long interval : It should be oiled before...
Similar Questions

Replacement Part For Singer Futura Xl 400
I am looking for the embroidery arm unit for a Singer Futura Xl 400. Can you assist me in locating t...
I am looking for the embroidery arm unit for a Singer Futura Xl 400. Can you assist me in locating t...
(Posted by sjh4ba 3 years ago)

Singer Futura Xl-400
I am in need of a Singer Futura XL-400 Startup disc. Any idea where I can get one
I am in need of a Singer Futura XL-400 Startup disc. Any idea where I can get one
(Posted by fayevb 4 years ago)

I Get E7 Error Message On My Singer Model 7258 Sewing Machine. There Is No Refe
Error message E7 is up on my Singer Stylist model 7258 sewing machine. It is not working at all. I t...
Error message E7 is up on my Singer Stylist model 7258 sewing machine. It is not working at all. I t...
(Posted by ebellamybellamy9 5 years ago)

Beeping From Singer Sewing Machine Stylist Ii 5625
My sewing machine will beep and stop sewing after three inches of sewing. I have taken it to be repa...
My sewing machine will beep and stop sewing after three inches of sewing. I have taken it to be repa...
(Posted by arusheria 9 years ago)

How Do I Install Auto Punch Into My Singer Futura 400 Programme
Do I have to link my sewing machine with the computer before installing Auto Punch. No joy so far.
Do I have to link my sewing machine with the computer before installing Auto Punch. No joy so far.
(Posted by jchurn33 11 years ago)