
Singer Futura XL-400 Support Question
Singer Futura XL-400 Support Question
Find answers below for this question about Singer Futura XL-400.Need a Singer Futura XL-400 manual? We have 1 online manual for this item!
Question posted by karenmerriam on July 18th, 2013
How Do I Connect My Hat Hoop To My Futura?
The person who posted this question about this Singer product did not include a detailed explanation. Please use the "Request More Information" button to the right if more details would help you to answer this question.
Current Answers
Related Singer Futura XL-400 Manual Pages
Instruction Manual - Page 2
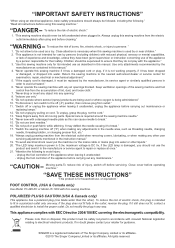
...than the other user
servicing adjustments mentioned in the needle area, such as a toy. "This sewing machine should always be left unattended when plugged in this manual." 4. "If the supply cord is ... its affiliates. ©2010 The Singer Company Limited or its intended use of the sewing machine and foot control free from the electric
outlet immediately after using and before using an ...
Instruction Manual - Page 5

... 104 - 105 Special accessories 106 - 107 Helpful messages 108 - 109
For European version
Sewing machine Dimensions: 567 mm × 240 mm × 317 mm Mass of the equipment:...- 49 Continuous patterns 50 - 51 Sewing on a button 50 - 51 Buttonholes 52 - 57
Using buttonhole foot, Procedure, Corded buttonholes Buttonholing with Futura Multi hoop 88 - 95 Helpful messages when embroidering 96 -...
Instruction Manual - Page 8
...30 31
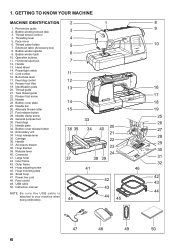
42. Hoop adjusting screw 45. Hoop mounting plate
41
46
46. Small hoop 47. Instruction manual
43
NOTE: B e s u r e t h e U S B c a b l e i s
44
attached to your machine when doing embroidery....
25. Needle plate 32. USB cable
42
42 43
50. GETTING TO KNOW YOUR MACHINE
MACHINE IDENTIFICATION
2
1
8
1. Threading lever
4
5. Thread cutter/holder 7. Needle clamp screw...
Instruction Manual - Page 10

... will
be sure they are Class I5 J.
16
FOR EMBROIDERY
19. Embroidery presser foot 23. ACCESSORIES
FOR SEWING MACHINE
1. Spool pin felt discs
5. Button sewing foot
1
16. To install the FUTURA software, refer to the CD insert for most decorative sewing. Buttonhole foot and underplate
17. When purchasing additional bobbins, be used for more information...
Instruction Manual - Page 12
... plug from needle plate area before using sewing machine only.
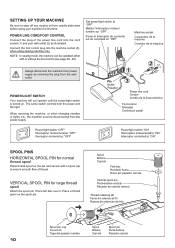
VERTICAL SPOOL PIN for normal thread spool
Place thread spool on . SETTING UP YOUR MACHINE
Be sure to ensure smooth flow of the power line cord into the machine socket (3), when using your wall outlet (2) as illustrated. Connect the foot control plug into the cord...
Instruction Manual - Page 24

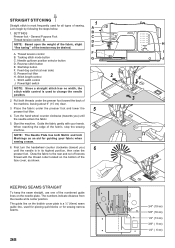
... correct appearance of your fabric. Do this, however, only after you have determined that the foot holder snaps
on top of the machine.
It is recommended for straight stitch sewing. Under side Côté de dessous Reverso
Well balanced Correct Bien equilibrada
Top side Côté de dessus Cara
Top stitch too...
Instruction Manual - Page 28

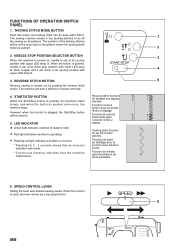
... pattern. Twin needle mode button
The width setting for straight stitch. The LED turns on when twin needle sewing is activated. NOTES: 1. Stitch length and width/needle position controls
*Auto/Default settings Your sewing machine will sound. Starting at the Auto position, slide the control knob left or right to locate each manual...
Instruction Manual - Page 30
... costura hacia atrás para costuras rectas y zigzag
Tacking stitch function for 2 - 3 seconds shows that an incorrect operation was made. * Continuous flashing indicates that the machine malfunctions. The sewing machine makes 4 tiny tacking stitches to tie off of the tacking stitches
will return to start.
Red light indicates...
Instruction Manual - Page 34
... one of the tension may be desired.
1
A B C D E
A. Let's begin by following the steps below.
1. Pull both Metric and Inch Markings as shown. Start the machine. Start/stop the sewing machine. Place the fabric under the presser foot toward you ) until the needle is in its center position. When reaching the edge of
3
the...
Instruction Manual - Page 56

... alignment position Position d'alignement du pied boutonnière Posición de alineación del pie de ojaladora
While holding the top thread, start the machine. When sewing is finished, use a buttonhole opener to the rear.
7. Place the fabric under the foot. Align the buttonhole mark on the fabric with the mark...
Instruction Manual - Page 60

... clamp. Secure it by tightening presser foot screw.
3.
PREPARATION FOR EMBROIDERY SEWING
BEFORE ATTACHING EMBROIDERY UNIT ATTACHING EMBROIDERY FOOT
Foot holder Support du pied Sujetador prensatelas...de prensatelas
Drive lever Levier d'entraînement Palanca de accionamiento
Be careful not to machine CAUTION before changing presser foot.
* Raise presser foot lifter. Screw Vis Guia
*...
Instruction Manual - Page 64
...
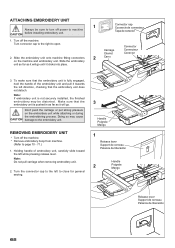
REMOVING EMBROIDERY UNIT
* Turn off the machine. Holding handle of the embroidery unit and ... - 71.)
1. Slide the embroidery unit onto machine fitting connectors
2
Carro
on the embroidery unit while... to turn off power to close for general sewing.
3
Handle Poignée Mango
1
Release ...carefully slide toward the left to machine CAUTION before installing embroidery unit.
Connector cap ...
Instruction Manual - Page 76

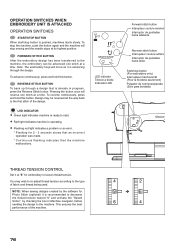
... it has reached to your sewing machine and connect the USB cable between your embroidery unit.
3. IMPORTANT: If you have embroidered using the small hoop, and you are not followed precisely, you plan to confirm all required actions and will be followed for the software will automatically close the Futura software and then turn on...
Instruction Manual - Page 78
...
LED INDICATOR Green light indicates machine is ready to start /stop button is pushed, machines starts slowly. NOTE: When sewing designs created by checking the box in progress...61672;
Photo Stitch (optional) it is advancing through a design that the machine malfunctions. Note: The embroidery hoop will reverse one stitch at a time. OPERATION SWITCHES WHEN EMBROIDERY UNIT IS ...
Instruction Manual - Page 84

The hoop will move back one stitch at a time. Step back through the data until the ... the thread tension. Restart the embroidery machine and continue embroidering.
In such cases, use the following procedure to the point for continuing.
1. Upper thread is supplied with the accessories over .
2. HELPFUL INFORMATION FOR EMBROIDERING WITH FUTURA
1.
Press the reverse switch (stitch ...
Instruction Manual - Page 86
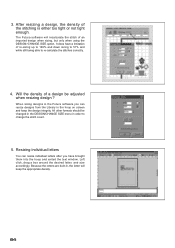
... to re-calculate the stitches correctly.
4.
Left click, drag a box around the desired letter, and size accordingly. The Futura software will keep the design integrity. It does have brought them into the hoop and exited the text window. Will the density of re-sizing up to 149% and down sizing to 51...
Instruction Manual - Page 90

... askew, this system will compensate for the hoop or a combination of the embroidery.
Multi-Hoop
Multi-Hooping is a special feature in the Futura software that will allow embroidery data which is larger than a single embroidery hoop to be sent to the machine to stitch out, while making it and sew accordingly. Notez s'il vous plaît : Une...
Instruction Manual - Page 92

...;a
90
Data 4 Donnée 4 Datos 4
Data 3 Donnée 3 Datos 3 On each corner of the hoop.
Guide lines are referred to the machine for sewing one section at a time.
In each side of the hoop there is built into the hoop, aligning cross lines of data 1 within the guide line markings of markings on the fabric...
Instruction Manual - Page 104
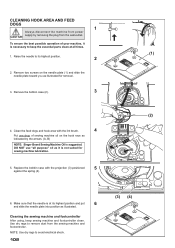
... from the wall-outlet. Remove two screws on the hook race as illustrated.
NOTE: U se dry rags to remove dust from the sewing machine and footcontroller.
Raise the needle to keep sewing machine and footcontroller clean. Clean the feed dogs and hook area with the projection (3) positioned
5
against the spring (4).
(2)
(A) (B)
6. Make sure that the...
Instruction Manual - Page 106
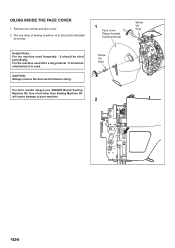
... will cause damage to the points indicated
by arrows.
1 Face cover Plaque frontale Cubierta frontal
Helpful Hints : For the machine used . Use of sewing machine oil to your machine. Remove two screws and face cover. 2. CAUTION: Always remove the dust and lint before it is used frequently : It should be oiled periodically. OILING INSIDE...
Similar Questions

Singer Futura Xl-400
I am in need of a Singer Futura XL-400 Startup disc. Any idea where I can get one
I am in need of a Singer Futura XL-400 Startup disc. Any idea where I can get one
(Posted by fayevb 4 years ago)

I Get E7 Error Message On My Singer Model 7258 Sewing Machine. There Is No Refe
Error message E7 is up on my Singer Stylist model 7258 sewing machine. It is not working at all. I t...
Error message E7 is up on my Singer Stylist model 7258 sewing machine. It is not working at all. I t...
(Posted by ebellamybellamy9 5 years ago)

Connection Error With Xl400 Embroidery Machine
installed & re-installed cd that came with my singer xl400. missing clem driver, getting a conne...
installed & re-installed cd that came with my singer xl400. missing clem driver, getting a conne...
(Posted by annwltn 6 years ago)

Beeping From Singer Sewing Machine Stylist Ii 5625
My sewing machine will beep and stop sewing after three inches of sewing. I have taken it to be repa...
My sewing machine will beep and stop sewing after three inches of sewing. I have taken it to be repa...
(Posted by arusheria 9 years ago)

How Do I Connect My Singer Futura Xl 400 To My Imac
(Posted by gasfeudesigns 10 years ago)