
Singer Futura XL-400 Support Question
Singer Futura XL-400 Support Question
Find answers below for this question about Singer Futura XL-400.Need a Singer Futura XL-400 manual? We have 1 online manual for this item!
Question posted by pressvibe2j on February 18th, 2014
Design Will Not Transmit To Futura Xl 400
The person who posted this question about this Singer product did not include a detailed explanation. Please use the "Request More Information" button to the right if more details would help you to answer this question.
Current Answers
Related Singer Futura XL-400 Manual Pages
Instruction Manual - Page 2
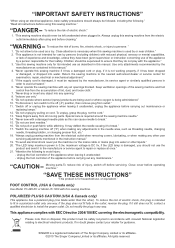
... 2004/108/EC covering the electromagnetic compatibility. If it unattended: - SINGER is intended to fit in this manual." 4.
Close attention is necessary when this sewing machine. "Never operate the sewing machine with relevant National legislation relating to electrical/ electronic products. "Do not operate where aerosol (spray) products are being administered." 10. "To avoid...
Instruction Manual - Page 5

...cover 104 - 105 Special accessories 106 - 107 Helpful messages 108 - 109
For European version
Sewing machine Dimensions: 567 mm × 240 mm × 317 mm Mass of the equipment: ...Troubleshooting 78 - 87 Helpful information for embroidering with Futura Multi hoop 88 - 95 Helpful messages when embroidering 96 - 97
4. STARTING TO SEW Quick reference table of stitch length and width ----------...
Instruction Manual - Page 10

... J.
16
FOR EMBROIDERY
19. To install the FUTURA software, refer to the CD insert for needle plate
10. Blind hem foot
14.
Vinyl bag 20. Buttonhole foot and underplate
17. When purchasing additional bobbins, be
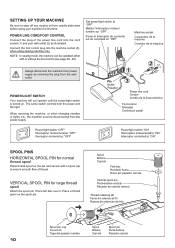
used for most decorative sewing. Spool pin felt discs
5. Bobbins 21. ACCESSORIES
FOR SEWING MACHINE
1. Spool pin cap (large)
8.
Instruction Manual - Page 12
...: In sewing mode, the machine can be disconnected from the walloutlet.
Poner el Interruptor de corriente/ luz de velocidad en "OFF"
machine socket Connecteur de la machine Conector de la máquina
2 1
Pin Butée Pasador
3
Power line cord Cordon Cordón de la linea eléctrica
Foot control Rhéostat
XL-550...
Instruction Manual - Page 24

... of your fabric. It is recommended for buttonholes to adjust the tension control. Helpful Hint: A slight adjustment to a higher number or a lower number may improve sewing appearance. Lower the presser foot lifter so that the machine is correctly threaded (see page 7). Raise presser foot lifter. 1. ADJUSTING TOP THREAD TENSION
90% of your...
Instruction Manual - Page 28

Stitch length and width/needle position controls
*Auto/Default settings Your sewing machine will produce most of the potential adjustments. Auto (preprogrammed) ...adjustments than others.
2. When a pattern is to locate each manual adjustment point, the LED will automatically sew at the Auto / Default Position.
*Manual settings Once you have determined the Auto / Default position you...
Instruction Manual - Page 30
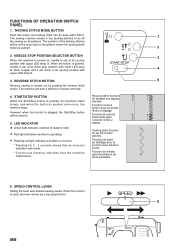
..., the lever serves as a top speed limiter.
6
28 TACKING STITCH MODE BUTTON
Push this button and tacking stitch can be at its up -stop .
4. The sewing machine makes 4 tiny tacking stitches to its down-stop position with LED lit. Reverse stitch function for straight and zigzag stitches Fonction couture arrière...
Instruction Manual - Page 34
... to change the needle
position. 2. Let's begin by following the steps below.
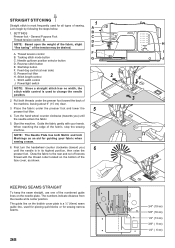
1. Start/stop the sewing machine. Pull both Metric and Inch Markings as shown. NOTE: The Needle Plate has both threads under the ... the needle is used for piecing quilt blocks or for guiding your hands. Start the machine. Guide the fabric gently with the thread cutter located on the bobbin cover plate is...
Instruction Manual - Page 36

... of foot to foot holder. Helpful Hint: Slight adjusting of fabric. Thread bobbin with thread that is designed to sew.
34 Increase thread tension toward 6 or higher until you achieve the desired appearance.
4. To sew down the right side, attach left side of zipper foot to presser foot holder so that the needle...
Instruction Manual - Page 44
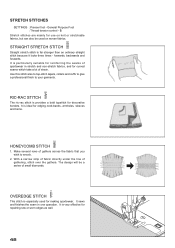
... times - With a narrow strip of fabric directly under the line of small diamonds. The design will be used for reinforcing the seams of gathers across the fabric that you wish to your... garments. Make several rows of sportswear in one operation.
It sews and finishes the seam in stretch and non-stretch fabrics, and for edging neck-bands, armholes,...
Instruction Manual - Page 56

When sewing is finished, use a buttonhole opener to open up the fabric in the following order.
1
2
3
4
5
6
7
Fabric ... fabric with the mark on your garment. 6. While holding the top thread, start the machine. Fabric marking Marque du tissu Marca de material
mark Marque Marca
* Sewing will be completed automatically in the center of buttonhole on the buttonhole foot, and then lower...
Instruction Manual - Page 62
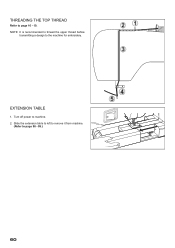
Turn off power to page 98 - 99.)
60 Slide the extension table to left to remove it from machine.
(Refer to machine. 2. NOTE: It is recommended to thread the upper thread before
transmitting a design to page 16 - 19. EXTENSION TABLE
1.
THREADING THE TOP THREAD
Refer to the machine for embroidery.
Instruction Manual - Page 76

...a short while until this happens.
If these steps are now ready to select and transmit a design to your machine. You are not followed precisely, you will prompt you to free some hard disk space... during the installation set-up the Futura Software.
4.
Double click on the Futura Icon on "Next" to 100%. Attach the hoop that you plan to your sewing machine and connect the USB cable between ...
Instruction Manual - Page 78
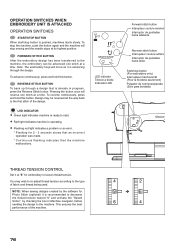
... 2 - 3 seconds shows that an incorrect operation was made. * Continuous flashing indicates that is already in Machine navigator, before
sending the design to loosen thread tension. To stop the machine, push the button again and the machine will stop sewing and the needle stops at a time. LED indicator Témoin a diode Indicador LED
Forward stitch button...
Instruction Manual - Page 84

... continue embroidering. Computer screen says thread is broken, machine lights are missing
If the embroidery machine detects that the thread has broken, it may ensure that is not in the thread tension. HELPFUL INFORMATION FOR EMBROIDERING WITH FUTURA
1. Rethread upper thread, (see page 16 - 17 "Threading the Top Thread".) Placing the small net...
Instruction Manual - Page 86
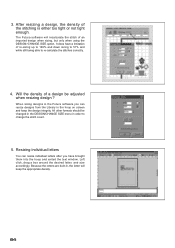
... you can resize individual letters after you have a limitation of an imported design when sizing, but only when using the DESIGN>CHANGE SIZE option. The Futura software will keep the design integrity. When sizing designs in , the letter will recalculate the stitch of re-sizing up to 149% and down sizing to 51% and while...
Instruction Manual - Page 90

....
Multi-Hoop
Multi-Hooping is a special feature in the Futura software that will allow embroidery data which is larger than a single embroidery hoop to be sent to the machine to stitch out, while making it and sew accordingly. The Multi-Hoop feature splits the design elements in the upper left corner.
88
Please note...
Instruction Manual - Page 92

...Transmit to be set on the horizontal and vertical cross lines on the inner hoop.
The example shown uses lettering and designs from the Design Library that is sent to the machine ... the hoop. Guide lines are referred to the machine for sewing.
These marks are to Machine" tool on the screen. 3. Select a large design or individual design elements and arrange them in the hoop area on...
Instruction Manual - Page 104
... you as it is necessary to avoid electrical shock.
102
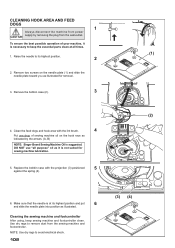
(3) (4) Remove two screws on the hook race as illustrated. NOTE: U se dry rags to keep sewing machine and footcontroller clean.
DO NOT use "all times.
(1)
1. Raise the needle to remove dust from the wall-outlet. Use dry rags to its highest position...
Instruction Manual - Page 106
...
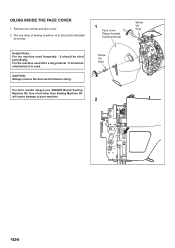
1. CAUTION: Always remove the dust and lint before it is used. Screw Vis Guia
2
Screw Vis Guia
104
Use of sewing machine oil to your machine.
Put one drop of oil other than Sewing Machine Oil will cause damage to the points indicated
by arrows.
1 Face cover Plaque frontale Cubierta frontal
Helpful Hints : For the...
Similar Questions

Copy Of Software For Singer Futura Xl 400
Can Anyone Help Me To Get A Copy Of Software For Singer Futura XL 400. Mine got damaged..?
Can Anyone Help Me To Get A Copy Of Software For Singer Futura XL 400. Mine got damaged..?
(Posted by amalilranaweera 3 years ago)

Replacement Part For Singer Futura Xl 400
I am looking for the embroidery arm unit for a Singer Futura Xl 400. Can you assist me in locating t...
I am looking for the embroidery arm unit for a Singer Futura Xl 400. Can you assist me in locating t...
(Posted by sjh4ba 3 years ago)

Singer Futura Xl-400
I am in need of a Singer Futura XL-400 Startup disc. Any idea where I can get one
I am in need of a Singer Futura XL-400 Startup disc. Any idea where I can get one
(Posted by fayevb 4 years ago)


Software Futura Xl-400 And Usb Cable
How can I get Futura XL-400 software to work. Currently, I cannot open software because the (I think...
How can I get Futura XL-400 software to work. Currently, I cannot open software because the (I think...
(Posted by idesktype 10 years ago)