Singer Futura Quartet Support Question
Singer Futura Quartet Support Question
Find answers below for this question about Singer Futura Quartet.Need a Singer Futura Quartet manual? We have 1 online manual for this item!
Question posted by kelleyminer on August 20th, 2014
Connector Cap
Where is the connector cap that you are supposed to turn to right to open
Current Answers
Related Singer Futura Quartet Manual Pages
Instruction Manual - Page 1
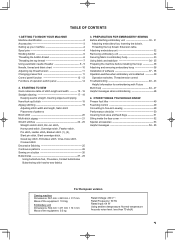
... Decorative Stitching 25 Continuous patterns 26 Sewing on a button 26 Buttonholes 27 - 29
Using buttonhole foot, Procedure, Corded buttonholes Buttonholing with Futura Multi hoop 44 - 47 Helpful messages when embroidering 48
4. TABLE OF CONTENTS
1.GETTING TO KNOW YOUR MACHINE Machine identification 2 Accessories 3 Setting up your machine 4 Spool pins 4 Winding bobbin 5 Threading the...
Instruction Manual - Page 2
...43. Hoop adjusting screw
32
45. Thread cutter/holder
7. Connector 41. Large hoop 42. Horizontal spool pin 12. Power line...mounting plate
41
46
46. Bobbin winder spindle
9. Twin thread guide
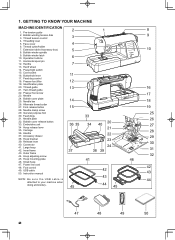
22. 1. GETTING TO KNOW YOUR MACHINE
MACHINE IDENTIFICATION
2
1
8
1. Identification plate
20. Needle clamp screw
29. Release lever 40. Instruction manual
42
42 43...
Instruction Manual - Page 3
... foot
14. Screwdriver for more information.
2
3
4
5
6
8
9
10
11
13
14
15
17
18
20
21
22
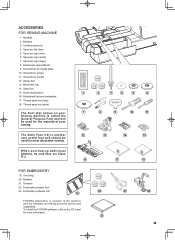
23 3 Embroidery software CD
19
FUTURA embroidery is another
12
very useful foot and should be sure they are Class I5 J.
16
FOR EMBROIDERY
19. Spool pin cap (mini)
6. Scissors 22. ACCESSORIES
FOR SEWING MACHINE
1. Needles
2. Spool pin...
Instruction Manual - Page 4
... plug from needle plate area before using sewing machine only.
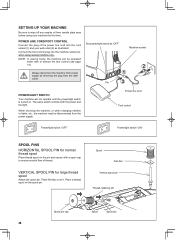
VERTICAL SPOOL PIN for normal thread spool
Place thread spool on the pin and secure with or without the foot control (see page 14). Spool
Felt disc
Vertical spool pin
Thread retaining slit
Spool pin cap
Spool
Spool pin
4
Set power/light switch...
Instruction Manual - Page 9
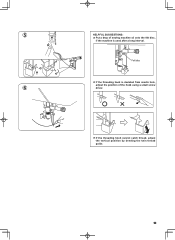
5
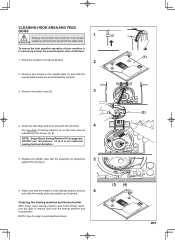
HELPFUL SUGGESTIONS: Put a drop of sewing machine oil onto the felt disc,
if the machine is deviated from needle hole,
adjust the position of the hook using a small screw
6
driver.
If the threading hook cannot catch thread, adjust the vertical position by bending the twin thread guide.
9 Felt disc
If the threading hook is used after a long interval.
Instruction Manual - Page 13
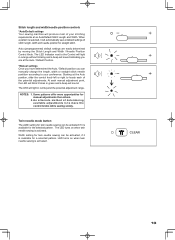
... right to move the control knobs while sewing slowly. At each of the potential adjustments.
The LED will sound. Width setting for the selected pattern. Some patterns offer more opportunities for straight stitch. The LED turns on when twin needle sewing is activated. Stitch length and width/needle position controls
*Auto/Default settings Your sewing machine...
Instruction Manual - Page 14
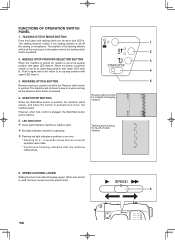
...machine is turned on all patterns. The machine will return to start.
Red light indicates machine is set at the exact spot in reverse as long as a top speed limiter.
6
14
START/STOP BUTTON
When the Start/Stop button is pushed, the machine...tacking stitch can be inactive.
5. The sewing machine makes 4 tiny tacking stitches to sew in the pattern where the tacking stitch...
Instruction Manual - Page 17
..., then raise the
6
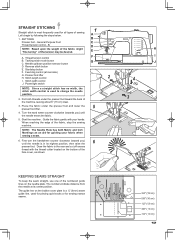
presser foot. Stitch width control J. First turn the handwheel counter clockwise (toward the back of the
face cover, as an aid for sewing narrow seams.
3/4" (19 mm) 5/8" (16 mm) 1/2" (13 mm) 3/8" ( 9 mm) 1/4" ( 6 mm)
17 Start/stop the sewing machine. Start the machine. STRAIGHT STITCHING
Straight stitch is used to the rear and...
Instruction Manual - Page 23
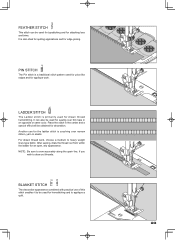
... stitch in an opposite or same color. For drawn thread work .
NOTE: Be sure to sew accurately along the grain line, if you
wish to heavy weight linen-type fabric. BLANKET STITCH
... special effect will be obtained for an open, airy appearance.
LADDER STITCH
The Ladder stitch is also ideal for quilting applications and for edge-joining. After sewing, draw the thread out from within the...
Instruction Manual - Page 26
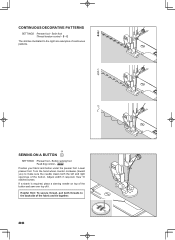
... - Position your fabric and button under the presser foot. Sew 10 stitches across. Adjust width if required. E
The stitches illustrated to the backside of continuous patterns. Lower presser foot. S - Helpful Hint: To secure thread, pull both the left and right openings of it. Button sewing foot :Feed dog control - Satin foot :Thread tension control...
Instruction Manual - Page 32
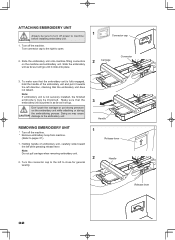
...Turn connector cap to the right to close for general sewing.
3
Handle
1
Release lever
2
Handle
Release lever
32
Don't push the carriage or put strong pressure on the machine...removing embroidery unit.
2. Turn the connector cap to the left to open.
2. ATTACHING EMBROIDERY UNIT
Always be distorted. Turn off the machine. * Remove embroidery hoop from machine.
(Refer to pages 37...
Instruction Manual - Page 38

... small hoop, and you are now ready to select and transmit a design to your sewing machine.
Attach the hoop that you .
2. Simply click on your machine. Double click on the Futura Icon on "Next" to open the Futura software. Boot up the Futura Software.
4. Turn on your embroidery unit.
3. You are now ready to the highest position by...
Instruction Manual - Page 41
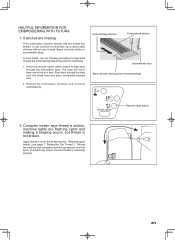
Restart the embroidery machine and continue embroidering. Embroidering direction
Embroidered section
1357
2468
automatically stop
Blank stitches resulting from....
41 Upper thread is not broken. Computer screen says thread is broken, machine lights are missing
If the embroidery machine detects that the thread has broken, it automatically stops.
HELPFUL INFORMATION FOR EMBROIDERING WITH...
Instruction Manual - Page 42
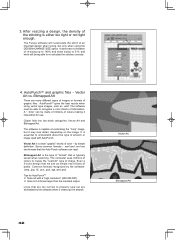
... is typically saved when scanning.
Even a 3-color design that are too narrow to properly sew out are many different types of images or formats of the stitching is a clean "graphic" blocks of image. Tips for use. The Futura software will recalculate the stitch of an imported design when sizing, but it cleans...
Instruction Manual - Page 43
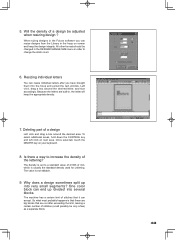
... letters are cut after you can accept. Once selected, touch the DELETE key on next area.
When sizing designs in the Futura software you have brought them into very small segments? Deleting part of stitches (could possibly be only a few) as a... a design
Left click and drag a box around the desired letter, and size accordingly. The machine has a certain limit of the lettering? 5.
Instruction Manual - Page 44
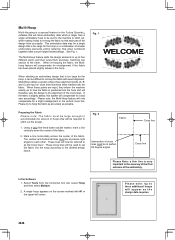
...sews them precisely, matching one section to stitch out the design.
1.
Preparing the Fabric P l e a s e n o t e : T h e f a b r i c m u s t b e l a r g e e n o u g h t o accommodate the amount of the embroidery. Multi-Hoop utilizes a system where three alignment points (A, B, and C) are input, they inform the machine... lines will now be at precise right angles to as possible.
Fig. ...
Instruction Manual - Page 51
... as it is necessary to its highest position and put
6
and slide the needle plate into position as indicated by removing the plug from the sewing machine and footcontroller. Use dry rags to avoid electrical shock.
(3) (4)
51
DO NOT use "all times.
(1)
1.
Make sure that the needle is not suited for removal...
Instruction Manual - Page 52
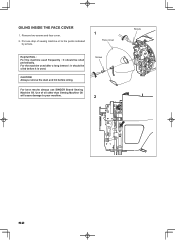
...: Always remove the dust and lint before it is used. Put one drop of oil other than Sewing Machine Oil will cause damage to the points indicated
by arrows.
1
Face cover
Helpful Hints : For the machine used after a long interval : It should be oiled before oiling.
For best results always use SINGER Brand...
Instruction Manual - Page 55
...
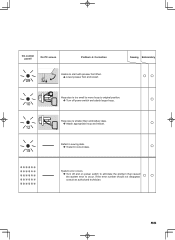
Problem Correction
Unable to start with presser foot lifted. Lower presser foot and restart.
09
Sewing Embroidery
○○
Hoop size is too small to move hoop to original position. Turn off and on power switch to eliminate the problem that caused the system error to occur. If the...
Instruction Manual - Page 60
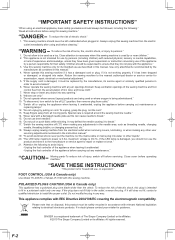
... experience and knowledge, unless they do not play with this sewing machine is used or where oxygen is not intended for use of burns, fire, electric shock, or injury to break." 17. "To disconnect, turn switch to the off ("0") when making any opening." 8. "Switch off
before cleaning." "Do not unplug by pulling on disposal...
Similar Questions

Where Can I Get Replacement Parts For My Futura Quartet 6000 Machine?
(Posted by treasuredjewels2321 8 months ago)

I Was Sewing And All Of The Sudden My Machine Turned Off
(Posted by mari0624 3 years ago)

I Get E7 Error Message On My Singer Model 7258 Sewing Machine. There Is No Refe
Error message E7 is up on my Singer Stylist model 7258 sewing machine. It is not working at all. I t...
Error message E7 is up on my Singer Stylist model 7258 sewing machine. It is not working at all. I t...
(Posted by ebellamybellamy9 5 years ago)

Singer Futura Quartet
Will my Singer Futura Quartet sew a patch on leather, if so, what size needle n foot do I use Ty
Will my Singer Futura Quartet sew a patch on leather, if so, what size needle n foot do I use Ty
(Posted by Lthomas85 9 years ago)
Beeping From Singer Sewing Machine Stylist Ii 5625
My sewing machine will beep and stop sewing after three inches of sewing. I have taken it to be repa...
My sewing machine will beep and stop sewing after three inches of sewing. I have taken it to be repa...
(Posted by arusheria 9 years ago)