Singer 8500Q MODERN QUILTER Support Question
Singer 8500Q MODERN QUILTER Support Question
Find answers below for this question about Singer 8500Q MODERN QUILTER.Need a Singer 8500Q MODERN QUILTER manual? We have 1 online manual for this item!
Question posted by b2uptite410 on November 23rd, 2019
Every Time I Use The Quilting Foot To Do Machine Quilting The Bobbin Thread Bare
catches or it knots up or jams I have lowered tension and increased it frustrated hel
Current Answers
Related Singer 8500Q MODERN QUILTER Manual Pages
Instruction Manual - Page 2
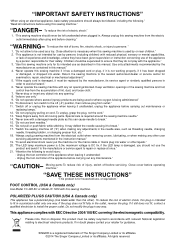
³,03257$176$)(7
Instruction Manual - Page 5
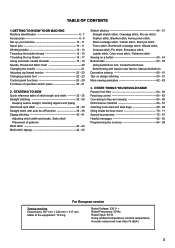
...LGHQWL¿FDWLRQ 6 - 7 Accessories 8 - 9 Set up your machine 10 - 11 Spool pins 10 - 11 Winding bobbin 12 - 13 Threading the bobbin thread 14 - 15 Threading the top thread 16 - 17 Using automatic needle threader 18 - 19 Needle, thread and fabric chart 20 Changing the needle 21 Adjusting top thread tension 22 - 23 Changing presser foot 22 - 23 Control panel functions 24 - 29...
Instruction Manual - Page 10
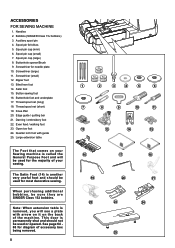
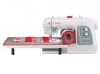
... door is removed, you will be used for needle plate 10. Buttonhole foot and underplate 17. Knee lifter 20. Edge guide / quilting bar 21. Large extension table
The Foot that comes on the back of your Sewing machine is another very useful foot and should not be sure they are SINGER Class 15J bobbins. See page 64 65 for...
Instruction Manual - Page 14
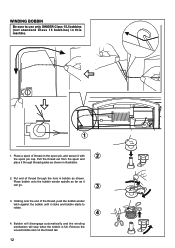
... will stop when the bobbin is full. Remove the wound bobbin and cut the thread tail.
12 WINDING BOBBIN
Be sure to rotate.
4
4. Place a spool of thread through thread guides as shown in bobbin as it clicks and bobbin starts to use only SINGER Class 15J bobbins (not standard Class 15 bobbins) in this machine.
1
1. Put end of thread on the spool pin...
Instruction Manual - Page 16
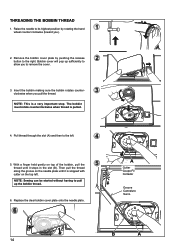
... plate by rotating the hand wheel counter clockwise (toward you).
2. Insert the bobbin making sure the bobbin rotates counterclockwise when you to remove the cover.
3. NOTE: Sewing can be started without having to the left . THREADING THE BOBBIN THREAD
1.
Replace the clear bobbin cover plate onto the needle plate. Raise the needle to its highest position by...
Instruction Manual - Page 18

... time you have mis-threaded the machine and need to raise the presser foot lifter before threading the top thread. (If the presser foot lifter is threaded properly in the tension discs, do not detect the resistance you should detect only D VOLJKW UHVLVWDQFH DQG OLWWOH RU QR GHÀHFWLRQ RI WKH needle.
2.) Now lower the presser foot and again pull...
Instruction Manual - Page 24
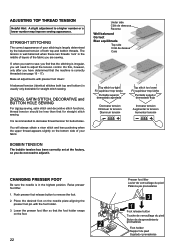
...Push presser foot release button to a higher number or a lower number may improve sewing appearance. Make all adjustments with the foot holder. 3.
You will need to decrease thread tension for straight stitch sewing. Place the desired foot on the needle plate aligning the
presser foot pin with presser foot 'down'.
A balanced tension (identical stitches both top and bobbin threads.
Instruction Manual - Page 30
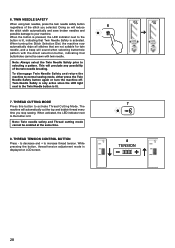
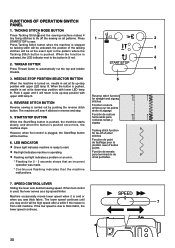
... the stitch width automatically and save broken needles and possible damage to normal sewing mode, either press the Twin Needle Safety button again or turn the machine off. THREAD TENSION CONTROL BUTTON
Press - Doing so will automatically cut the top and bobbin thread every time you selected. When the button is pressed, the LED indicator next to...
Instruction Manual - Page 32
... cut the top and bobbin
5
threads.
3.
The machine will sew 4 stitches in the pattern where the
Tacking Stitch button is stopped
so tacking stitch will be at its up -stop position with upper LED lamp lit. The lower speed continues until you sew thick fabric. However, when foot control is
7
from cold machine. Machine occasionally moves lower speed when it...
Instruction Manual - Page 38
... stitch button E. Thread tension control button I
4
2. Pull both Metric and Inch Markings as shown. The numbers indicate distance from the needle at rear side) G. Start/stop the sewing machine. Power/light switch
F G
2
NOTE: Since a straight stitch has no width, the stitch width control is a ¼" (6mm) seam guide line, used for piecing quilt blocks or for...
Instruction Manual - Page 40
....
4. Press the reverse button and the machine will sew 4 stitches forward and then 4 stitches in with the fabric color, so it doesn't show.
3.
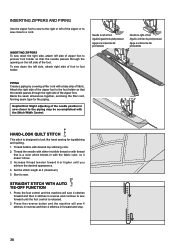
INSERTING ZIPPERS AND PIPING
Use the zipper foot to sew to the right or left of the zipper or to sew close to sew.
Increase thread tension toward 6 or higher until the foot control is a color which blends...
Instruction Manual - Page 42
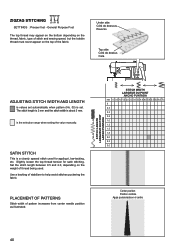
... used . Slightly loosen the top thread tension for appliqué, bar-tacking, etc. Set the stitch length between 0.5 and 2.0, depending on the top of thread being used ...Foot
The top thread may appear on the bottom depending on the thread, fabric, type of stitch and sewing speed, but the bobbin thread must never appear on the weight of the fabric. Use a backing of pattern increases...
Instruction Manual - Page 46
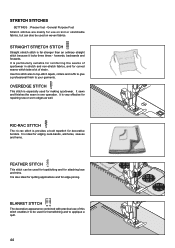
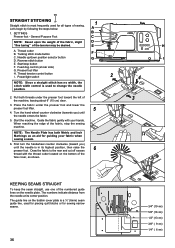
...straight stitch because it to applique a quilt.
44
It is also ideal for quilting applications and for hemstitching and to be used for edge-joining. It is ideal for...used on knit or stretchable fabrics, but can be used for topstitching and for attaching lace and trims. It is particularly suitable for reinforcing the seams of strain. STRETCH STITCHES
SETTINGS :Presser foot - Use...
Instruction Manual - Page 54
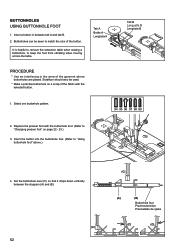
It is helpful to remove the extension table when sewing a buttonhole, to "Using buttonhole foot" above.)
4. Tab B Languette B Lengüeta B
1. Stabilizer should also be sewn to "Changing presser foot" on a scrap of the fabric with the selected button. Replace the presser foot with the buttonhole foot. (Refer to match the size of the garment where buttonholes...
Instruction Manual - Page 56
...
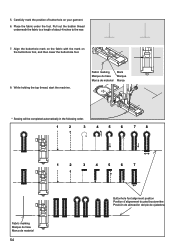
* Sewing will be completed automatically in the following order.
1
2
3
4
5
6
7
8
1
2
3
4
5
6
7
Fabric marking Marque du tissu Marca de material
54
Buttonhole foot alignment ...foot, and then lower the buttonhole foot.
8. Place the fabric under the foot. Pull out the bobbin thread
underneath the fabric to the rear.
7. 5. While holding the top thread, start the machine.
Instruction Manual - Page 68
....
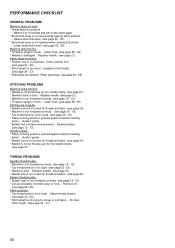
(see page 14 - 15). * Lint accumulates in bobbin case or hook. - Bobbin thread breaks. * Bobbin case is caught in hook. - Shorten
stitch length. (see page 68 - 69). PERFORMANCE CHECKLIST
GENERAL PROBLEMS Machine does not sew. * Power switch is not lowered - Remove lint
(see page 24 - 27).
66 Machine jams/knocks. * Thread is not threaded correctly. (see page 12 - 13). Clean hook...
Instruction Manual - Page 70
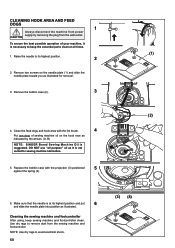
...;DOO SXUSRVH´ RLO DV LW LV QRW
suited for removal.
3.
Remove the bobbin case (2).
3
4. Clean the feed dogs and hook area with the projection (3) positioned
5
against the spring (4).
(2)
(A) (B)
6. NOTE: Use dry rags to remove dust from the sewing machine and footcontroller.
Remove two screws on the hook race as indicated by removing the...
Instruction Manual - Page 74
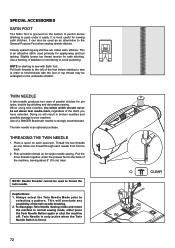
... foot before starting to sew in broken needles and possible damage to your machine. Doing so will preclude any possibility of the twin needle breaking. 2.
Place a spool on each needle from front to back.
2. It is most useful for single needle sewing. The twin needle is lit red.
72 Draw one . Pick up bobbin thread as for sewing...
Instruction Manual - Page 76
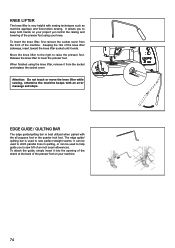
... cover from the front of the presser foot using your project yet control the raising and lowering of the machine. EDGE GUIDE / QUILTING BAR
The edge guide/quilting bar is used to sew perfect straight seams. It can be used to stitch parallel lines in quilting, or can be used to help guide you to sew 5/8 of the knee lifter sideways, insert...
Instruction Manual - Page 78
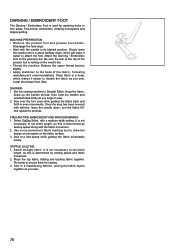
... manufacturer's recommendations. Place the top fabric, batting and backing fabric together. Sew. Draw up the bobbin thread, then hold the bobbin and QHHGOHWKUHDG¿UPO\DV\RXEHJLQWRVHZ 2.
STIPPLE QUILTING 1. Pin baste to Straight Stitch. Sew in a hoop, which will make it is resting on the fabric surface. 3.
Hoop the fabric. MACHINE PREPARATION ‡...
Similar Questions

I Can Not Get My Tension Adjusted Correctly, My Bobbin Thread Looks Like A Snake
bottom thread very wavy
bottom thread very wavy
(Posted by nanab12456 1 year ago)

Needle Won't Pick Up Bobbin Thread So Won't Stitch. The Needle Broke When I Se
the needle broke when I sewed over a bead accidentally. Needle replaced and machine runs but won't s...
the needle broke when I sewed over a bead accidentally. Needle replaced and machine runs but won't s...
(Posted by Sylviasuffield49 5 years ago)

Bringing Up Bobbin Thread.
I have watched the online video tutorial for the Singer 3333, and when demonstrating winding the bob...
I have watched the online video tutorial for the Singer 3333, and when demonstrating winding the bob...
(Posted by croswords 7 years ago)
Singer Sewing Machine 8763 Bobbin Thread Does Not Sew After Material Jam
(Posted by Anonymous-151081 9 years ago)

Keep Getting Error Messages That Thread Is Broken When It Is Not
And also get message that bobbin is jammed and to clean. When I retread and clean the bobbin area st...
And also get message that bobbin is jammed and to clean. When I retread and clean the bobbin area st...
(Posted by Anonymous-148126 9 years ago)