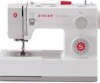
Singer 5523 SCHOLASTIC Support Question
Singer 5523 SCHOLASTIC Support Question
Find answers below for this question about Singer 5523 SCHOLASTIC.Need a Singer 5523 SCHOLASTIC manual? We have 1 online manual for this item!
Question posted by pnjmilstead on July 14th, 2014
Optional Cutter
I am having trouble with the optional cutter on my Singer Scholastic sewing machine. I just purchased it and need to know how to put the fabric through the cutter. I don't know if I can put small amounts of fabric through it or wider pieces of fabric.
Current Answers
Related Singer 5523 SCHOLASTIC Manual Pages
Instruction Manual - Page 2
... or instruction concerning use as described in this appliance from accumulation of the sewing machine and foot controller free from the electric outlet immediately
after using and before cleaning...the like. 10. Always unplug this manual. 3. Do not pull or push fabric while stitching. Switch the sewing machine off ("O") when making any adjustments
in . 2. An appliance should never be ...
Instruction Manual - Page 6
... Step Presser Foot Lifter/ Adjusting Presser Foot Pressure...8 Accessories...10
Threading the Machine Winding the Bobbin...12 Inserting the Bobbin ...14 Threading the Upper Thread...16 Automatic Needle Threader ...18 Raising the Bobbin Thread ...20 Thread Tension ...22
Sewing How to Choose Your Pattern...24 Three Needle Position Dial ...26 Stitch Width...
Instruction Manual - Page 9
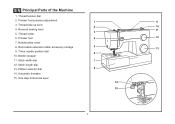
EN Principal Parts of the Machine
1. Thread tension dial
2. Thread take-up lever 2
10
4. Three needle position dial
6
10. Reverse sewing lever
11
3
5. Stitch length dial
13. Stitch width dial
7
12. Automatic threader 15. Presser foot pressure adjustment
1
9
3. Presser foot
4
12
7. Needle plate cover
8. Bobbin stopper
...
Instruction Manual - Page 11

...
17
19. Power and light switch 19
22. Face plate
20
26. Horizontal spool pin
17. Main plug socket
23. EN Principal Parts of the Machine
16. Power cord
4
23 24 25 26 27
29 30
28
Instruction Manual - Page 13
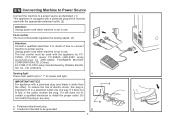
... Electric Ind. IMPORTANT NOTICE For appliance with a polarized plug (one way. To reduce the risk of how to connect machine to power source. Conductor intended to " l " for power and light. Co., Ltd. (Vietnam)
Sewing light
1
Press main switch (A) to be grounded
2
6
A 3 If it still does not fit, contact a qualified electrician to install...
Instruction Manual - Page 15
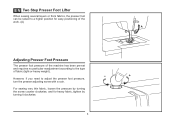
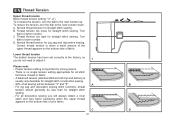
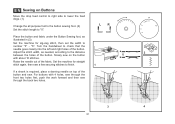
However, if you need to the type of the machine has been pre-set and requires no particular readjustment according to adjust the presser foot pressure, turn the presser adjusting screw with a coin. For sewing very thin fabric, loosen the pressure by turning it clockwise.
8 EN Two Step Presser Foot Lifter
When sewing several layers or...
Instruction Manual - Page 17
...machine; Quilting/ straight stitch foot t. Darning/ embroidery foot v. Twin needle
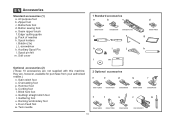
2 Optional ...sewing foot e. Satin stitch foot o. EN Accessories
Standard accessories (1) a. Pack of needles h. Soft cover
1 Standard accessories
a
b
c
006918008
e
006905008 006Q6A0150
f
d
006914008
g
h
i
j
k
l
m
Optional accessories (2) (These 10 accessories are , however, available for purchase...
Instruction Manual - Page 19

... is in "bobbin winding"
position, the machine will not sew and the handwheel turn. Snap thread into thread guide. (3)
- Thread bobbin as illustrated and place on foot control pedal. (8)
- Push bobbin spindle to the left (10) and remove.
Step on spindle. (5)
- Cut thread. (9) 2
- To start sewing, push the bobbin winder spindle to left...
Instruction Manual - Page 23
...small side of thread to spool. (2)
- Draw thread from right to left channel. (5) During this process it is helpful to carry out correctly as by raising the needle to its highest point (1), and continue turning the handwheel counterclockwise until the needle just... with built in thread cutter. (8)
5
16
2
3
4
6
7
8 Start by not doing so several sewing problems could result.
-...
Instruction Manual - Page 29
... number.
A
B
-
Thread tension too tight for straight stitch sewing. There is when a small amount of the upper thread appears on the bottom side of fabric.
For all stitch
functions, thread or fabric.
- B. Normal thread tension for straight stitch sewing. Normal thread tension for zig zag and decorative sewing. C
D
22 Turn
dial to lower number. For zig zag...
Instruction Manual - Page 31

... Dial e. The Pattern Selector Dial may be turned in gray. a
b
c d e
a. Reverse Sewing Lever b. To select the patterns indicated with the gray color, turn the Pattern Selector Dial. (e) Use the Stitch Length Dial (d) to sew these stretch patterns is on the machine.
Stitches in the top of the diagram are indicated on the Pattern...
Instruction Manual - Page 33
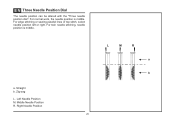
For normal work, the needle position is middle. For edge stitching or sewing parallel lines of top stitch, select needle position left or right. Middle Needle Position R. a. EN Three Needle Position Dial
The needle position can be altered ...
Instruction Manual - Page 35
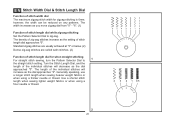
... the individual stitches will decrease as you move zigzag dial from "0" - Use a shorter stitch
length when sewing lighter weight fabrics or when using a thicker needle or thread. Generally speaking, use
a longer stitch length when sewing heavier weight fabrics or
when using a
finer needle or thread.
4 3 2 1 0.5
2
28 The density of stitch length dial approaches "0". Standard...
Instruction Manual - Page 37
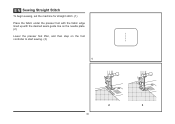
EN Sewing Straight Stitch
To begin sewing, set the machine for straight stitch. (1) Place the fabric under the presser foot with the fabric edge lined up with the desired seam guide line on the needle plate. (2) Lower the presser foot lifter, and then step on the foot controller to start sewing. (3)
1
2
3
30
Instruction Manual - Page 39
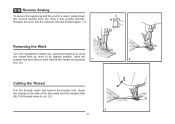
... secure the beginning and the end of the face plate and into thread cutter (B). Pull threads down
the reverse sewing lever (A). A
Release the lever and the machine will sew forward again. (1)
Removing the Work
Turn the handwheel toward you (counterclockwise) to bring
the thread...
2
foot. (2)
Cutting the Thread
Pull the threads under and behind the presser foot. Sew a few reverse stitches.
Instruction Manual - Page 41
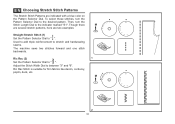
... Stitch Width Dial to the indicator marked "S1". Ric Rac Stitch is suitable for firm fabrics like denim, corduroy, poplin, duck, etc. Then, turn the Pattern Selector Dial to...Selector Dial. Ric Rac (2) Set the Pattern Selector Dial to stretch and hardwearing seams. The machine sews two stitches forward and one stitch backwards. EN Choosing Stretch Stitch Patterns
The Stretch Stitch Patterns are...
Instruction Manual - Page 43
... stitch length setting. Blind hems, however, are
appropriate for part number)
36 Sew a test first to make sure the machine settings are normally sewn
with the range shown on the
diagram at
a setting appropriate for the weight/type of fabric being sewn,
within the range shown in Fig. 1) against the right side of...
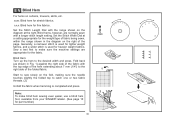
Instruction Manual - Page 45
... to
E
remove any slack, then trim off the excess.
38
3 4
2
1
D Lower the presser foot and start the machine. 7. EN Sew 1-step Buttonholes
Buttonhole sewing is strongly suggested to always make a
M
practice buttonhole on a sample of your fabric and stabilizer. However, it back (C). 6.
Set stitch length dial to determine this. 3. While lightly holding the upper...
Instruction Manual - Page 49
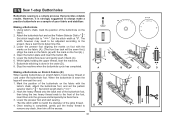
... needed, according to check that the needle goes cleanly into the left and right holes of the button. Slowly sew on the button with 4 holes, sew through the front two holes first, push the work forward and then sew through the back two holes.
3
4
42 Raise the needle out of the fabric. Set the machine for...
Instruction Manual - Page 64
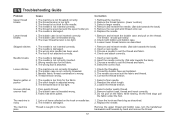
... correctly inserted. 3. The wrong size needle has been used. 4. The needle is damaged. The machine is noisy
The machine jams
1. Poor quality thread. 2. The machine is not correctly threaded. 2. Lint or oil have collected on the fabric while sewing, let the feed dogs pull
the fabric under the foot.
1. Choose a needle to suit the thread and...
Similar Questions

What Does C2 Mean On My Singer 6100 Sewing Machine Mean?
my machine just stopped working and a c2 shows on my digital screen
my machine just stopped working and a c2 shows on my digital screen
(Posted by monabec2341 8 years ago)

Singer Scholastic 5523
I cant get the needle position dial to change needle position.
I cant get the needle position dial to change needle position.
(Posted by jhines1947 9 years ago)

I Download My Embroidery Pattern And Then The Machine Just Starts Sewing Straigh
(Posted by peppers1149 10 years ago)

I Need A Singer Scholastic 5523 Spool Pin
Where on line can I purchase a Singer Scholastic spool pin?
Where on line can I purchase a Singer Scholastic spool pin?
(Posted by Curleyandlc 10 years ago)
Singer 5523 Scholastic---
inset bobbin case....thread keeps hanging on hook
inset bobbin case....thread keeps hanging on hook
(Posted by donmir45 11 years ago)