
Singer 4411 Heavy Duty Support Question
Singer 4411 Heavy Duty Support Question
Find answers below for this question about Singer 4411 Heavy Duty.Need a Singer 4411 Heavy Duty manual? We have 1 online manual for this item!
Question posted by terrijames59 on December 13th, 2013
How To I Fix The Timing Hook On A Fashion Mate 5400/5500
The person who posted this question about this Singer product did not include a detailed explanation. Please use the "Request More Information" button to the right if more details would help you to answer this question.
Current Answers
Related Singer 4411 Heavy Duty Manual Pages
Instruction Manual - Page 2
... never be followed, including the following: Read all controls to ensure that is fixed with reduced physical, sensory or mental capabilities, or lack of experience and knowledge,... accumulation of the appliance by a person responsible for use only. Switch the sewing machine off the machine or unplug when the machine is used by the manufacturer as a toy. The wrong plate can cause ...
Instruction Manual - Page 6
... 8 Accessories ...10
Threading the Machine Winding the Bobbin ...12 Inserting the Bobbin ...14 Threading the Upper Thread ...16 Raising the Bobbin Thread ...18 Thread Tension...20
Sewing How to Choose Your Pattern ...22...Hem ...32 Buttonholes ...34 Left and Right Side Balance for Buttonhole ...36 Sewing on Buttons ...38
General Information Installing the Removable Extension Table...40 Attaching the...
Instruction Manual - Page 9
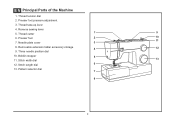
Thread take-up lever
4. Thread cutter
1
9
6. Pattern selector dial 7
8
2 EN Principal Parts of the Machine
1. Thread tension dial
2. Reverse sewing lever
5. Stitch width dial
13
12. Presser foot
2
10
11
7. Bobbin stopper
5
11. Removable extension table/ accessory storage
4
12
9. Stitch length dial
6
13. Needle plate ...
Instruction Manual - Page 13
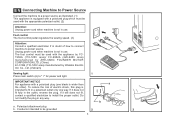
...a polarized plug which must be grounded
2
6
A 3 Foot control The foot control pedal regulates the sewing speed. (3)
Attention: Consult a qualified electrician if in doubt of electric shock, this plug is not in... Electric Ind. Polarized attachment plug
b. To reduce the risk of how to connect machine to fit in use . If it still does not fit, contact a qualified electrician to " ...
Instruction Manual - Page 15
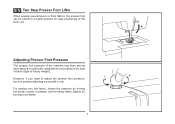
... can be raised to a higher position for heavy fabric, tighten by turning it clockwise.
8 For sewing very thin fabric, loosen the pressure by turning the screw counter clockwise, and for easy positioning of the work. (A)
A
Adjusting Presser Foot Pressure
The presser foot pressure of the machine has been pre-set and requires no...
Instruction Manual - Page 17
...s
t
u
v
w
006916008 006917008
006016008
0061850081
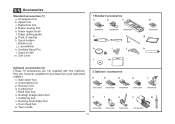
10 Zipper foot c. Hemmer foot q. Edge/ quilting guide g. L-screwdriver k. they are not supplied with this machine; Even Feed foot w. All purpose foot b. Button sewing foot e. Bobbin (3x) j. Quilting/ straight stitch foot t. Blind hem foot s. Gathering foot u. Satin stitch foot o. Overcasting foot p. Pack of...
Instruction Manual - Page 19
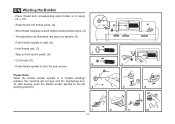
Step on spindle. (5)
- To start sewing, push the bobbin winder spindle to left
(sewing position).
4
3
5
6
7
8
9
10
12 Push bobbin spindle to spool pin. (1/2)
- Cut thread. (9) 2
- Thread bobbin as ...right. (6)
- Please Note:
When the bobbin winder spindle is in "bobbin winding"
position, the machine will not sew and the handwheel turn. Hold thread end. (7) 1
-
Instruction Manual - Page 23
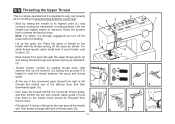
... to the needle which should be threaded from front to hold the thread between the spool and thread guide.
- Start by not doing so several sewing problems could result.
- Raise the presser foot to descend. Pull about 6-8 inches of the take-up the spool pin.
For small thread spools, place small...
Instruction Manual - Page 27
.... D. Proper tension setting is
usually only desirable for strong seams.
-
Turn
dial to lower number. Thread tension too tight for straight stitch sewing. Thread tension too loose for straight stitch sewing. EN Thread Tension
Upper thread tension Basic thread tension setting: "4". (1) To increase the tension, turn the dial to the next number...
Instruction Manual - Page 29
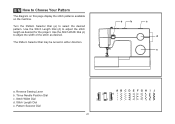
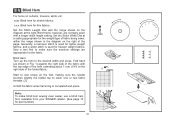
Use the Stitch Width Dial (c) to adjust the stitch length as desired.
Stitch Width Dial d. Reverse Sewing Lever b. Use the Stitch Length Dial (d) to adjust the width of the stitch as desired for the project. Pattern Selector Dial
ABCDE ...
The diagram on this page display the stitch patterns available on the machine. Stitch Length Dial e. EN How to select the desired pattern.
Instruction Manual - Page 31
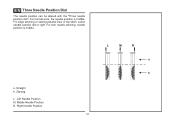
...". For twin needle stitching, needle position is middle. Zig-zag L. Straight b. Left Needle Position M. Right Needle Position
24
L
M
R
a b
Middle Needle Position R. a. For edge stitching or sewing parallel lines of top stitch, select needle position left or right. For normal work, the needle position is middle.
Instruction Manual - Page 33
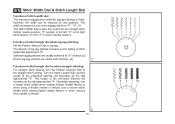
... Width Dial is also the control for when straight stitching
For straight stitch sewing, turn the Pattern Selector Dial to zig-zag. Standard zigzag stitches are ... left, "6" is full right and between "2" and "3" is 5mm; Generally speaking, use a longer stitch length when sewing heavier weight fabrics or when using a finer needle or thread.
2
26
4 3 2 1 0.5
EN Stitch Width Dial...
Instruction Manual - Page 35
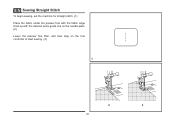
EN Sewing Straight Stitch
To begin sewing, set the machine for straight stitch. (1) Place the fabric under the presser foot with the fabric edge lined up with the desired seam guide line on the needle plate. (2) Lower the presser foot lifter, and then step on the foot controller to start sewing. (3)
1
2
3
28
Instruction Manual - Page 37
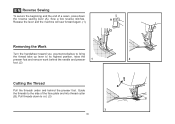
... the threads under and behind the presser foot. Pull threads down
the reverse sewing lever (A). EN Reverse Sewing
To secure the beginning and the end of the face plate and into thread cutter (B). A
Release the lever and the machine will sew forward again. (1)
Removing the Work
Turn the handwheel toward you (counterclockwise) to bring...
Instruction Manual - Page 39
...the desired width and press. M
Set the Stitch Length Dial with a longer stitch length setting. Sew a test first to the
right side of the
page.
Blind hems, however, are
appropriate for lighter... weight
fabrics, and a wider stitch is completed and press.
2 Note: To make sure the machine settings are normally sewn
with the range shown on the
diagram at the right.
Blind hem for ...
Instruction Manual - Page 41
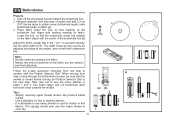
mark buttonhole length on fabric. Adjust the Stitch Length Dial in steps 1 and 3. Note: Density varies according to set stitch density.
The zig-zag should sew over the heavy thread or cord. (A)
34
M (a) (b) Measure diameter and thickness of the buttonhole foot (b). The width however may need to be sure that the needle is...
Instruction Manual - Page 45
... width, as illustrated in (3). For buttons with about 10 stitches. Turn the handwheel to "0". Set the machine for zig-zag stitch, then set the width to the distance between the holes of the button and sew.
"6".
Raise the needle out of the button. LR
Place the button and fabric under the Button...
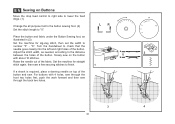
Instruction Manual - Page 51
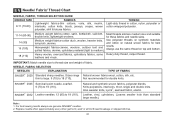
... Knits-polyesters, interlocks, tricot, single and double knits.
Heavy woolen, overcoat fabrics, upholstery fabrics, some Heavy duty thread, carpet thread.
Natural and synthetic woven fabrics, polyester..., upholstery. (Leaves smaller hole than standard large needle.)
Note : 1. For best sewing results always use the same thread on natural woven fabrics for best
Heavyweight fabrics-canvas,...
Instruction Manual - Page 54

EN How To Drop Feed Dog
For ordinary sewing, keep the feed dog up, for freehand embroidery, sewing on buttons and darning, drop the feed dog. To raise (a) and lower (b) feed dog. (2)
1
2
47
a
ba
b
Instruction Manual - Page 60

.... 2. Fabric has been pulled. Remove and reinsert the bobbin case and pull on the fabric while sewing, let the feed dogs pull
the fabric under the foot.
1. Choose a needle to suit the ...too thick for the fabric. 4. The machine is caught in the hook.
53
Correction
1. Lint or oil have collected on the hook or needle bar. 2. Thread is noisy
The machine jams
1. Remove the reel and wind thread...
Similar Questions

How Do I Clear E7 Error Code On Singer Fashion Mate Model 7256 Sewing Machine
(Posted by cathyhowden1 2 years ago)

Error E7 On My Singer 5500 Fashion Mate Sewing Machine. What Does It Mean? How C
How to fix the E7 code on a Singer 5500 Fashion Mate
How to fix the E7 code on a Singer 5500 Fashion Mate
(Posted by jkdavis2007 5 years ago)

Reverse Caused Nesting?
Works fine stitching in forward, when reverse material rolls up and stitching nests. Have new needle...
Works fine stitching in forward, when reverse material rolls up and stitching nests. Have new needle...
(Posted by dwdsad 7 years ago)

Thread Underneath Fabric In Large Loops.
When sewing the thread under the fabric comes in large loops. The tension wheel of the upper thread ...
When sewing the thread under the fabric comes in large loops. The tension wheel of the upper thread ...
(Posted by hanserikjohansson 7 years ago)
Hand Wheel Stuck
I have just pulled out my 2 year old singer 5500/5400 for the 4th time and the hand wheel is stuck. ...
I have just pulled out my 2 year old singer 5500/5400 for the 4th time and the hand wheel is stuck. ...
(Posted by kjlavell 9 years ago)