
Singer 4411 Heavy Duty Support Question
Singer 4411 Heavy Duty Support Question
Find answers below for this question about Singer 4411 Heavy Duty.Need a Singer 4411 Heavy Duty manual? We have 1 online manual for this item!
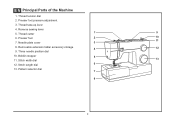
Question posted by esbric on December 1st, 2013
E2 Error When Winding The Bobbin
My machine stops and doesnt let me wind the bobbin. It gives me e 2
Current Answers
Answer #1: Posted by Odin on December 1st, 2013 6:33 PM
Odin

Member since:
April 10th, 2010 Points: 41,236,790

Member since:
April 10th, 2010 Points: 41,236,790
This is a bobbing threading error, which may be caused by the thread looping or bunching under the fabric as you sew.
Hope this is useful. Please don't forget to click the Accept This Answer button if you do accept it. My aim is to provide reliable helpful answers, not just a lot of them. See https://www.helpowl.com/profile/Odin.
Related Singer 4411 Heavy Duty Manual Pages
Instruction Manual - Page 2
...is damaged, it must be replaced by the manufacturer as threading needle, changing needle, threading bobbin, or changing presser foot, and the like. 10. Use this appliance only for use... used or where oxygen is intended for examination, repair, electrical or mechanical adjustment. 4. Always unplug sewing machine from outlet. 15. Never drop or insert any opening. 12. To unplug, grasp the plug,...
Instruction Manual - Page 6
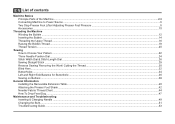
... Power Source ...6 Two Step Presser Foot Lifter/ Adjusting Presser Foot Pressure 8 Accessories ...10
Threading the Machine Winding the Bobbin ...12 Inserting the Bobbin ...14 Threading the Upper Thread ...16 Raising the Bobbin Thread ...18 Thread Tension...20
Sewing How to Choose Your Pattern ...22 Three Needle Position Dial...24 Stitch Width Dial & Stitch Length Dial ...26...
Instruction Manual - Page 9
... selector dial 7
8
2 Bobbin stopper
5
11. Reverse sewing lever
5. Needle plate cover
3
8. Removable extension table/ accessory storage
4
12
9. Stitch width dial
13
12. Presser foot pressure adjustment
3. Stitch length dial
6
13. Thread tension dial
2. Three needle position dial
10. Thread take-up lever
4. EN Principal Parts of the Machine
1. Thread cutter...
Instruction Manual - Page 11
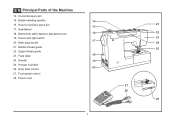
...Machine
14. Handwheel
18. Main plug socket
21. Power cord
4
21 22 23 24 25
27 28
26 Handle
19
25. Buttonhole stitch balance adjustment slot
16
19. Upper thread guide
23. Drop feed control
27. Horizontal spool pin
15. Power and light switch 17
20. Bobbin... thread guide
22. Hole for auxiliary spool pin 15
17. Bobbin winding spindle
14
16. ...
Instruction Manual - Page 13
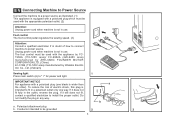
... plug is wider than the other). The foot control must be grounded
2
6
A 3 Co., Ltd. (Vietnam)
Sewing light
1
Press main switch (A) to install the proper outlet. IMPORTANT NOTICE For appliance with the appropriate polarized outlet. (2)
Attention: Unplug power cord when machine is not in use . To reduce the risk of how to connect...
Instruction Manual - Page 15
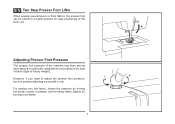
... can be raised to a higher position for heavy fabric, tighten by turning it clockwise.
8 For sewing very thin fabric, loosen the pressure by turning the screw counter clockwise, and for easy positioning of the work. (A)
A
Adjusting Presser Foot Pressure
The presser foot pressure of the machine has been pre-set and requires no...
Instruction Manual - Page 17
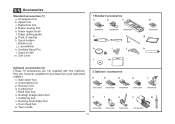
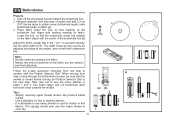
...Bobbin (3x) j. Auxiliary Spool Pin l. Soft cover
1 Standard accessories
a
b
c
006806008
e
006905008
006909008
f
h
i
j
l
m
d
006914008
g
k
Optional accessories (2) (These 10 accessories are , however, available for purchase from your authorized retailer.)
n. Quilting/ straight stitch foot t. Gathering foot u. Button sewing... machine; Blind hem foot s. Hemmer foot q. ...
Instruction Manual - Page 19
...9
10
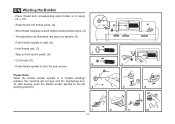
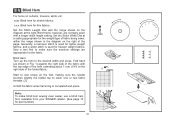
12 Step on spindle. (5)
- Wind thread clockwise around bobbin winder tension discs. (4)
- Hold thread end. (7) 1
- Please Note:
When the bobbin winder spindle is in "bobbin winding"
position, the machine will not sew and the handwheel turn. Cut thread. (9) 2
- EN Winding the Bobbin
- Push bobbin spindle to spool pin. (1/2)
-
Push bobbin spindle to the left (10) and remove.
Instruction Manual - Page 21
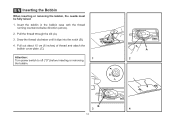
... about 15 cm (6 inches) of thread and attach the bobbin cover plate. (C)
Attention:
1
Turn power switch to off ("O") before inserting or removing
the bobbin. EN Inserting the Bobbin
When inserting or removing the bobbin, the needle must be fully raised.
1.
B 3
14
A 2
C
4 Insert the bobbin in the bobbin case with the thread running counterclockwise direction (arrow).
2. Pull...
Instruction Manual - Page 23
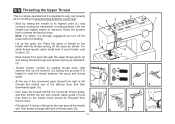
... clamp guide (7) and then down right channel and up the spool pin. Lift up left through pre-tension spring as by not doing so several sewing problems could result.
- Raise the presser foot to back.
- Thread tension module by raising the needle to its highest point (1), and continue turning the handwheel...
Instruction Manual - Page 25
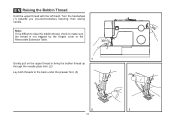
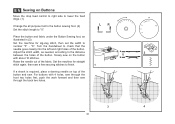
Turn the handwheel (1) towards you (counterclockwise) lowering, then raising needle.
EN Raising the Bobbin Thread
Hold the upper thread with the left hand. Note: If it is difficult to raise the bobbin thread, check to make sure the thread is not trapped by the hinged cover or the Removable Extension Table.
1 Gently pull...
Instruction Manual - Page 27
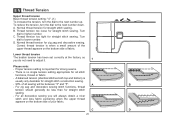
... between "3" and "5". C. Turn
dial to higher number.
B. Turn
dial to lower number. Lower thread tension
The bobbin tension has been set correctly at the factory, so you will be less than for straight stitch
sewing.
- A balanced tension (identical stitches both top and bottom) is when a small amount of the upper thread appears...
Instruction Manual - Page 29
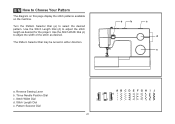
... select the desired pattern. Turn the Pattern Selector Dial (e) to Choose Your Pattern
The diagram on this page display the stitch patterns available on the machine. Reverse Sewing Lever b.
Instruction Manual - Page 35
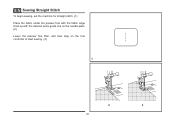
EN Sewing Straight Stitch
To begin sewing, set the machine for straight stitch. (1) Place the fabric under the presser foot with the fabric edge lined up with the desired seam guide line on the needle plate. (2) Lower the presser foot lifter, and then step on the foot controller to start sewing. (3)
1
2
3
28
Instruction Manual - Page 37
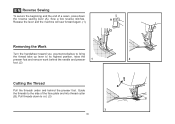
... the needle and presser 1
2
foot. (2)
Cutting the Thread
Pull the threads under and behind the presser foot. Pull threads down
the reverse sewing lever (A). A
Release the lever and the machine will sew forward again. (1)
Removing the Work
Turn the handwheel toward you (counterclockwise) to bring
the thread take up lever to cut. (3)
30...
Instruction Manual - Page 39
... stitch is completed and press.
2 Note: To make sure the machine settings are normally sewn
with
the top edge of the hem extending about 7 mm (1/4") to the desired width and press. Blind hem for firm fabrics.
Blind hem for stretch fabrics. Sew a test first to catch one or two fabric threads. (2)
Unfold...
Instruction Manual - Page 41
... cut buttonhole open from one step to set stitch density. Use a stabilizer for stretch or knit
fabrics. EN Buttonholes
Prepare 1. The zig-zag should sew over the heavy thread or cord. (A)
34
M (a) (b)
Tips: - It is raised before turning the Pattern Selector Dial to obtain correct buttonhole length; mark buttonhole length on fabric...
Instruction Manual - Page 45
... the stitch width, as illustrated in (3).
Set the machine for zig-zag stitch, then set the width to the distance between the holes of the button.
LR
Place the button and fabric under the Button Sewing foot, as needed, according to number "3" - Slowly sew on Buttons
Move the drop feed control to right...
Instruction Manual - Page 51
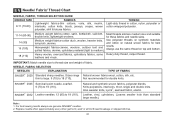
...Standard sharp needles.
Always use genuine SINGER® needles. 2. Heavy woolen, overcoat fabrics, upholstery fabrics, some Heavy duty thread, carpet thread. Not recommended for these fabrics and needle..., tricots, jerseys, crepes, woven polyester, shirt & blouse fabrics.
For best sewing results always use the same thread on natural woven fabrics for best
Heavyweight fabrics-canvas...
Instruction Manual - Page 60

...is threaded wrong. 3. Poor quality thread. 2. Lint or oil have collected on the fabric while sewing, let the feed dogs pull
the fabric under the foot.
1. Insert a new needle. 2.... thread and fabric. 4. The machine is not inserted correctly. 2. The needle is not threaded correctly. 2. The bobbin case is not inserted correctly. 2. Remove the reel and wind thread onto reel. 6. The ...
Similar Questions

How Do I Clear E7 Error Code On Singer Fashion Mate Model 7256 Sewing Machine
(Posted by cathyhowden1 2 years ago)

I Get E7 Error Message On My Singer Model 7258 Sewing Machine. There Is No Refe
Error message E7 is up on my Singer Stylist model 7258 sewing machine. It is not working at all. I t...
Error message E7 is up on my Singer Stylist model 7258 sewing machine. It is not working at all. I t...
(Posted by ebellamybellamy9 5 years ago)
Reverse Caused Nesting?
Works fine stitching in forward, when reverse material rolls up and stitching nests. Have new needle...
Works fine stitching in forward, when reverse material rolls up and stitching nests. Have new needle...
(Posted by dwdsad 7 years ago)

How To Tighten Bottom Tension On Heavy Duty 4411 Machine ?
(Posted by Gabyguyer 8 years ago)

The Stitch Is Clumping Up And Popping The Bobbin Is Making A Noise
The machine starts to sew and right after the thread pop,sound like the bobbin is making a clapping ...
The machine starts to sew and right after the thread pop,sound like the bobbin is making a clapping ...
(Posted by Justwhatilikeaccessories 9 years ago)