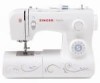
Singer 3323 Talent Support Question
Singer 3323 Talent Support Question
Find answers below for this question about Singer 3323 Talent.Need a Singer 3323 Talent manual? We have 2 online manuals for this item!
Question posted by fmodin on March 29th, 2022
Singer Talent 3323 Timing Is Off. How Do You Remove The Black Bobbin Holder To
Singer Talent 3323 timing is off. How do you remove the black bobbin holder to access underneath
Current Answers
Answer #1: Posted by SonuKumar on March 30th, 2022 8:06 AM
SonuKumar

Member since:
May 9th, 2021 Points: 16,617,800

Member since:
May 9th, 2021 Points: 16,617,800
https://www.youtube.com/watch?v=OpyBzTebo-4
https://www.youtube.com/watch?v=OpyBzTebo-4&t=45
https://www.youtube.com/watch?v=OpyBzTebo-4&t=69
https://www.youtube.com/watch?v=OpyBzTebo-4&t=349
https://www.youtube.com/watch?v=OpyBzTebo-4&t=471
https://www.youtube.com/watch?v=OpyBzTebo-4&t=471
https://www.youtube.com/watch?v=OpyBzTebo-4&t=712
How do you remove a bobbin holder?
Loosen the presser foot screw and the needle clamp screw to remove the presser foot holder and the needle.
Grasp both sides of the needle plate cover and then slide it toward you to remove the needle plate cover.
Remove the bobbin case. Grasp the bobbin case and then pull it out.
Please respond to my effort to provide you with the best possible solution by using the "Acceptable Solution" and/or the "Helpful" buttons when the answer has proven to be helpful.
Regards,
Sonu
Your search handyman for all e-support needs!!
Related Singer 3323 Talent Manual Pages
Instruction Manual - Page 2

...intended for household use bent needles. 8. Keep ventilation openings of the sewing machine and foot controller free from the electrical outlet when removing covers, lubricating, or when making any air openings blocked. Do not ... Do not use as threading needle, changing needle, threading bobbin, or changing presser foot, and the like. 10.
The wrong plate can cause the needle to break...
Instruction Manual - Page 6
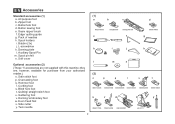
... Foot Lifter ...8 Accessories ...9
Threading the Machine Winding the Bobbin...11 Inserting the Bobbin ...13 Threading the Upper Thread ...15 Automatic Needle Threader ...17 Raising the Bobbin Thread ...19 Thread Tension...21
Sewing How to Choose Your Pattern ...23 Stitch Width Dial & Stitch Length Dial ...25 Sewing Straight Stitch ...27 Reverse Sewing/Removing the Work/Cutting the Thread ...29...
Instruction Manual - Page 9
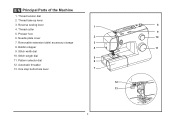
...
9 5. Removable extension table/ accessory storage
3
8. Presser foot
6. Stitch width dial
10. Needle plate cover
2
10
7. Pattern selector dial
6
12. Stitch length dial
5
11. Bobbin stopper
4
11
9. Thread take-up lever
3. One step buttonhole lever
7
12 13
2 Reverse sewing lever
1
8
4. Automatic threader
13. EN Principal Parts of the Machine
1.
Instruction Manual - Page 16
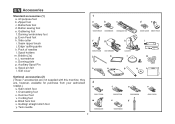
...machine; Blind hem foot x. Twin needle
9
2
s
006172008
w
006904008
t
u
006907008
x
006900008
y
006916008
v
006813008 All purpose foot b. Buttonhole foot d. Cording foot w. EN Accessories
Standard accessories (1) a. Darning/ embroidery foot g. Spool holders... c. Hemmer foot v. Darning plate p. Seam ripper/ brush j. Bobbin (3x) n. Overcasting foot u. Spool pin felt r.
Instruction Manual - Page 18
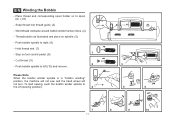
... thread and corresponding spool holder on spindle. (5)
- Step on foot control pedal. (8)
- To start sewing, push the bobbin winder spindle to right. (6)
- Please Note:
When the bobbin winder spindle is in "bobbin winding"
position, the machine will not sew and the hand wheel will
not turn. Push bobbin spindle to
the left (10) and remove. Snap thread into thread...
Instruction Manual - Page 20
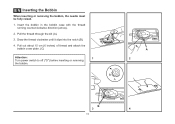
... it slips into the notch (B).
4. B 3
13
A 2
C
4 Pull out about 15 cm (6 inches) of thread and attach the bobbin cover plate. (C)
Attention:
1
Turn power switch to off ("O") before inserting or removing
the bobbin.
EN Inserting the Bobbin
When inserting or removing the bobbin, the needle must be fully raised.
1. Pull the thread through the slit (A).
3. Insert the...
Instruction Manual - Page 48

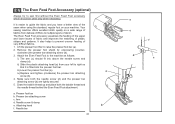
... foot bar. Note: Free motion darning is recommended for straight stitch. Stippling: Set the machine for easier sewing and better results.
Turn work from behind the needle clamp screw (b). EN Free Motion Darning, Stippling
Darning: Install the darning plate. (1)
Remove the presser foot shank. (2) Attach the darning/ embroidery foot to hold layers of...
Instruction Manual - Page 50

... prevent uneven feeding of plaids, stripes and patterns. Draw the bobbin thread up and place both the needle screw (d) and the presser bar
attaching screw (b) are tightly secured. 5. Arm d. Your sewing machine offers excellent stitch quality on a wide range of fabrics from your machine.
iii) Lower the presser foot bar (a). iv) Replace and tighten...
Instruction Manual - Page 63
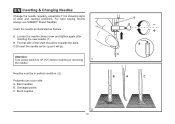
... the needle regularly, especially if it will go. Attention:
Turn power switch to off ("O") before inserting or removing
1
the needle. Bent needles B. C/D.Insert the needle as far up as follows:
A. Loosen the needle clamp...C
Needles must be towards the back. The flat side of wear and causing problems. For best sewing results always use SINGER® Brand Needles. Damaged points C.
Instruction Manual - Page 65

EN Changing the Bulb
Disconnect the machine from the power supply by removing the plug from the main socket! Remove the face plate (B). - Replace the face plate and tighten screw. Should there be any problem, consult your authorized SINGER® retailer.
1
B A
C
2
58 Loosen screw (A) as illustrated. (1) - Unscrew the bulb and install a new one (C). (2) - Replace bulb...
Instruction Manual - Page 67
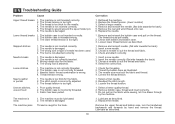
... fabric while sewing, let it be lubricated. 2. Check the threading. 2.
Insert a new needle. 2. The needle size must be drawn through
by hand and remove the thread. Loosen the thread tension.
1. Lubricate as illustrated. 3. The thread is noisy
The machine jams
1. Wrong needle size for the needle. 4. The machine is wound around the spool holder pin...
Instruction Manual 2 - Page 2
... of the sewing machine and foot controller free from the electrical outlet when removing covers, lubricating, or when making any air openings blocked. Always use as a toy. Do not operate where aerosol spray products are being used by a person responsible for use by the manufacturer as threading needle, changing needle, threading bobbin, or changing...
Instruction Manual 2 - Page 6

... Foot Lifter ...8 Accessories ...9
Threading the Machine Winding the Bobbin...11 Inserting the Bobbin ...13 Threading the Upper Thread ...15 Automatic Needle Threader ...17 Raising the Bobbin Thread ...19 Thread Tension...21
Sewing How to Choose Your Pattern ...23 Stitch Width Dial & Stitch Length Dial ...25 Sewing Straight Stitch ...27 Reverse Sewing/Removing the Work/Cutting the Thread ...29...
Instruction Manual 2 - Page 9

... step buttonhole lever
7
12 13
2 Needle plate cover
2
10
7. Thread cutter
9 5. Bobbin stopper
4
11
9. Removable extension table/ accessory storage
3
8. Stitch width dial
10. Stitch length dial
5
11. EN Principal Parts of the Machine
1. Thread take-up lever
3. Reverse sewing lever
1
8
4. Pattern selector dial
6
12. Automatic threader
13. Presser foot
6.
Instruction Manual 2 - Page 16
Pack of needles h. Bobbin (3x) j. Spool pin felt n. Soft cover
Optional accessories (2) (These 11 accessories ... sewing foot e. Seam ripper/ brush f. Spool holders i. Darning plate l. Cording foot s. Buttonhole foot d. Overcasting foot q. Darning/ embroidery foot w. Side cutter y. L-screwdriver k. Quilting/ straight stitch foot u. they are not supplied with this machine;...
Instruction Manual 2 - Page 18

... to spool pin. (1/2)
- Thread bobbin as illustrated and place on foot control pedal. (8)
- Push bobbin spindle to
the left (10) and remove. EN Winding the Bobbin
- Hold thread end. (7) 1
- Place thread and corresponding spool holder on to right. (6)
- Please Note:
When the bobbin winder spindle is in "bobbin winding"
position, the machine will not sew and the hand wheel...
Instruction Manual 2 - Page 20

B 3
13
A 2
C
4 Attention:
1
Turn power switch to off ("O") before inserting or removing
the bobbin. Insert the bobbin in the bobbin case with the thread running counterclockwise direction (arrow).
2. Pull the thread through the slit (A).
3. Pull out about 15 cm (6 inches) of thread and attach the bobbin cover plate (C). Draw the thread clockwise until it slips into the...
Instruction Manual 2 - Page 48

...Note: Free motion darning is accomplished without the sewing machine internal feed system.
Turn work from behind the needle clamp screw (b). Stippling: Set the machine for easier sewing and better results. A darning hoop is ...optional accessory not included with your machine. (1)
Darning: Install the darning plate. (2)
Remove the presser foot shank. (3) Attach the darning/ embroidery foot to the...
Instruction Manual 2 - Page 50
... (d) and the presser bar
attaching screw (b) are tightly secured. 5.
Make sure both the bobbin thread and
the needle thread behind the Even Feed Foot attachment. Needle bar
43
a b
e c
f
d c Remove the presser foot shank by unscrewing (counter-
Attaching head f. Your sewing machine offers excellent stitch quality on your left to raise the presser foot bar...
Instruction Manual 2 - Page 67
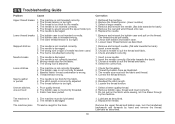
.... 4. The needle size must be drawn through
by hand and remove the thread. Loosen the thread tension.
1.
The thread tension is attached.
1. The thread is not inserted correctly. 2. The bobbin case is wound around the spool holder pin. 6. The machine is noisy
The machine jams
1. The machine is not correctly threaded. 2. Thread is too tight. Choose...
Similar Questions

I Have A M3500 Singer Sewing Machine .got Tread Tangled In The Bobbin Area .just
(Posted by guitijoon 2 years ago)

I Get E7 Error Message On My Singer Model 7258 Sewing Machine. There Is No Refe
Error message E7 is up on my Singer Stylist model 7258 sewing machine. It is not working at all. I t...
Error message E7 is up on my Singer Stylist model 7258 sewing machine. It is not working at all. I t...
(Posted by ebellamybellamy9 5 years ago)

Sewing Wheel Will Not Turn
I have a singer talent 3323 and the wheel that controls the needle will not move. It also looks as i...
I have a singer talent 3323 and the wheel that controls the needle will not move. It also looks as i...
(Posted by gabriellemharris 9 years ago)

I Have A Heavy Duty Singer Sewing Machine (model 4432)
stopped sewing after bobbin replacement?
stopped sewing after bobbin replacement?
(Posted by sueisforme 9 years ago)

Beeping From Singer Sewing Machine Stylist Ii 5625
My sewing machine will beep and stop sewing after three inches of sewing. I have taken it to be repa...
My sewing machine will beep and stop sewing after three inches of sewing. I have taken it to be repa...
(Posted by arusheria 9 years ago)