Singer 2273 Esteem II Support Question
Singer 2273 Esteem II Support Question
Find answers below for this question about Singer 2273 Esteem II.Need a Singer 2273 Esteem II manual? We have 2 online manuals for this item!
Question posted by debifahey on January 24th, 2014
How Do I Lubricate The Machine? The Outside Wheel Arm Won't Move.
The person who posted this question about this Singer product did not include a detailed explanation. Please use the "Request More Information" button to the right if more details would help you to answer this question.
Current Answers
Related Singer 2273 Esteem II Manual Pages
Instruction Manual 2 - Page 1
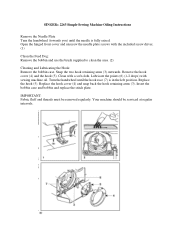
... be serviced at regular intervals. Remove the hook cover (4) and the hook (5). Your machine should be removed regularly. Lubricate the points (6) (1-2 drops) with sewing machine oil. Replace the hook cover (4) and snap back the hook retaining arms (3). SINGER® 2263 Simple Sewing Machine Oiling Instructions
Remove the Needle Plate Turn the handwheel (towards you) until the hook...
Instruction Manual - Page 2
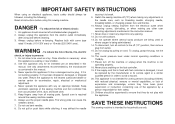
...Close attention is necessary when
this appliance from the electrical outlet when removing covers, lubricating, or when making any air openings blocked. Special care is used by the manufacturer... they have been given supervision or instruction concerning use only. SAVE THESE INSTRUCTIONS
This sewing machine is not intended for use by a person responsible for its service agent or a...
Instruction Manual - Page 3

... in creativity. All rights reserved.
SINGER is a registered trademark of operation by going through this
sewing machine when considered necessary. Congratulations
As the owner of a new Singer sewing machine, you are sewing on one
of the easiest to use sewing machines ever made. May we recommend that you discover the many features and the ease of The...
Instruction Manual - Page 4
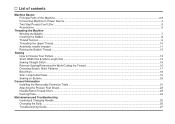
... Basics Principle Parts of the Machine...2/3 Connecting Machine to Power Source ...4 Two Step Presser Foot Lifter...5 Accessories ...6
Threading the Machine Winding the Bobbin ...7 Inserting the Bobbin ...8 Thread Tension ...9 Threading the Upper Thread ...10 Automatic needle threader ...11 Raising the Bobbin Thread...12
Sewing How to Choose Your Pattern...13 Stitch Width Dial & Stitch Length...
Instruction Manual - Page 5
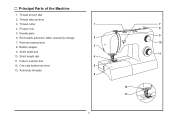
Presser foot 5. Reverse sewing lever 8. Automatic threader
1
7
8
2
9
10 3
PUSH
4
11
5
6
12
PUSH
13
2 Thread cutter 4. One step buttonhole lever 13. Principal Parts of the Machine
1. Needle plate 6. Stitch width dial 10. Removable extension table/ accessory storage 7. Stitch length dial 11. Pattern selector dial 12. Thread take-up lever 3. Bobbin stopper 9. ...
Instruction Manual - Page 6
...
23
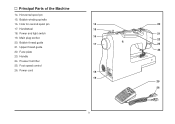
21. Foot speed control
26. Bobbin winding spindle
16. Handle
24. Upper thread guide
24 22. Horizontal spool pin
15. Principal Parts of the Machine
14. Hole for second spool pin
14
20
17.
Instruction Manual - Page 7
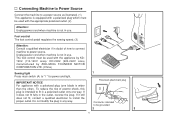
... which must be used with the appropriate polarized outlet. (2)
Attention: Unplug power cord when machine is intended to fit in a polarized outlet only one blade is not in use . Foot control The foot control pedal regulates the sewing speed. (3)
Attention: Consult a qualified electrician if in doubt of electric shock, this plug is...
Instruction Manual - Page 8
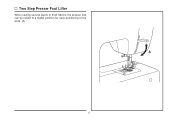
Two Step Presser Foot Lifter
When sewing several layers or thick fabrics, the presser foot can be raised to a higher position for easy positioning of the work. (A)
A
5
Instruction Manual - Page 9
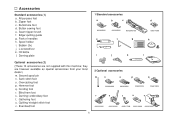
...hem foot s. Evenfeed foot
2 Optional accessories
m
n
o
p
q
006804008
006803008
006800008
006810008
r
s
t
u
v
006812008
006016008 006917008 006916008 006815008
6 Darning/ embroidery foot t. Button sewing foot e. L-screwdriver k. Second spool pin n. All purpose foot b. Overcasting foot p. Buttonhole foot d. Bobbin (3x) j. Oil bottle l. Seam ripper/ brush f. Pack...
Instruction Manual - Page 10
... remove.
4
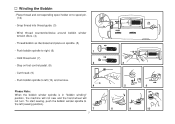
Please Note: When the bobbin winder spindle is in "bobbin winding" position, the machine will not sew and the hand wheel will not turn. Wind thread counterclockwise around bobbin winder tension discs. (4)
- Winding the Bobbin
- To start sewing, push the bobbin winder spindle to spool pin. (1/2)
- Place thread and corresponding spool holder on...
Instruction Manual - Page 13
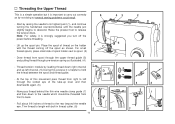
... the thread coming off the power before threading.
- Pull about 6-8 inches of spool holder next to carry out correctly as by not doing so several sewing problems could result.
- Raise the presser foot to descend. Thread tension module by raising the needle to its highest point (1), and continue turning the handwheel...
Instruction Manual - Page 16
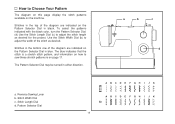
Stitches in the top of the diagram are indicated on the machine. To select the patterns indicated with the black color, turn the Pattern Selector Dial. (d) Use the Stitch Length Dial (c) to sew these stretch patterns is a stretch stitch pattern, and information on ... blue. How to adjust the width of the stitch as desired for the project.
a
b
c
d
a. Reverse Sewing Lever b.
Instruction Manual - Page 18
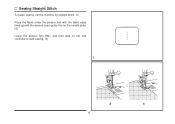
Sewing Straight Stitch
To begin sewing, set the machine for straight stitch. (1) Place the fabric under the presser foot with the fabric edge lined up with the desired seam guide line on the needle plate. (2) Lower the presser foot lifter, and then step on the foot controller to start sewing. (3)
1
2
3
15
Instruction Manual - Page 19
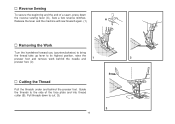
... face plate and into thread cutter (B). Release the lever and the machine will sew forward again. (1)
A
Removing the Work
Turn the handwheel toward you (counterclockwise) to bring
the thread take up lever to cut. (3)
B
PUSH
3
16 Pull threads down
the reverse sewing lever (A). Sew a few reverse stitches. Guide the threads to the side of...
Instruction Manual - Page 20
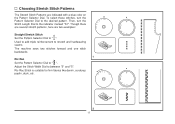
... several stretch patterns, here are indicated with a blue color on the Pattern Selector Dial. Used to add triple reinforcement to stretch and hardwearing seams. The machine sews two stitches forward and one stitch backwards.
1 Ric Rac Set the Pattern Selector Dial to between "3" and "5". Adjust the Stitch Width Dial to " ". Choosing Stretch...
Instruction Manual - Page 21
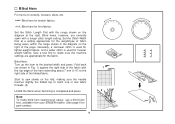
...for lighter weight fabrics, and a wider stitch is completed and press.
2
Note: To make sure the machine settings are normally sewn with
1
the top edge of the hem extending about 7 mm (1/4") to the
..., a narrower stitch is used for heavier weight fabrics. Blind Hem:
Turn up the hem to sew slowly on the right of the folded fabric.
Blind Hem
For hems on the diagram at a setting...
Instruction Manual - Page 22
... on the
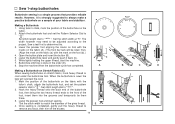
fabric. 2. While lightly holding the upper thread, start sewing.
*Set the stitch width to match the diameter of your fabric and stabilizer.
Lower the presser foot and start the machine. 7. Set the stitch width at "5". Lower the presser foot aligning the marks on foot with the
marks on the fabric...
Instruction Manual - Page 23
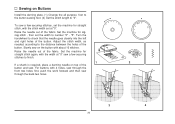
..., according to the distance between the holes of the fabric. Slowly sew on the button with 4 holes, sew through the
front two holes first, push the work forward and then sew
through the back two holes.
3
4
20 To sew a few securing stitches, set the machine for straight stitch, with the width at "0".
Raise the needle...
Instruction Manual - Page 29
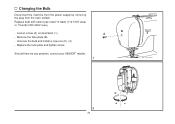
... plate (B).
- Unscrew the bulb and install a new one (C). (2)
- Should there be any problem, consult your SINGER® retailer. 1
B
PUSH
C
2
26 Changing the Bulb
Disconnect the machine from the power supply by removing the plug from the main socket!
Instruction Manual - Page 30
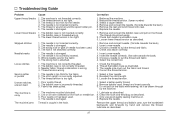
.... (flat side towards the back) 5. Insert a new needle. 2. Remove bobbin case, thread and insert correctly. 3. Do not pull on the fabric while sewing, let it be lubricated. 2. Lubricate as described. 3. The machine is damaged. The thread tension is wound around the spool holder pin. 6. The thread is too tight. 3. The bobbin case is wrong...
Similar Questions

Singer Futura Quartet Seqs 6700 Sewing Machine
how to set my singer futura quartet seqs 6700 sewing machine to sew. A distance more than one inch a...
how to set my singer futura quartet seqs 6700 sewing machine to sew. A distance more than one inch a...
(Posted by johour2194 3 years ago)

Why Won't My Machine Sew, Checked Bobbin And Retreaded. Has Power Just Will Not
the machine has power and threade correctly and bobbin is in right. It did freeze on me when sewing....
the machine has power and threade correctly and bobbin is in right. It did freeze on me when sewing....
(Posted by alewis41 7 years ago)

Help! My Machine Seems Jammed But There Is Not Thread Anywhere. What Do I Do?
it runs when I'm on the bobbin setting but when I switch it back is jams again and there's this loud...
it runs when I'm on the bobbin setting but when I switch it back is jams again and there's this loud...
(Posted by Amynalove 8 years ago)

