Singer 14J250 Stylist II Serger Support Question
Singer 14J250 Stylist II Serger Support Question
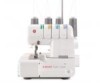
Find answers below for this question about Singer 14J250 Stylist II Serger.Need a Singer 14J250 Stylist II Serger manual? We have 1 online manual for this item!
Question posted by acarlah on May 18th, 2014
How Can I Change The Upper Looper?
The person who posted this question about this Singer product did not include a detailed explanation. Please use the "Request More Information" button to the right if more details would help you to answer this question.
Current Answers
Related Singer 14J250 Stylist II Serger Manual Pages
Instruction Manual - Page 2

...never be replaced by persons (including children) with the appliance." 3. "Use this sewing machine. "Never operate the sewing machine with same type rated 15 watts." "Do not use only." 9. Do not... as threading needle, changing
needle, threading looper, or changing presser foot, etc." 18. " Read all moving parts. "To avoid electrical shock never put the machine nor the mains cable...
Instruction Manual - Page 7
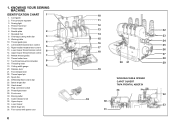
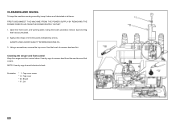
... needle thread tension control
5
13. Differential feed control dial
25. Power/light switch
29. Thread cutter
6. Overedge cutting width dial
3
9. Front cover
30. KNOWING YOUR SEWING MACHINE
IDENTIFICATION CHART 1
1. Upper looper thread tension control
15. Needle plate
2
7. Cord guide
2. Foot release lever
22.
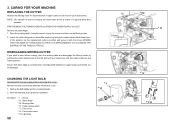
Instruction Manual - Page 11
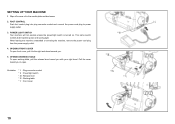
This same switch controls both machine power and sewing light. OPENING FRONT COVER To open front cover, pull it to open working table... the power cord plug from the power supply outlet.
4. OPENING WORKING TABLE To open .
SETTING UP YOUR MACHINE
1. Illustration
* I : Plug connector socket * II : Power/light switch * III : Release lever * IV: Working table * V : Front cover
10 FOOT ...
Instruction Manual - Page 17
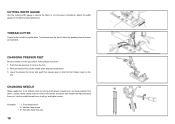
...Raise presser foot lever. 1. Place the desired foot on the
foot. Illustration
* I
*III
*II Adjust the width gauge for the desired seam allowance. THREAD CUTTER
Thread cutter is in needle plate. ...far as illustrated. CUTTING WIDTH GAUGE
Use the cutting width gauge to remove the foot. 2. CHANGING NEEDLE
Raise needle bar to remove the needle, and place new needle with flat side away ...
Instruction Manual - Page 19

NOTE : K eep in mind that the lower and upper loopers will use about twice the amount of fabric. Le fil polyester, par exemple, est tr... Pour des tissus fins
* Les fils synthétiques sont recommandés pour la couture courante.
When purchasing thread for sewing, especially if it is very useful for ordinary overlocking. NOTE : G arder en mémoire que les boucleurs infé...
Instruction Manual - Page 21

... is released when the presser foot is up. Pull the lower thread through the thread guide as illustrated. 2. Pull about 4" (10 cm) of Lower Looper-Upper Looper-Needle. STARTING TO SEW
THREADING YOUR MACHINE
Wrong threading may cause skipped stitches, breaking threads, or other problems. Try to its highest point by the
arrow. THREADING LOWER...
Instruction Manual - Page 23
Draw the thread through the thread guide as illustrated.
(When threading according to the instructions, upper looper thread passes the thread guide (A) automatically after turning the hand wheel.) 4. Feed the thread through ... about 4" (10 cm) above the needle plate and behind the presser foot.
22
Pull the upper thread through the thread guide and looper eye. THREADING UPPER LOOPER
1.
Instruction Manual - Page 31
... can be done with the presser foot down , or use a scrap of fabric. 4. Cut thread by test sewing on most fabrics except bulky materials.) Guide the fabric gently as machine automatically feeds the material.
3. At the fabric end, continue running the machine at low speed and feed in the following order: 1. Start the...
Instruction Manual - Page 33

... thread tension control dial at ← 2 →.
The following advice can help you sew light or heavy weight fabric. 3. Incorrect tension setting causes stitch skipping. SETTING CHART
Number of scrap you use and find the best settings.
* When threading upper looper with a piece of threads
4
Overedge cutting width dial
← 6 →
6
Needle to...
Instruction Manual - Page 37
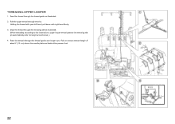
...Please remove the unused needle and place it into the upper looper hole. Make sure that you .
Illustration * I : Two-thread converter * II : Upper looper
36 By threading the RIGHT needle only, a seam ...not using the converter, insert it in Fig. 1.
Attach the two-thread converter onto the upper looper as showing in the needle pad. Pull out the two-thread converter as shown in Fig....
Instruction Manual - Page 39
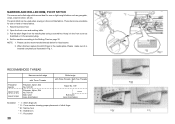
...the needle plate. Set the machine according to the Setting Chart on fine scarf-like fabrics.
RECOMMENDED THREAD
Thread for needle
Upper looper
Lower looper
Narrow overlock edge
with Three Threads...Stitch finger (A) * II : Cross section showing proper placement of stitch finger * III : Narrow hem * IV : Rolled hem * V : Picot stitch
38 The picot stitch can be used when sewing on page 32....
Instruction Manual - Page 41

... a scrap of
fabric. Under side Left needle thread
Under side Right needle thread
Upper looper thread Left needle thread Top side
Lower looper thread Right needle thread Fig. 1
40
Upper looper thread
Upper looper thread
Lower looper thread
Top side
Fig. 2 Top side
Fig. 3
Increase upper looper thread Increase lower looper thread
tension and/ or decrease tension and/or decrease
lower...
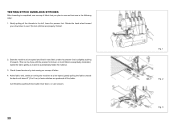
Instruction Manual - Page 45
...change the stitch finger (A) to (B) to accommodate your fabric. Decrease the cutting width by turning it towards 7 if loops hang off the edge. (Fig. 2)
Stitch finger (B)
Loops may hang off the edge when you sew...cutting width dial to get proper stitching. (Fig. 4)
Illustration
* I : Stitch length dial * II : Overedge cutting width dial * III : Stitch finger (B) * IV : Cross section view of ...
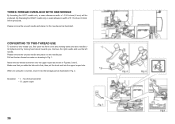
Instruction Manual - Page 49

...sewing. For normal sewing...number to adjust it for most ordinary sewing. The machine is necessary, turn the overedge cutting width...you tighten the screw as illustrated when sewing with light or normal weight fabric, ... sewn on this machine. When sewing with extra heavy weight fabrics or ...cutting width for normal weight fabric.
SEWING WITH EXTRA HEAVYWEIGHT FABRIC OR MULTIPLE LAYERS...
Instruction Manual - Page 51

...
Fig. 4
Illustration * I : Cut
50
Fig. 3
* I
Fig. 2
5
Fig. 4 Fold the upper left hand, and at the same time apply a little opposite pressure at point B with the needle above the fabric.... 2. Raise the presser foot and turn the fabric. Unfold the folded portion and sew the next edge of the fabric. (5)
1
2
3
4
TURNING CURVED EDGES
Apply pressure at the...
Instruction Manual - Page 53

... sleeve or side seams when making sure the cord is positioned under and to the rear of the machine spool pin. Follow directions as a crochet cotton, gimp, wool, knitting yarn, or shirring elastic at ... rear hole in the presser foot and use knitting yarn of the stitch. Start at intervals and pull out looper thread(s). Fig. 2
52
Fig. 3 Fig. 4 FOR MAKING WAVY EDGES OR HEMS, (Fig. 4) ...
Instruction Manual - Page 55
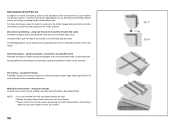
...the blind hem foot, decorative stitches are easy. **Reduce the upper looper tension when you until the cutter snaps into the "up"...by pushing the cutter release knob in this instruction book, your machine can be used for a number of decorative applications such as ... sides together and overlock along a line to be top-stitched and sew over a cord or braid, holding it carefully with both hands....
Instruction Manual - Page 59
... * II
* IV
1
2
* VII
Illustration
* I
NOTE: You should not need to replace the fixed cutter which is not wider than overedge width selected or upper looper and... position by pushing the cutter release knob to sew without cutting, open the working table.
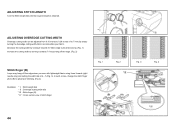
Push ... found in position and secure it becomes blunt. CHANGING THE LIGHT BULB
Disconnect from power supply before removing...
Instruction Manual - Page 61
....
Cleaning the serger and foot control
Keep the serger and foot control clean. Apply a few drops of oil to remove dust from the machine and foot control. ALWAYS USE A GOOD QUALITY SEWING MACHINE OIL.
3. CLEANING AND OILING
To keep the machine running smoothly, ...
2. Use the brush to avoid electrical shock. Illustration
* I : Top cover screw * II : Top cover * III : Brush * IV: Oil
60
Instruction Manual - Page 65

... in straight seams.
Use for rolled edge. • Lower cutter to lowest position. Replace with Pearl foot. • Remove stitch finger as follows:
Left needle: 4 Upper looper: 1 - 2 Lower looper: 7 - 8
SEW: • Remove Standard presser foot. Close front cover. • Raise needle to it 's highest position. • Place pearls in channel on the edge of...
Similar Questions


I Get E7 Error Message On My Singer Model 7258 Sewing Machine. There Is No Refe
Error message E7 is up on my Singer Stylist model 7258 sewing machine. It is not working at all. I t...
Error message E7 is up on my Singer Stylist model 7258 sewing machine. It is not working at all. I t...
(Posted by ebellamybellamy9 5 years ago)

Beeping From Singer Sewing Machine Stylist Ii 5625
My sewing machine will beep and stop sewing after three inches of sewing. I have taken it to be repa...
My sewing machine will beep and stop sewing after three inches of sewing. I have taken it to be repa...
(Posted by arusheria 9 years ago)

Do It Yourself Repair Manual
My sister gave me her serger. I would like to try to fix it myself. How can I find the repair manual...
My sister gave me her serger. I would like to try to fix it myself. How can I find the repair manual...
(Posted by SandyWagner 10 years ago)

I Am Trying To Down Load To My Reader But I Have Not Been Able To Do So.
Can I have a manual for the singer stylist II serger 14J250 mail to my home.
Can I have a manual for the singer stylist II serger 14J250 mail to my home.
(Posted by pcriss41 10 years ago)