
2009 Saturn VUE Support Question
2009 Saturn VUE Support Question
Find answers below for this question about 2009 Saturn VUE.Need a 2009 Saturn VUE manual? We have 1 online manual for this item!
Question posted by bistr on January 24th, 2014
Where Do To You Hook Jumper Cables On A 2009 Saturn Vue
The person who posted this question about this Saturn automobile did not include a detailed explanation. Please use the "Request More Information" button to the right if more details would help you to answer this question.
Current Answers
Related Manual Pages
Owner's Manual - Page 1

2009 Saturn VUE Owner Manual
Seats and Restraint System ...1-1
Head Restraints ...1-2 Front Seats ...1-3 Rear Seats ...1-9 Safety Belts ...1-10 Child Restraints ...1-23 Airbag System ...1-42 Restraint System Check ...1-58 ...
Owner's Manual - Page 2

...ès de concessionnaire ou à l'adresse suivante: Helm, Incorporated P.O. Saturn reserves the right to learn about the vehicle's features and controls. Box 07130 Detroit, MI ...48207 1-800-551-4123 www.helminc.com
SATURN, the SATURN Emblem, and the name VUE are registered trademarks of Saturn Corporation. Canadian Owners
A French language copy of control or an...
Owner's Manual - Page 108

... openings of the vehicle. Slide the adapters to the desired location on the rail, place the hook in the rear of the net and insert them into the lower groove. Compress the rods of... the vehicle. 2-44
Features and Controls
Rear Seat Armrest
Cargo Cover
For vehicles with adapters and hooks. The longer rod is for the upper adapter. Convenience Net
Use the convenience net, located in the...
Owner's Manual - Page 135

Remove the air filter cover screw. Unplug both wire cables and remove the glove box.
4. Instrument Panel
3-25
2. Lower the loosened glove box housing.
3.
Owner's Manual - Page 136

.... Warning lights come on when there may be a problem, check the section that something is needed. Reinstall the air filter cover.
Reconnect the wire cabling and re-install the glove box. See your dealer/retailer if additional assistance is wrong before it becomes serious enough to do repairs can signal...
Owner's Manual - Page 184

..., etc. The portable audio device continues playing. CD/AUX (CD/Auxiliary): Press to the auxiliary input jack for use a portable audio player, connect a 3.5 mm (1/8 inch) cable to normal, the CD should play a CD when a portable audio device is very hot.
Drivers are encouraged to the radio when a portable audio device is...
Owner's Manual - Page 191
... and overrides the audio
J / 0 (Push To Talk): Press to answer incoming calls, confirm system information, and to start speech recognition.
− / K (Phone On Hook): Press to end a call , to dial phone numbers and name tags. Not all phones support all functions, and not all phones are guaranteed to operate...
Owner's Manual - Page 238
... for towing. Release the parking brake. 4-34
Driving Your Vehicle
5. Towing the Vehicle From the Rear
Dolly Towing (Front-Wheel-Drive Vehicles)
Front-wheel-drive VUE Red Line vehicles should be towed with all four wheels off of the ground or dinghy towed from the front.
Owner's Manual - Page 241
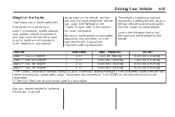
... trailer weight is calculated assuming only the driver is used to find the maximum trailer weight for the vehicle should not be exceeded. **The VUE Red Line should not be subtracted from the maximum trailer weight. Trailer Wt. *GCWR 2WD - 2.4L L4 Engine 3.91 1,500 lbs (680 kg) 5,375 lbs...
Owner's Manual - Page 246

... uphill grades, consider the following: Engine coolant will not strike soft shoulders, curbs, road signs, trees or other drivers the vehicle is turned off . Properly hooked up, the trailer lamps also flash, telling other objects.
On a long uphill grade, shift down a long or steep downgrade. Reduce speed and shift to...
Owner's Manual - Page 251
...durability, and electronic systems like antilock brakes, traction control, and stability control. Genuine Saturn parts have one of the vehicle warranty and may affect remaining warranty coverage for GM...you will know that GM-trained and supported service technicians will receive genuine Saturn parts and Saturn-trained and supported service people. Also, see Adding Equipment to complement ...
Owner's Manual - Page 278

...the battery over an extended period of the vehicle, remove the black, negative (−) cable from running down and new ones are wrong for the vehicle, the balance between the ...has the replacement number shown on a vehicle is driven infrequently, remove the black, negative (−) cable from the battery. Infrequent Usage: If the vehicle is complex. 5-30
Service and Appearance Care
...
Owner's Manual - Page 279

...the following steps to do it safely. Get the vehicles close enough so the jumper cables can explode or ignite. • They contain enough electricity to the vehicle that... steps could damage the vehicle. 1. Notice: If you do not want to use another vehicle and some jumper cables to jump start procedure. If you leave the radio or other accessories on both vehicles can hurt you may...
Owner's Manual - Page 280

If you do not need more information on location. Battery fluid contains acid that can start up . Place the negative (−) jumper cable clamp on the negative (−) terminal on top of that vehicle. Open the hood on your vehicle and find the remote positive (+) and remote ...
Owner's Manual - Page 281

...the dead battery, but not near engine parts that move. The vehicles could get a short that the jumper cables do , you will get a shock. Do not let the other end touch anything until the next... one . If they do not have loose or missing insulation. Do not connect the negative (−) cable to a remote positive (+) terminal if the vehicle has one. The other end of the good battery....
Owner's Manual - Page 282

... start the vehicle with the good battery. If it probably needs service. Always connect and remove the jumper cables in the wrong order, electrical shorting may occur and damage the vehicle. Disconnect the red positive (+) cable from the other metal. Heavy, Unpainted Metal Engine Part or Remote Negative (−) Terminal B. The repairs would...
Owner's Manual - Page 290
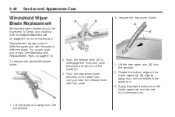
... and are removed in different ways. Push the release lever (B) to the blade assembly and remove from the windshield. Apply downward pressure to disengage the hook and push the wiper arm (A) out of the blade assembly (B) slightly away from the window. 2. For proper type and length, see Maintenance Replacement Parts on...
Owner's Manual - Page 307

...listed on your vehicle's original tires. Vehicles that have them properly installed by a Saturn certified technician. Additionally, if your vehicle has electronic systems such as your...Loading the Vehicle on the vehicle. Service and Appearance Care
5-59
{ CAUTION
If you use Saturn specific wheel and tire systems developed for your vehicle, and have a tire pressure monitoring...
Owner's Manual - Page 310

... wheel can be replaced. Used Replacement Wheels
{ CAUTION
Putting a used wheel on your vehicle can also cause problems with new Saturn original equipment parts. Tire Chains
{ CAUTION
Do not use a new Saturn original equipment wheel. This way, you will know how it has been used on page 5-64 for more information. Each...
Owner's Manual - Page 313

... information.
2. Service and Appearance Care
5-65
Removing the Spare Tire and Tools
To access the spare tire: 1. Lift the load floor and hang the hook to the tailgate opening.
4. Remove the tire protector foam.
5. See Compact Spare Tire on the load floor. Remove the compact spare tire. Open the...


