Ryobi TSS101L Support Question
Ryobi TSS101L Support Question
Find answers below for this question about Ryobi TSS101L.Need a Ryobi TSS101L manual? We have 4 online manuals for this item!
Question posted by thguenand on October 13th, 2015
I Have To Remove Arm Support Bracket To Replace It After A Falling Accident
dear sirs I removed two little nuts and am stocked with lock pins , so what tool do you use to remove two little pins locking both steel rods, thank you for answers , THIERRY
Current Answers
Answer #1: Posted by TommyKervz on October 14th, 2015 3:16 AM
TommyKervz

Member since:
January 10th, 2013 Points: 17,776,833

Member since:
January 10th, 2013 Points: 17,776,833
Please contact service center or visit your local Ryobi repair center for assistance concerning this.
Click the link below to find your nearest authorised service and repair providers.
http://ryobi.com.au/servicecentrelocator.
For part list and diagram please click here
Related Ryobi TSS101L Manual Pages
English Manual - Page 3

...REMOVE ADJUSTING KEYS AND WRENCHES. Use only a cord heavy enough to determine that is safer than using your extension cord is used outdoors, use of personal injury.
USE THE RIGHT DIRECTION OF FEED. Everyday eyeglasses have only impactresistant lenses, they are removed from tool... manual carefully. Cluttered areas and benches invite accidents. Make sure your hand and frees both ...
English Manual - Page 4
...SUPPORT LONG WORKPIECES while cutting to a live terminal. If repair or replacement of your saw arm (bevel function) by a qualified electrician.
Keep TOOL dry, clean, and free from the rotating blade.
Inspect EXTENSION CORDS periodically and replace if damaged.
GROUND ALL TOOLS. Always use... tightening the bevel lock lever.
NEVER USE A LENGTH STOP ...
English Manual - Page 5
...of workpiece.
THIS TOOL should any part of the body in place. Refer to perform properly, shut off the power switch, remove the miter saw plug from frequent use the fence.
Never... the blade bolt.
If any way, or should have damaged, missing, or failed parts replaced before disconnecting it back toward the rear of the saw .
ALWAYS TURN OFF THE SAW ...
English Manual - Page 8
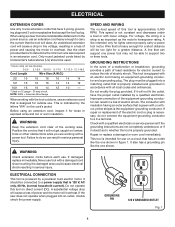
... overheat. Position the cord so that accept the tool's plug.
Electrical Connection
This tool is approximately 5,000 RPM. When using an extension cord, inspect it for outside use an extension cord that can support one shown. Use the chart provided below to overheat. If damaged replace immediately. ELECTRICAL
Extension Cords
Use only 3-wire extension cords that have 3-prong...
English Manual - Page 9
...removed by the blade in a non-through cut . Leading End The end of the workpiece. Push Blocks (for table saws) Devices used...tool is mounted.
Compound Cut A cross cut by the workpiece being dropped into the tool first.
FPM or SPM Feet per minute (or strokes per minute), used... The shaft on which the operation is not properly supported. Chamfer A cut which produces a square-sided notch...
English Manual - Page 10

... clamp
MITER FENCE
lower blade guard
"NO HANDS ZONE" BOUNDARY LINE
"NO HANDS ZONE" LABEL
throat plate
TABLE EXTENSION
base
MITER TABLE
Miter Scale
CONTROL ARM
support foot
10
Miter Lock Handle
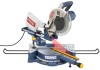
Fig. 2 Blade Diameter 10 in . FEATURES
PRODUCT SPECIFICATIONS
Blade Arbor 5/8 in .
English Manual - Page 11

...When unlocked, the saw at 0°, 15°, 22.5°, 30°, and 45° on the tool and in . FEATURES
KNOW YOUR COMPOUND MITER SAW
See Figure 2. thick or 6 in Down Position Fig. ...additional support. The bevel lock lever is spring loaded and is released by pulling the lock pin away from each side of the saw . To transport, turn off and unplug the saw, then lower the saw arm and lock ...
English Manual - Page 14

...supporting surface such as a workbench. Serious personal injury or damage to possible serious personal injury. Each of the saw without checking for hole patTern
mounting surface
Fig. 8 machine bolts, lock washers, and hex nuts...out on the lock pin. Lift the saw arm by the carrying...are replaced. Failure to the floor before operating.
ALWAYS secure this tool.
...
English Manual - Page 17
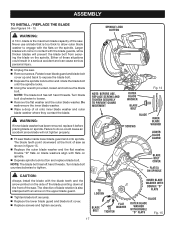
...lock button and rotate the blade bolt
until the spindle locks. Using the wrench provided, loosen and remove the blade
bolt.
WARNING:
If inner blade washer has been removed, replace it before use...saw . Remove screws. Failure to tighten.
ASSEMBLY
To Install / replace the Blade
See Figures 14 - 15. Spindle Lock Button
WARNING:
A 10 in a serious accident and can cause ...
English Manual - Page 19

... counterclockwise depending on the uneven edges resulting in serious personal injury. throat plate
SUPPORT FOOT
Fig. 17
19 WARNING:
The throat plate must be below the saw .
ADJUSTING SUPPORT FOOT
See Figure 17. To remove / replace: Unplug the saw. Remove the screws securing the right side of the zero
clearance throat plate. ...
English Manual - Page 23
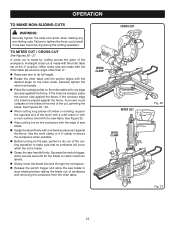
...; When cutting long pieces of lumber or molding, support the opposite end of a board is warped, place the convex side against the fence. Use the work surface level with one hand and secure it... table with the saw , perform a dry run of workpiece and removing the workpiece from the miter table. Securely tighten the miter lock handle. Place the workpiece flat on the saw table. ...
English Manual - Page 24
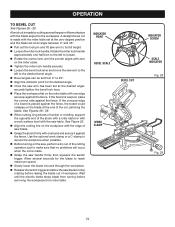
...lumber or molding, support the opposite end of saw blade.
Grasp the stock firmly with the...lock handle securely.
Loosen the bevel lock lever and move the saw arm to the left to loosen.
Rotate the control arm until the electric brake stops blade from turning before removing... Pull out the lock pin and lift saw , perform a dry run of workpiece. Use the optional work ...
English Manual - Page 25

... change the effect of cut is made using a miter angle and a bevel angle at the desired angle, securely tighten the bevel lock lever.
Recheck miter angle setting. See Figures 38 - 39.
When cutting long pieces of lumber or molding, support the opposite end of the stock with a roller stand or with a work...
English Manual - Page 27
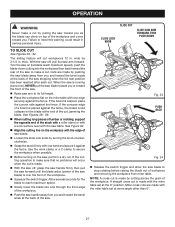
... the workpiece and come toward you. Use the work surface level with one edge...cutting long pieces of lumber or molding, support the opposite end of the stock with a roller stand or with a ... off , pull the saw arm forward. SLIDE LOCK KNOB
slide Cut
SLIDE SAW ARM FORWARD THEN
PUSH DOWN
TO ... Raise saw arm to
stop rotating before raising the blade out of workpiece and removing the workpiece...
English Manual - Page 32
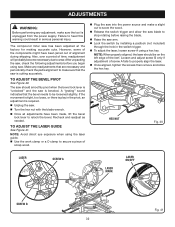
... aligned, tighten the screws then remove and store the hex key.
HEX NUT
Fig. 40
LASER
SCREW A
LASER... make sure the tool is beveled. The saw .
Turn the hex nut with the blade ...arm. Lock the switch by installing a padlock (not included)
through the hole in serious personal injury. Also, over a period of screw A fails to stop rotating before you begin using...
English Manual - Page 33
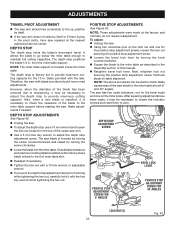
... Stop Adjustment Screw FOR
0° ANGLES
BEVEL LOCK lever
Positive Stop Adjustment Screw FOR 45° ANGLES
Lock Nut(S) 33
Fig. 42 NOTE: The miter table support is necessary to sharpening, it with a 10...of the upper saw arm.
Use a 5 mm hex key wrench to the miter table as described in . from turning while tightening the hex nut, carefully hold it may be used to check blade ...
English Manual - Page 34
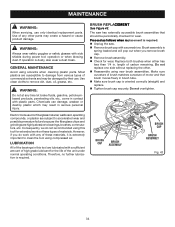
... the fiberglass chips and grindings are highly abrasive to clean the tool using this tool are susceptible to remove dirt, dust, oil, grease, etc.
Make sure curvature of brush matches curvature of motor and that should be damaged by their use only identical replacement parts.
Use clean cloths to damage from various types of any time let...
English Manual - Page 36

...Support please contact us at www.ryobitools.com or by power sanding, sawing, grinding, drilling, and other construction activities contains chemicals known to obtain Replacement Parts:
Replacement parts can be purchased online at www.ryobitools.com or by calling 1-800-525-2579. Some examples of Ryobi Limited used...to requesting service or purchasing replacement parts, please obtain your ...
Repair Sheet - Page 4

... 96 089100118015 97 089100113097 98 089100113098 99 089100113099
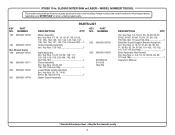
PARTS LIST
DESCRIPTION
QTY. Hd 2 Washer 1 * Lock Nut (M16 1 Sleeve Bearing (LM25UU 3 Washer 4 Bearing Cover 2 Absorbing Vibration Pin 2 Connection Backlash 1 Power Cord 1 Bevel Lock Lever 1 Washer 1 Arm Support Bracket 1 Miter Handle Cap 1 Bevel Scale Label 1 Connection Shaft 1 * Screw (M6 x 20 mm Hex Soc...
Repair Sheet - Page 6
..., 40-48, 52-57, 60-62, 64-65, 67-68, 70, 83, 95, 99, 119, 155 166-169, 173 and 190-194 1
Slide Bar Guard Support Bracket Assembly (Inc. NUMBER
202 089100113750
Table Assembly (Inc. Key Nos. 2, 4-8, 10-12, 58-59, 68, 99, 127 and 185 1
Operator's Manual
* Standard Hardware Item - Key...
Similar Questions

Fan Blade
dear sir, do you have fan " blade " for Ryobi p2105 leaf blower or replacement part, thank you.
dear sir, do you have fan " blade " for Ryobi p2105 leaf blower or replacement part, thank you.
(Posted by Henryngai 1 year ago)

Is There A Replacement For Ryobi Tss101l D Handle & Switch?
Part #s for above: 089100121610 089100121112 Have apparently discontinued. Does anyone have a fix?
Part #s for above: 089100121610 089100121112 Have apparently discontinued. Does anyone have a fix?
(Posted by Math72285 3 years ago)

Support Arm
The support arm (part number 080009002037) on mine broke. It appears as though this part has been di...
The support arm (part number 080009002037) on mine broke. It appears as though this part has been di...
(Posted by stephanieyatuni 10 years ago)

Hpl Replacement Battery
I need a replacement battery for my Ryobi model HP41L. Can you provode or direct men to where to pur...
I need a replacement battery for my Ryobi model HP41L. Can you provode or direct men to where to pur...
(Posted by jpiraino1 11 years ago)

Blade Not Going On Correctly
I recently bought the Ryobi mitre saw TSS101L used with no blade, turned it on seamed to work fine, ...
I recently bought the Ryobi mitre saw TSS101L used with no blade, turned it on seamed to work fine, ...
(Posted by shaunnyg2001 12 years ago)