
Ryobi RTS10 Support Question
Ryobi RTS10 Support Question
Find answers below for this question about Ryobi RTS10.Need a Ryobi RTS10 manual? We have 4 online manuals for this item!
Question posted by fainavycv on March 30th, 2014
How To Assemble Rts10
The person who posted this question about this Ryobi product did not include a detailed explanation. Please use the "Request More Information" button to the right if more details would help you to answer this question.
Current Answers
Related Ryobi RTS10 Manual Pages
English Manual - Page 2

...General Safety Rules...3-4 Specific Safety Rules...5 Symbols...6-7 Electrical...8 Glossary of Terms...9 Features...10-12 Tools Needed...13 Loose Parts...14-15 Assembly...16-19 Operation...20-29 Adjustments...30-31 Maintenance...32 Troubleshooting...33 Parts Ordering / Service...Back...
English Manual - Page 10

Input 120 V, AC only, 60 Hz, 13 A No Load Speed 4,800 r/min. (RPM)
spreader
BLADE GUARD ASSEMBLY
BLADE
RIP FENCE
ANTI-KICKBACK PAWLS
MITER GAUGE
FRONT RAIL
LOCKING LEver
BEVEL LOCKING
LEVER
BLADE ADJUSTING
HANDLE
BEVEL INDICATOR
SWITCH assembly
trigger Lock
Fig. 2 10 Cutting Depth at 45 2-5/8 in .
Table Size 25-3/4 in . x 16...
English Manual - Page 11

... occur. The blade is secured with the blade adjusting handle on the front of the blade guard assembly) are provided in a location that will be operated. Bevel LOCKING LEVER -
RIP FENCE - A...the grain (cross cuts or miter cuts), use the tool.
11 ANTI-KICKBACK PAWLS -
SWITCH ASSEMBLY - To lock the switch in this tool. This saw table shows the distance between the rip fence...
English Manual - Page 13

TOOLS NEEDED
The following tools (not included or drawn to scale) are needed for assembly and making adjustments:
WRENCH (2) 10 mm, 12 mm
PHILLIPS SCREWDRIVER
flathead SCREWDRIVER
FRAMING SQUARE
Fig. 4
13
English Manual - Page 14
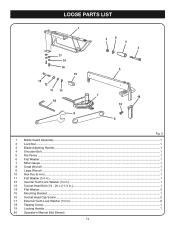
...
1
17 14 16 15
13 12 11 14 10
9
2
6
3
4
5
7
19
18
8
1 2
3 4 5 6 7 8 9 10 11 12 13 14 15 16 17 18 19 20
Fig. 5
Blade Guard Assembly...1 Lock Nut...1 Blade Adjusting Handle...1 Shoulder Bolt...1 Rip Fence ...1 Flat Washer...1 Miter Gauge ...1 Small Wrench...1 Large Wrench...1 Hex Key (5 mm)...1 Flat Washer (1/4 in.)...1 Internal Tooth...
English Manual - Page 16

... brace. If shipping has influenced the settings, refer to install the lower braces. Do not reach over or across the blade. ASSEMBLY
UNPACKING
This product requires assembly. Carefully remove the tool and any accessories from loose parts.
Place an upper brace inside two of the legs, with the legs wide end...
English Manual - Page 17

... workbench after mounting to the height adjusting handwheel with a screwdriver. Secure using 3/8 in. ASSEMBLY
Mounting THE leg stand on the table saw base.
The blade adjusting handle mounts to make...See Figure 8.
Ignoring these precautions can occur during use. Hand tighten.
Repeat for assembling the leg stand and leveling feet.
Place the leg stand on the TABLE saw...
English Manual - Page 18
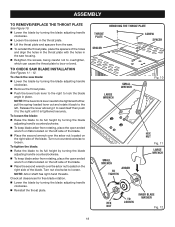
ASSEMBLY
TO remove/replace the THROAT PLATE
See Figure 10. Lower the blade by turning the blade adjusting handle
clockwise.
Loosen the screws in ...
English Manual - Page 19

... beside the saw blade on the left or right as shown in shipping, should not require adjustments during assembly. After extensive use, it may need to align the spreader with the saw blade are not in ....If the spreader and saw blade. TO Check and Align the Saw Blade and Blade Guard Assembly
See Figure 14.
SOCKET HEAD BOLT
EXTernal TOOTH LOCK
WASHER
FLAT WASHER
SOCKET HEAD CAP SCREWS
...
English Manual - Page 25
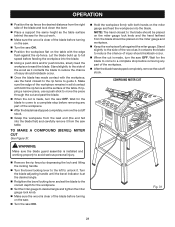
... tighten the lock knob. Place a support (the same height as it contacts the blade to reduce the chance of this tool. To secure the angle, lock the miter gauge in personal injury. WARNING:
Make sure the blade guard assembly is set to the correct depth for any part of the workpiece.
English Manual - Page 26
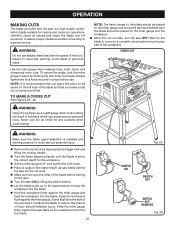
... ON.
26
Fig. 28 MITER cut
rip cut
Fig. 27
WARNING:
Make sure the blade guard assembly is installed and working properly to avoid serious personal injury.
Remove the rip fence by lifting... handle until the blade is made , turn the saw OFF. WARNING:
Make sure the blade guard assembly is clear of the workpiece. Wait for the cut past the blade. Never push a small piece ...
English Manual - Page 27

...the hand farthest from the blade should kickback occur. WARNING:
Make sure the blade guard assembly is installed and working properly to avoid serious personal injury.
27
Fig. 30 Turn the...the blade to avoid trapping the wood and causing kickback.
WARNING:
Make sure the blade guard assembly is installed and working properly to avoid serious personal injury.
Remove the rip fence...
English Manual - Page 28
... workpiece, use a push stick to move the piece through the cut and past the blade.
When the cut
WARNING:
Make sure the blade guard assembly is installed and working properly to avoid serious personal injury.
Remove the rip fence by depressing the lock and lifting the locking handle.
...
English Manual - Page 29

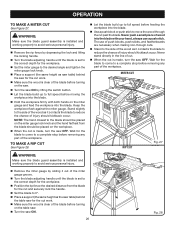
... cuts are complete:
Unplug the saw . Remove the blade guard assembly by the workpiece during most of serious personal injury. note: Always use push blocks, push... wood with the grain (ripping) or across the grain (cross cut is made without the blade guard assembly installed.
operation
To make a NON-THROUGH cut such as rabbets. The use push blocks, push sticks,...
English Manual - Page 30

...two screws. Make two or three test cuts on the rear of injury, always make sure the tool is unplugged from the power supply and the switch is in scrap wood before beginning any adjustment, make sure ... any operation.
Unplug the saw then remove the blade guard assembly.
Unlock the rip fence by turning clockwise to increase tightness of the rear of the rip fence.
English Manual - Page 32
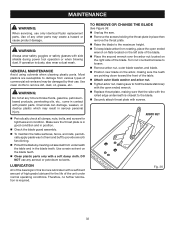
... time let brake fluids, gasoline, petroleumbased products, penetrating oils, etc., come in this tool are susceptible to the maximum height. To keep blade arbor from various types of... Remove the screws holding the throat plate in position.
Check the blade guard assembly. To maintain the table surfaces, fence, and rails, periodi- WARNING:
Always wear safety...
Repair Sheet - Page 3
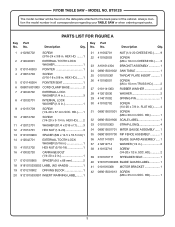
... DRIVING BLOCK 1
20 9121015333301 INSERT WARNING LABEL........ 1
21 411062701 NUT (1/4-20 CHEESE HD.)........ 9 22 410162003 SCREW (M6 x 18 mm CHEESE HD.)...... 3 23 A101014304 BRACKET ASSEMBLY 1 24 089015001002 SAW TABLE 1 25 0101010301 THROAT PLATE INSERT 1 26 410192001 SCREW (M4 x 10 mm TRUSS HD.)......... 2 27 0101141303 RUBBER WASHER 2 28 412012030 WASHER...
Repair Sheet - Page 5
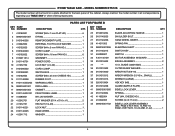
...41 089015001005 BEVEL LOCK LEVER 1
42 0101140904 SPRING 1
43 411062004 NUT (M4, CHEESE HD 2
44 410542005 SCREW (m4 X 15 mm 2
45 089015001702 BEVEL LOCK LEVER ASSEMBLY (INC. NO.
NUMBER
DESCRIPTION
QTY. NUMBER
DESCRIPTION
QTY.
1 410182001 SCREW (M4 x 7 mm FLAT HD 6 2 089015001007 E-RING 1 3 0101040305 REINFORCEMENT PLATE 1 4 412042002 EXTERNAL TOOTH LOCK WASHER...
Repair Sheet - Page 7

... 5 412042001 EXTERNAL TOOTH LOCK WASHER 2 6 410252001 SCREW w/WASHER (M4 x 12 mm 6 7 0101015002 BRUSH ASSEMBLY 2 8 0101010208 END CAP (MOTOR 1 9 0101010209 RUBBER PLUG 2 10 0101010502 BRUSH HOLDER 2 11 411012001 HEX... NUT (M5 2 12 410272004 SCREW (M5 x 75 mm 2
13 0101010207 MOTOR HOUSING ASSEMBLY 1 14 0101010807 SCREW w/WASHER (M5 x 30 mm 1 15 412061001 WAVY WASHER 1 16 ...
Repair Sheet - Page 8

... (1/4-20 x 1-5/8 in 4
11 411062701 HEX NUT (1/4-20 4
8 BTS12S
Figure D
3
6
7
9
4
10 9 6
11
8 9 7
5 8
3
2
3
5
4
9
2
2
8 3
2
PARTS LIST For FIGURE D
Key Part
Key Part
No. Description
Qty.
1 A101141301 COMPLETE STAND ASSEMBLY (INC. No. No. No.
Similar Questions

Ryobi Rts10 Riving Lever Won't Lock
The riving knife lever on Ryobi RTS10 won't lock. Is there anything that shows the assembly of this ...
The riving knife lever on Ryobi RTS10 won't lock. Is there anything that shows the assembly of this ...
(Posted by nsmerk 8 years ago)

Dado Blade Insert For A Ryobi Rts10 Table Saw
Where can I purchase a dado blade insert for my Ryobi RTS10 10" table saw? I am having difficulty fi...
Where can I purchase a dado blade insert for my Ryobi RTS10 10" table saw? I am having difficulty fi...
(Posted by bstilton 9 years ago)


Rts10 Dado Throat Cover
I need a dado throat cover for a Ryobi RTS10 table saw
I need a dado throat cover for a Ryobi RTS10 table saw
(Posted by mattharbaugh 10 years ago)

Rts10/bts16
Is the motor on the RTS10, the same motor as is on the BTS16?
Is the motor on the RTS10, the same motor as is on the BTS16?
(Posted by kesev 11 years ago)