Ricoh Aficio MP 5001 Support Question
Ricoh Aficio MP 5001 Support Question
Find answers below for this question about Ricoh Aficio MP 5001.Need a Ricoh Aficio MP 5001 manual? We have 4 online manuals for this item!
Question posted by blashia on March 5th, 2012
Connection With Destination Failed - Scan Function
I am receiving the error, "Connection with destination has failed. To check current status press [Scanned Files Status]. This is after I have scanned and am trying to send to an email address. Address is verified and ok. Network connection is good coming into the machine. I do not know where to check the [Scanned Files Status] and I do not know how to troubleshoot this one. Please advise.
Current Answers
Answer #1: Posted by freginold on March 5th, 2012 7:42 PM
freginold

Member since:
December 20th, 2011 Points: 23,253,885

Member since:
December 20th, 2011 Points: 23,253,885
There could one of several things preventing you from scanning to that email address. Is your DNS server up and running? If DNS is down, the copier won't be able to resolve the SMTP server name. You could try entering the SMTP server's IP address instead of name and see if that fixes the problem.
It could also be an authentication issue. Do you have any necessary SMTP authentication entered into the copier? This information should be put in under User Tools > System Settings > File Transfer.
If your SMTP server needs a sender email address, make sure the administrator email address field in the File Transfer tab is filled in.
Another thing to check is any settings on the SMTP server itself. If you are using a security suite, you may need to tell the software to allow the copier to access the SMTP server. This is typically done by trusting the copier's IP address (unless you are using DHCP).
Related Ricoh Aficio MP 5001 Manual Pages
Quick Start Guide - Page 4
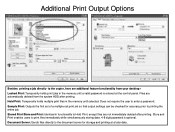
... date. Document Server: Sends files directly to printing the entire job. Additional Print Output Options
Besides printing a job directly to the copier, here are additional feature functionality from the system HDD after... printing. Sample Print: Outputs the first set of a multiple-set print job so that output settings can be checked for accuracy...
Quick Start Guide - Page 5
Hold Print: Temporarily holds multiple print files in functionality to printing the entire job. Does not require the user to print files immediately while simultaneously storing data. 4-8 digit password is entered at a later date. Document Server: Sends files directly to the document server for accuracy prior to Hold Print, except files are automatically deleted from the system...
Quick Start Guide - Page 10
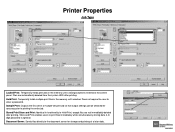
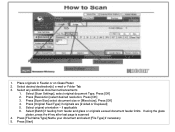
Scanning Documents
From Copier Panel, Select Scanner - Place the documents to be scanned in the Document Feeder or on the Platen Glass and Select the appropriate options for your Documents where necessary.
Quick Start Guide - Page 11
... from list of registered users.
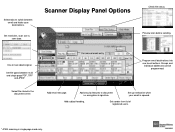
* JPEG scanning in the document server. Set resolution, scan size & scan type. Preview scan before sending.
For manual email entry
Program email destinations into one touch buttons.
Add email message. Add subject heading.
Scanner Display Panel Options
Check file status.
Groups and
individual addresses can be programmed. Set up notification when...
Quick Start Guide - Page 12

Place Originals in Feeder or on your operating system and device.) Your display may vary depending on Glass 5. At copier Screen Press [Scanner]
2. Select destination [email address or folder location
4. Select [E-mail] or [Folder] Tab 3. Basic Scanning
1. Press [Start]
(Note: Screenshots are provided for reference purposes only.
Quick Start Guide - Page 13
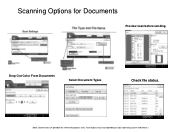
Your display may vary depending on your operating system and device.) Scanning Options for reference purposes only. Drop Out Color From Documents
Select Document Types
Check file status.
(Note: Screenshots are provided for Documents
Preview scan before sending.
Quick Start Guide - Page 18

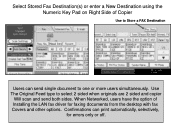
... desktop with fax Covers and other options. Confirmations can send single document to select 2 sided when originals are 2 sided and copier
Will scan and send both sides. Use The Original Feed type to one or more users simultaneously. Select Stored Fax Destination(s) or enter a New Destination using the Numeric Key Pad on Right Side of...
Quick Start Guide - Page 19

... is already pre-programmed in address book.
6. Select [File], then [Print]
Faxing From Desktop
3. 1. You can customize your fax cover.
8. Press [OK] or [Print].
5. At [Fax Number] type the Recipient's Fax# just as Destination] to confirm Recipient's destination. Press [Attach Cover] to add a fax cover to the document, you wish to send same fax.
7. In the [Name...
User Guide - Page 2

... program button allows you to store
frequently used job settings and screen
display defaults
Allows user to
interrupt job in
progress for new job
Hard function keys have Red/Yellow status LEDs
8.5" Full Color W-VGA Screen
Ready
Not Ready
Simplified display magnifies fonts for
example
User Guide - Page 11
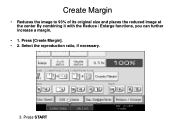
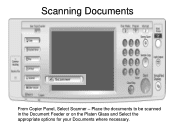
Select the reproduction ratio, if necessary.
3. Press [Create Margin]. • 2. Press START Create Margin
• Reduces the image to 93% of its original size and places the reduced image at the center By combining it with the Reduce / Enlarge functions, you can further increase a margin.
• 1.
User Guide - Page 14

used for hole-punching, stapling or binding
Stamps -
erase color, change or adjust color
Scan Position -
used to move margins for cleaning edges and borders, page centers
Edit Image - Used for background numbering, page numbering, watermarks, date stamping
Erase - used ...
User Guide - Page 15
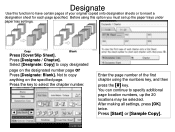
Select [Designate: Copy] to copy designated
page on the specified page.
Press [Start] or [Sample Copy]. Not to insert a designation sheet for each page specified. Copy
Blank
Press [Cover/Slip Sheet].
Enter the page number of the first chapter using this function to have certain pages of your original copied onto designation sheets or...
User Guide - Page 20
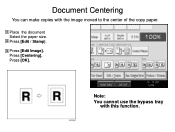
Press [Centering]. Place the document Select the paper size.
Note: You cannot use the bypass tray
with the image moved to the center of the copy paper. Press [Edit / Stamp]. Press [OK]. Document Centering
You can make copies with this function. Press [Edit Image].
User Guide - Page 33
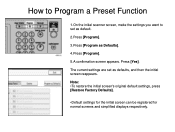
The current settings are set as default.
2.Press [Program].
3.Press [Program as defaults, and then the initial screen reappears. Note: •To restore the initial screen's original default settings, press [Restore Factory Defaults].
•Default settings for the initial screen can be registered for normal screens and simplified displays respectively.
How to Program a Preset Function
1....
User Guide - Page 35
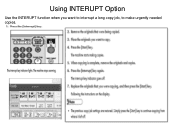
Using INTERUPT Option
Use the INTERUPT function when you want to interrupt a long copy job, to make urgently needed copies.
User Guide - Page 52
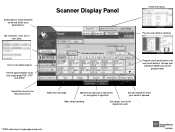
...Add subject heading. Set resolution, scan size & scan type. Set up notification when your email is opened. For manual email entry
Program email destinations into one touch buttons. encryption & signature.
Set file types between email and folder scan destinations.
Groups and
individual addresses can be programmed.
Preview scan before sending. Add email message. Set sender from...
User Guide - Page 53
... - Press [File Name/Type] Name your document and select [File Type] if necessary 5. Press [Original Feed Type] if originals are [2 sided or Duplexed] 5. Press [Start] Press [Resolution] select desired resolution, Press [OK] 3. If using the glass
platen, press the # key after last page is scanned 4. Place originals in Feeder or on Glass Platen 2. Select desired destination[s] e-mail...
User Guide - Page 59
... document to select 2 sided when originals are 2 sided and copier
Will scan and send both sides. Select Stored Fax Destination(s) or enter a New Destination using the Numeric Key Pad on Right Side of Installing the LAN fax driver for errors only or off. When Networked, users have the option of Copier
Use to Store a FAX...
User Guide - Page 60
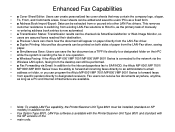
... the inbound paperless fax to SAF/HDD, the Aficio MP 6001/MP 7001/ • MP 8001/MP 9001 Series' have the ability to forward all incoming faxes directly to an administrator's email • address or folder, or you can be extracted from specific senders directly to designated receivers. Fax users can receive fax documents anywhere, anytime,
as long as...
Reference Guide - Page 9

... pages 2. Basic Scanning to Email or Folder Features
Figure 1: Document is placed Face Up in the Document Feeder
Figure 2: Document is limited to a 4MB file size. Please see Scan Settings below for steps to .
3. Press [E-mail], and then select the recipient you want to send the scan to change this setting.
9
Press the [Start] key. Scanning to Auto Select...
Similar Questions

How To Add A Senders Email Address To Use For Scanning
How do I how to add a senders email address to use for scanning
How do I how to add a senders email address to use for scanning
(Posted by westbros 9 years ago)

How To Scan To Multiple Email Addresses With My Network Printer
(Posted by bwisyk 10 years ago)

How To I Scan To My Email Address On A Ricoh Aficio Mp 5001
(Posted by jedw 10 years ago)
How To Add Email Address In The 'other Function'?
In our machine, the scanning is done through by going into the "other function." Under the "other fu...
In our machine, the scanning is done through by going into the "other function." Under the "other fu...
(Posted by psingh 11 years ago)

How Do I Change My Email Address For Wireless Scanning?
How do I change my email address for wireless scanning?
How do I change my email address for wireless scanning?
(Posted by spond 12 years ago)