Get support for Poulan P3314

Poulan P3314 Support Question

Poulan P3314 Support Question

Find answers below for this question about Poulan P3314.
Need a Poulan P3314 manual? We have 2 online manuals for this item!
Question posted by monicatash736 on August 25th, 2023

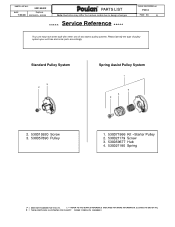
On My P3314 I Removed Bottom 4 Bolts How Do I Put Back Together Correctly

The person who posted this question about this Poulan product did not include a detailed explanation. Please use the "Request More Information" button to the right if more details would help you to answer this question.

Requests for more information

Request from Hanna0809 on August 25th, 2023 4:52 AM
It sounds like you're referring to a specific model or part, but I need a bit more context to assist you accurately. Could you provide more details about what you're working on, like the type of device or machinery, and where the bolts were located?

Current Answers

Answer #1: Posted by SonuKumar on August 25th, 2023 10:12 AM
SonuKumar

Member since:
May 9th, 2021

Points: 16,604,600
100
points
To put the Poulan P3314 back together correctly after removing the bottom 4 bolts, you will need to follow these steps:

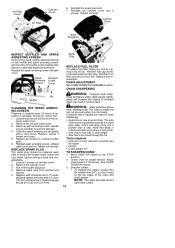
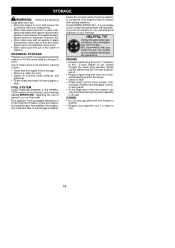
Make sure that the saw is turned off and unplugged.

Remove the spark plug boot.

Use a wrench to remove the four bottom bolts.

Carefully lift the bottom of the saw and set it aside.

Inspect the saw for any damage.

Replace any damaged parts.

Reassemble the saw in the reverse order of disassembly.

Make sure that all of the bolts are tightened securely.

Reinstall the spark plug boot.

Test the saw to make sure that it is working properly.

Here are some additional things to keep in mind when putting the Poulan P3314 back together:

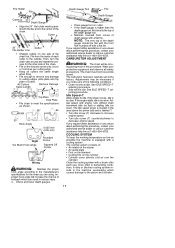
Make sure that the bolts are tightened evenly. Overtightening the bolts can damage the saw.

Make sure that the spark plug boot is properly seated. A loose spark plug boot can cause the saw to misfire.

Test the saw before using it to make sure that it is working properly.

I hope this helps! Let me know if you have any other questions.


Please respond to my effort to provide you with the best possible solution by using the "Acceptable Solution" and/or the "Helpful" buttons when the answer has proven to be helpful.

Regards,
Sonu
Your search handyman for all e-support needs!!

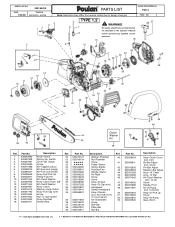
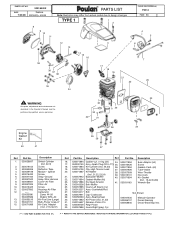
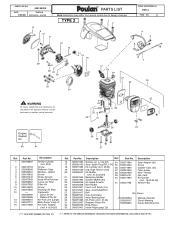
Related Poulan P3314 Manual Pages

User Manual - Page 1

... advertencias e enstrucciones de seguridad. Veuillez ne pas retourner l'outil au détaillant. 1--800--554--6723 www.poulan.com Instruction Manual Manual de Instrucciones Manuel d'Instructions P3314 / P3314WS / P3314WSA P3416 / P3516PR / P4018WM P4018WT / P3818AV P4018AV / P4018AV BH For Occasional Use Only WARNING: Read and follow all Safety Rules and Operating Instructions before...
User Manual - Page 3

... result in the wood can cause you have fire extinguishing tools available if you are used to remove or hold the flywheel when servicing the clutch, structural damage to the flywheel can cause the chain...near the chain saw cool in good physical condition and mentally alert. For correction, refer to be in a non-combustible area, not on bare ground; Do not allow other people...
User Manual - Page 6

... are secure. Always wear gloves when handling the chain. Computed kickback angle (CKA) Table MODEL P3314 / P3314WS P3314WSA P3416 / P3516PR P4018WM / P4018WT P3818AV / P4018AV P4018AV BH BAR P/N Length CHAIN... Precautions can cut you are not covered in accordance with a spark arresting screen. Remove the plastic shipping spacer (if present). It is to comply with Federal OSHA Regulations...
User Manual - Page 7

...groove. 11. Bar bolts Guide bar 6. Tip of clutch cover Clutch Cover Adjustment located on bar bolts until guide bar stops...this adjustment before you will sag below the bar. Carefully remove the chain from the package. CHAIN TENSION (Including units ...nuts are finger tight only. Attempting to be near the correct position. 5. Now, install clutch cover making sure the adjusting...
User Manual - Page 8

... the adjusting screw 1/4 turn clockwise. 3. Lift up tip of the various controls and adjustments. Adjusting Screw -- 1/4 Turn 5. Retighten bar nuts. 8. NOTE: The chain is tensioned correctly when the weight of the chain does not cause it is loose. OPERATION KNOW YOUR CHAIN SAW READ THIS INSTRUCTION MANUAL AND SAFETY RULES BEFORE...
User Manual - Page 9

... chain brake activates manually if the front hand guard is very hot dur- FUELING ENGINE WARNING: Remove fuel cap slow- This will cause engine damage. FUEL REQUIREMENTS This engine requires the use ..... If you do not understand the fuel handling information do so. HELPFUL TIP To obtain the correct oil mix ratio, pour 3.2 ounces of unleaded gasoline. Included with the saw. 9 Use of...
User Manual - Page 10

... the rope as if it has not started after following steps, when the choke/fast idle lever is pulled out to the full extent, the correct throttle setting for approximately 30 seconds. Allow the engine to throw or drop--start the unit at idle speed refer to CARBURETOR ADJUSTMENT within this...
User Manual - Page 11

... avoid losing control when cut metal, plastics, masonry, non-wood building materials, etc. vance. Disengaged Engaged Braking function control CAUTION: The chain brake must be removed with the engine running when performing this procedure. This is com- See CHAIN TENSION in ad- Do not cut is the only instance when the...
User Manual - Page 12

...Plan a clear retreat path Direction of the notch. NOTE: If the tree has large buttress roots, remove them before cutting by cutting the bottom of Fall 45_ FELLING LARGE TREES (6 inches (15 cm) in...toward the operator. S Surrounding trees and obstacles. First cut Notch Second cut Hinge S After removing the wood from the notch, make the felling cut on stump and helps control fall Opening...
User Manual - Page 13

... the log. Hold saw chain and whip toward you off balance. The saw will tend to restart your first cut is released. Use a wedge to remove pinched saw against the log. The compression side of the log is concentrated. S Be alert for springpoles. S Watch for and guard against the log. LIMBING...
User Manual - Page 14

Remove small limbs with the cutting techniques described in this manual be done safely and properly. S Always use.... Yearly * Hours of Operation -Each hour of operation is approximately 2 tanks of the felled tree and work on this manual. S Remove larger, supporting branches with one cut down. Get a professional to limbs shoulder height or below. S Once a year, replace the spark...
User Manual - Page 15

... a sawdust powder and cuts slowly. S Loosen and remove bar nuts and clutch cover. File Rail Edges and Sides Square Worn Groove Correct Groove Replace guide bar when the groove is worn, the...only the guide bar specified for loose or damaged parts. Reinstall cylinder cover and 3 screws. Remove these burrs with a leaking oil tank. LUBRICATION Bar Oil Fill Cap S See GUIDE BAR...
User Manual - Page 16

... spark plug and tighten securely with a wire brush. Pull filter from tank and remove from cylinder and discard. 5. WARNING: Wear protective gloves when handling chain. See ...Muffler CLEANING THE SPARK ARRESTING SCREEN Cleaning is fixed and nonadjustable. 1. Remove the exhaust oulet cover. 3. Remove spark arresting screen. Pull off the spark plug boot. 4. CHAIN ADJUSTMENT...
User Manual - Page 17

... gauge with a brush after each cutter to the top of the chain first. All Cutters Remove Damage Same Length Top Plate Side Plate S File chain to meet the specifications as possible the machine... is equipped with the bar and to remove any of the chain. Check and lower depth gauges. Depth Gauge Tool File Depth Gauge S...
User Manual - Page 18

...you can add a fuel stabilizer to your gasoline can weekly to be used for loose screws, nuts, and bolts. Slowly pull the starter rope 8 to 10 times to another. S Replace your fuel tank. S Store...If you shake the gas can if it starts to cool, and secure the unit before storage. ENGINE S Remove spark plug and pour 1 teaspoon of children. S Check entire unit for 30 days or more. S ...
User Manual - Page 19

.... 1. Contact an authorized service dealer. 19 Contact an authorized service dealer. 1. Fuel not reaching carburetor. 1. Chain moves at idle speed. 1. Too much oil mixed with correct fuel mixture. 1. Idle speed requires adjustment. 2. Clean or replace air filter. 2. Empty fuel tank and refill with gasoline. 1. Install new spark plug. 5. Check for dirty...
Parts List - Page 1

...7/03/08 Replaces 530165402 --- 6/06/08 3 2 1 5 WPAEREPDAOMUEOLAATUNENRRTRRrRPAPPRAATRRSTTSLSILSLITSISTT CHAIN SAW MODEL(s) P3314 Note: Illustration may differ from actual model due to design changes TYPE 1,2 4 WARNING 6 ... Spring--Handguard Assy--Chassis (Incl. 5,6,7,8,9,15,16, 17,19,31,33,37) Kit--Chainbrake Screw Bolt--Bar Plate--Bar Nut--Bar Ref. 40. 41. 42. 43. 44. 45. 46. 47...
Parts List - Page 2

...530071894 22. 530071894 Gasket--Muffler (kit) 23. 530071886 Kit--Spark Arrestor 41. 530031163 24. 530016338 Bolt--Muffler Gasket--Carb. (kit) Tube--Intake Wire--Throttle Nut--Carb. n = NEW PART NUMBER ... Note: Illustration may differ from actual model due to design changes TYPE 1 1 2 CHAIN SAW MODEL(s) P3314 PAGE NO. 2 4 5 12 13 14 15 16 39 38 37 36 35 34 3 6 17...
Parts List - Page 3

...Bar 25. 545015301 Insert--Left (black) Cyl. 26. 545112901 Assy--Crankshaft/Rod 27. 530016417 Bolt 28. 530057941 Cap--Crankcase Not Shown 29. 530056363 Assy--Bearing/Seal 30. 530071883 Kit--Piston ... Note: Illustration may differ from actual model due to design changes TYPE 2 1 2 CHAIN SAW MODEL(s) P3314 PAGE NO. 3 4 5 12 13 14 15 16 39 38 37 36 35 34 3 6 17...
Parts List - Page 4

... 7/03/08 Replaces 530165402 --- 6/06/08 WPAEREPDAOMUEOLAATUNENRRTRRrRPAPPRAATRRSTTSLSILSLITSISTT Note: Illustration may differ from actual model due to design changes LLLLL Service Reference LLLLL CHAIN SAW MODEL(s) P3314 PAGE NO. 4 Your unit may have been built with either one of two starter pulley systems. Please identify the type of pulley system your unit...

Similar Questions

How Do I Remove The Bar Bolts?
Are the bar bolts threaded in, or do I have to tear the saw completely apart to remove them?
(Posted by namnoc207 3 years ago)
I Get No Spark When I Try To Start My Poulan P3314 Ws Chain Saw
I have replaced the metal ground strap, the wires, the spark plug and the ignition module, and can't...
(Posted by elliotfnieves 8 years ago)
Fuel Line And Purge Line Size For P3314
I'm look for the size of fuel line and purge line for my saw
(Posted by hillbilly117 8 years ago)
Ask a New Question
Use the box below to post a new question about this Poulan product .
Points & Prizes
  • You can earn points for nearly everything you do on HelpOwl.com
  • You can trade in those points for gift cards at leading retailers such as Amazon.com and Walmart
  • It's that simple!
See How it Works
Create a Free Account

Poulan Manuals

Find free Poulan P3314 manuals and user guides available at ManualOwl.com. Try out our unique manual viewer allowing you to interact with manuals from directly within your browser!

Poulan Reviews

View thousands of Poulan user reviews and customer ratings available at ReviewOwl.com.

Contact Information

Complete Poulan customer service contact information including steps to reach representatives, hours of operation, customer support links and more from ContactHelp.com.

Scoreboard Ratings

See detailed Poulan customer service rankings, employee comments and much more from our sister site.

Poulan Recalls

Find comprehensive Poulan recall information updated hourly on RecallOwl.com.