2006 Pontiac G6 Support Question
2006 Pontiac G6 Support Question
Find answers below for this question about 2006 Pontiac G6.Need a 2006 Pontiac G6 manual? We have 1 online manual for this item!
Question posted by dbmcknghtd on August 11th, 2014
How To Remove And Replace 2006 Pontiac G6 Starter?
What bolts do I remove to get starter out?
Current Answers
Answer #1: Posted by waelsaidani1 on August 12th, 2014 1:40 AM
waelsaidani1

Member since:
May 12th, 2013 Points: 19,501,777

Member since:
May 12th, 2013 Points: 19,501,777
Related Manual Pages
Owner's Manual - Page 1
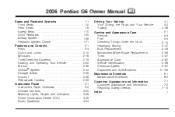
2006 Pontiac G6 Owner Manual
Seats and Restraint Systems ...1-1 Front Seats ...1-2 Rear Seats ...1-9 Safety...Appearance Care ...5-1 Service ...5-3 Fuel ...5-5 Checking Things Under the Hood ...5-10 Headlamp Aiming ...5-47 Bulb Replacement ...5-49 Windshield Wiper Blade Replacement ...5-56 Tires ...5-57 Appearance Care ...5-87 Vehicle Identification ...5-96 Electrical System ...5-97 Capacities ...
Owner's Manual - Page 35
..., they activate in a moderate to expose its storage clip, and then slide the guide onto the clip. See Replacing Restraint System Parts After a Crash on page 1-23. Pretensioners work only once. To remove and store the comfort guides, squeeze the belt edges together so that the shoulder belt crosses the shoulder. Safety...
Owner's Manual - Page 85
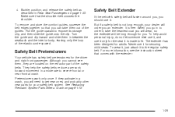
...maximum of the transmitter. 2. Each vehicle can have to get inside the transmitter. 4. Notice: When replacing the battery, use , the battery in any remaining transmitters with the vehicle. 2-7 Insert a fl.../panic alarm button, and separate the bottom half from unlocking your dealer. Remove the battery and replace it . Make sure the cover is weak if the transmitter will not get...
Owner's Manual - Page 99

..." the transponder value of a new or replacement key. When trying to check the fuse, see Fuses on page 5-97. At this time, you insert or remove the key from starting.
It is cut ... light will not start , and the key appears to be discouraged because of the high number of removing the original key. 5. This means you must see your vehicle does start the vehicle will be undamaged...
Owner's Manual - Page 104
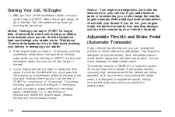
...15 seconds between each try to disable the switch. Do this feature, you do not, your starter motor. With your foot off for a maximum of 15 seconds.
Any resulting damage would not..., such as your vehicle. Simply remove the obstruction and try to START. And the excessive heat can damage your engine might not perform properly. If your starter. 2. When the engine starts, ...
Owner's Manual - Page 270
...Alignment and Tire Balance ...5-71 Wheel Replacement ...5-72 Tire Chains ...5-73 If a Tire Goes Flat ...5-74 Changing a Flat Tire ...5-74 Removing the Spare Tire and Tools ...5-76 Removing the Flat Tire and Installing the Spare... and Specifications ...5-105
Windshield Wiper Blade Replacement ...5-56 Tires ...5-57 Tire Sidewall Labelling ...5-59 Tire Terminology and Definitions ...5-62 Infl...
Owner's Manual - Page 277
...replacing the fuel cap, turn it clockwise until it may damage your tank is nearly full, and is more information.
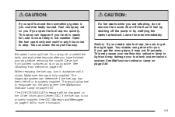
{CAUTION:
If a fire starts while you get one for you have finished pumping before removing...off the pump or by notifying the station attendant. If you are refueling, do not remove the nozzle. See DIC Warnings and Messages on the Driver Information Center (DIC) if ...
Owner's Manual - Page 290
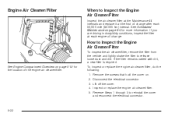
... Overview on . 2. Disconnect the electrical connector. 3.
Remove the screws that hold the cover on page 5-12 for more information. Inspect or replace the engine air cleaner/filter. 5. If the ...cover. 4. Reverse Steps 1 through 3 to release loose dust and dirt. To inspect or replace the engine air cleaner/filter, do the following: 1. Engine Air Cleaner/Filter
When to...
Owner's Manual - Page 304

...mixture to the FULL COLD mark. Wait about five minutes, then check to the mark. Then replace the pressure cap. With the coolant surge tank pressure cap off, start the engine and let it ...level is hand-tight and fully seated.
3. 2. Then keep turning the pressure cap slowly, and remove it run until the level remains constant at the FULL COLD mark for the engine cooling fans. ...
Owner's Manual - Page 305
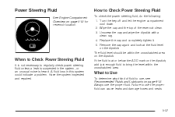
...in this system could indicate a problem. What to Use
To determine what kind of the reservoir clean. 3. Replace the cap and completely tighten it. 5. A fluid loss in the system, or an unusual noise...64258;uid level on the dipstick The fluid level should be within the crosshatched area.
Remove the cap again and look at or below the ADD mark on page 5-12 for reservoir location...
Owner's Manual - Page 308

...need brake fluid, use the proper brake fluid.
Be careful not to be replaced. If you do , wash it .
Disc brake pads have to spill brake fluid ...a sealed container only. Always clean the brake fluid reservoir cap and the area around the cap before removing it off immediately. Always use only DOT-3 brake fluid. Use new brake fluid from entering ...
Owner's Manual - Page 310
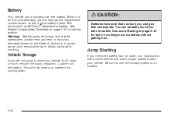
...vehicle. You can be badly hurt if you and gas that has the replacement number shown on the original battery's label. This will help keep your vehicle for battery location. ...We recommend an ACDelco® replacement battery. See Jump Starting on page 5-42 for tips on page 5-12 for 25 days or more, remove the black, negative (−) cable from running down ,...
Owner's Manual - Page 318

Pull back the front fascia then pull the headlamp assembly forward, out of these bulbs, do the following: 1. To replace one of the vehicle. Remove the two screws that secure the headlamp assembly.
5-50 Front Sidemarker Front Turn Signal/Parking Lamp Low-Beam Headlamp High-Beam Headlamp
2. Headlamps, Front Turn ...
Owner's Manual - Page 319
... reinstall the bulb assembly. Center High-Mounted Stoplamp (CHMSL) (Retractable Hardtop and Coupe)
If your dealer.
5-51 Remove the bulb by your vehicle has this component and it needs replacement, it is recommended that it be replaced as a unit by turning it counterclockwise. 5. Reverse Steps 3 through 4 to reinstall the bulb assembly and headlamp...
Owner's Manual - Page 320

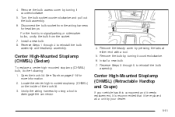
Remove the convenience net, if equipped.
Remove the wing nuts holding the trunk trim.
5-52 Open the trunk. Sidemarker Lamp C. Stoplamp/Taillamp/Turn Signal B. A. Taillamps, Turn Signal, Sidemarker, Stoplamps and Back-up Lamp
3. See Trunk on page 2-14 for more information. 2. Back-up Lamps (Sedan)
To replace one of these bulbs, do the following: 1.
Owner's Manual - Page 322

...the bulb from the rear of these bulbs, do the following: 1. Install a new bulb. 9. Remove the two wing nuts from the trunk trim to reinstall the taillamp assembly. A. See Trunk on page..., Sidemarker, Stoplamps and Back-up Lamp B. Remove the three hex nuts retaining the taillamp assembly. 5. To replace one of the vehicle. 6. Remove the convenience net, if equipped.
7.
Owner's Manual - Page 323
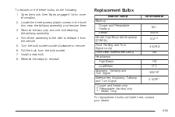
... your dealer. H9 H11 3057K* 3157K** 921 3057K 912*** 3157KX 194 Bulb Number
5-55 To replace one bolt retaining the taillamp assembly. 4. See Trunk on page 2-14 for more information. 2.
Open the trunk. Pull the bulb from the vehicle. 5. Pull off the assembly to the side to remove. 6. Reverse the steps to reinstall.
Owner's Manual - Page 351
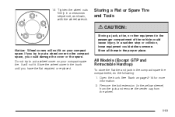
... the proper place. All Models (Except GTP and Retractable Hardtop)
To store the flat repaired or replaced. See Trunk on your compact spare. In a sudden stop or collision, loose equipment could cause injury. Remove the bolt extension (in the passenger compartment of the vehicle could strike someone. 13. Notice: Wheel covers will...
Owner's Manual - Page 353
... from the wheel.
5.
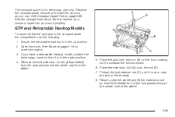
GTP and Retractable Hardtop Models
To store the flat or near the end of the wheel.
5-85 Remove the bolt extension (in the compact spare tire compartment, do the following: 1. Replace the compact spare tire with a full-size tire as soon as shown. 6. See the storage instructions label to...
Owner's Manual - Page 354

...Replace the cover. C. D. Remove the yellow cap. 10. It should stop as soon as you want. Your spare will last longer and be 60 psi (420 kPa). B. Cover Wing Nut Spare Tire Bolt Extension E. Bolt...course, it again. The compact spare is made to perform well at speeds up to replace your compact spare into your vehicle.
5-86
See the storage instructions label to 3,000 ...
Similar Questions


Where Is The Power Steering Fluid Reservoir Located On A Good 2006 G6 Pontiac
reservoir capr
reservoir capr
(Posted by glendajean50 10 years ago)
