Pfaff hobbylock 2.0 Support Question
Pfaff hobbylock 2.0 Support Question
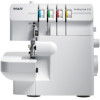
Find answers below for this question about Pfaff hobbylock 2.0.Need a Pfaff hobbylock 2.0 manual? We have 1 online manual for this item!
Question posted by jeannerieger59 on April 5th, 2014
Gathering
Does this machine gather without a special foot?
Current Answers
Related Pfaff hobbylock 2.0 Manual Pages
Owner's Manual - Page 2
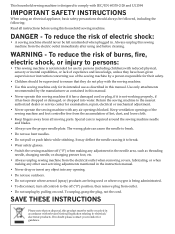
...recommended by pulling on disposal, this sewing machine from all instructions before using and before cleaning. Special care is required around the sewing machine needle and blades.
• Always...DANGER - Keep ventilation openings of the sewing machine and foot controller free from the accumulation of electric shock:
• A sewing machine should always be left unattended when plugged...
Owner's Manual - Page 3

... the 2-thread overlock converter 8
Threading the machine 9
Threading the upper looper (red 10
Threading the lower looper (yellow 11
Threading the right needle (green 12
Threading the left needle (blue 12
Changing threads 13
Start sewing 13
Thread tension settings 14
Differential feed adjustment 15
Presser foot pressure adjustment 16
Stitch width settings...
Owner's Manual - Page 4
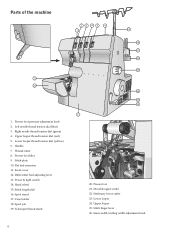
... 9. Flat bed extension 11. Hand wheel 15. Cone holder 18. Presser foot 21. Upper looper 25. Presser foot pressure adjustment knob 2. Left needle thread tension dial (blue) 3. Handle 7. Spool pin 19. Stationary lower cutter 23. Differential feed ... 12
21 20
23
22 25
24
26
20. Lower looper thread tension dial (yellow) 6. Parts of the machine
7
8
9 10
1. Lower looper 24.
Owner's Manual - Page 5
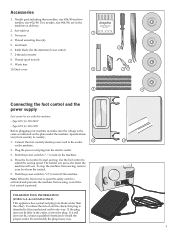
.... Knife blade (for 220-240V - Type GTE for 100-120V Before plugging your foot from sewing, remove your machine in the machine on the plate under the machine. The harder you press, the faster the machine will sew. Do not modify the plug in the outlet, reverse the plug. Accessories
1. Needle pack including three needles, size #14...
Owner's Manual - Page 6

...shaped hooks of the table. Note: The front cover has a safety switch and the machine will go and then pull it easier to sew small items and hard to prevent tangling. Removing and replacing the Áat bed extension...
Free arm sewing
For a free arm machine, slide off the Áat bed extension with the edge of the ...
Owner's Manual - Page 7

... small screwdriver while you are at the back of the machine. Changing the presser foot
A
Turn off . 4. Raise the presser foot. 2. Insert the needle/s into place.
7 Place the new foot with the presser foot lift lever (A) at the
highest position. 2.
Presser foot lift
Raise the presser foot with the pin right underneath the groove
of the ankle...
Owner's Manual - Page 8

...sewing, because this machine must be attached to form the stitch over the fabric edge. Before sewing, the two-thread converter must trim off any excess fabric to the upper looper, so the machine ...the the 2-thread converter back to the horizontal position. Turn the knob away from the hole of the machine.
Continue to rotate the cutter to the accessory storage.
8
A
B A C D Removing the ...
Owner's Manual - Page 9

...(s) 2. Left needle threading - (Blue)
Important: If the lower looper should come unthreaded, do the following order: 1. Upper looper threading - (Red) 2. Thread the needle(s)
4
3
1
2
9 Threading the machine
A color coded diagram is located inside the front cover for quick reference. When threading the...
Owner's Manual - Page 10

... the thread behind the lower looper and thread into the hole in the upper looper from left to back (8).
6. Pull about 10 cm of the machine following the red color coded thread guides (4-7). Use the tweezers to make the threading easier.
5. Threading the upper looper (red)
1. While holding the thread with...
Owner's Manual - Page 11
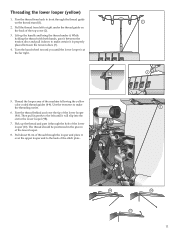
... right under it between the tension discs (3).
4. Lift up the thread and pass it through the looper and place it over the tip of the machine following the yellow
color coded thread guides (4-8). Then pull it is at the far right.
2
1 3
5.
Owner's Manual - Page 13

...foot using standard thread spools, place the thread unreeling disc as this may deÁect the needle, causing it to prevent the thread from the right, then toward you . When the machine is 5-8 cm in front of the new thread to previous settings. Sew... not pull easily, check for next sewing.
8. Continue holding the thread chain while pressing the foot control. Tie the end of the ...
Owner's Manual - Page 15

... is changed in front and back of the presser foot. The setting depends on your project. Use the differential feed to the feed by the rear feed teeth it will "stretch" or "gather" the fabric.
Both feed teeth work independently of each other .
When sewing, apply gentle tension to give perfect results when...
Owner's Manual - Page 16

... on the stitch plates as a guideline.
Adjust the stitch length to 2 mm when sewing on light weight fabrics.
16
B) Right needle 3.5 mm
Stitch length settings
The stitch ...adjustment knob in some conditions be set for most sewing.
Presser foot pressure adjustment
The presser foot pressure is pre-set on 3 for sewing based on normal conditions. Adjustment might in clockwise ...
Owner's Manual - Page 17
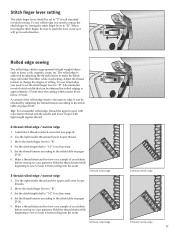
...fabrics such as it will go in each direction. Hold the thread chain while beginning to sew to keep it from curling into the seam.
2-thread rolled edge
3-thread rolled edge
2-...that can be obtained by adjusting the thread tension to "R". 3.
Hold the thread chain while beginning to sew to keep it from curling into the seam.
3-thread rolled edge / narrow edge
1. A variant of...
Owner's Manual - Page 18

...stitch
Standard Flatlock Stitch 1. Either with the right sides together, to Áatten the seam. Sew the seam, trimming the excess fabric. Place the movable upper cutter in the Áatlock stitch.... The needle thread will pull into a straight line at the fabric edge. 6. Flatlock sewing
A Flatlock Stitch is made by adjusting the tension of fabric (Ornamental Flatlock Stitch). The ...
Owner's Manual - Page 19

...also stabilize the seams. 1. Position the cord under the foot to strengthen stitches when joining elastic fabrics such as the seam is sewn. Warning: Sewing over pins will be used to the back of the ...cutters. The pins will damage and might destroy the edge of the machine
and sew the garment seam. 3.
Securing the thread chain
1. Insert the cord through the hole in...
Owner's Manual - Page 20

...
Turn off the main power switch and unplug the machine.
Use sewing machine oil. A lot of lint is produced when the cutters are cutting the the
fabric. - Machine maintenance
An overlock requires more frequent maintenance than a conventional machine for two reasons: - Wipe the machine surface to lubricate the internal working parts. Oiling
Turn off the main...
Owner's Manual - Page 21

...Tighten the stationary cutter set screw (2) and remove the stationary cutter (3).
3. Cover the machine with the vinyl cover to direct sunlight or humidity. Turn the handwheel so the needles are... having any questions regarding service and/or operation, contact the store where the machine was purchased.
21 Open the front cover and set the movable upper cutter (1) in their...
Owner's Manual - Page 22

... a blunt point.
7
-
Insert needle correctly.
7
- Replace one or both cutters.
21
- Do not pull fabric while sewing. - Decrease presser foot pressure for heavy weight fabric. - Check alignment of fabric with conventional machine before sewing with overlock.
- Insert needle correctly. - Tighten needle set screw. - Check for tangled or caught thread.
- Use high...
Owner's Manual - Page 27
Intellectual Property
PFAFF and HOBBYLOCK are trademarks of accessories without prior notice, or make modiÀcations ...#60/2
#50/2 - #60/2
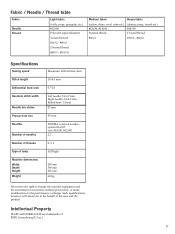
SpeciÀcations
Sewing speed Stitch length Differential feed ratio Overlock stitch width
Needle bar stroke Presser foot rise Needles
Number of needles Number of threads Type of lamp Machine dimensions Width Depth Height Weight
Maximum 1300 stitches/min
...
Similar Questions

Edge Guide - Pfaff Select 1540 Sewing Machine
How does the Edge Guide work for the Pfaff Select 1540 sewing machine?
How does the Edge Guide work for the Pfaff Select 1540 sewing machine?
(Posted by jesjames 2 years ago)
Hobbylock 787
Hobbylock 787, handwheel is stuck. Any suggestions??
Hobbylock 787, handwheel is stuck. Any suggestions??
(Posted by cathieg1980 6 years ago)

Pfaff 259 Sewing Machine Won't Run With Foot Petal
I have a pfaff 259. When I push on the foot petal the motor runs but the machine itself doesn't run....
I have a pfaff 259. When I push on the foot petal the motor runs but the machine itself doesn't run....
(Posted by Aemazing 8 years ago)

Pfaff Hobbylock 2.0 Stitch Lever Problem
The stitch lever does not stay in S position, the tip of the lever keeps grinding on and then jumpin...
The stitch lever does not stay in S position, the tip of the lever keeps grinding on and then jumpin...
(Posted by Anonymous-152149 8 years ago)
Pfaff Hobbylock 2.0 Problem
Aloha! I have had my pfaff hobbylock 2.0 for 3 years now - never a problem - recently tho, when I am...
Aloha! I have had my pfaff hobbylock 2.0 for 3 years now - never a problem - recently tho, when I am...
(Posted by thezenkitchen 11 years ago)