
Pfaff hobby 808 Support Question
Pfaff hobby 808 Support Question
Find answers below for this question about Pfaff hobby 808.Need a Pfaff hobby 808 manual? We have 1 online manual for this item!
Question posted by asd006 on June 27th, 2014
Pfaff 808 Horizontal Gear Tooth Is Broken, What's The Part No, How To Buy
pfaff 808 horizontal gear tooth is broken, what's the part no, how could i buy the horizontal and vertical gears
Current Answers
Related Pfaff hobby 808 Manual Pages
Owner's Manual - Page 2
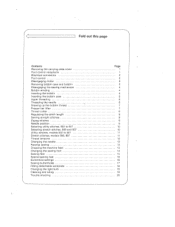
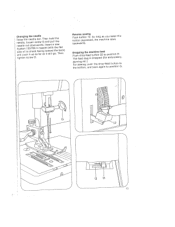
... and 807 Utility stitches, models 802 to 807 Stretch stitches, models 806, 807 Thread tensions Changing the needle Reverse sewing Dropping the machine feed Changing the sewing foot Sewing feet Special sewing feet Buttonhole settings Sewing buttonholes Fitting detachable workplate Changing the light bulb Cleaning and oiling Trouble shooting
Page 1 1 2 2 3 3 4 4 5 5 6 6 7 7 8 8 9 9 9
10 10 11 11 12...
Owner's Manual - Page 4
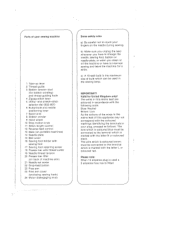
... may not correspond with the coloured markings identifying the terminals in your plug, proceed as follows: The wire which is used in the sewing lamp. Parts of your sewing machine
1 Take-up lever 2 Thread guide 3 Bobbin tension stud
(for a while. and stretch-stitch selector dial (802-807) 6 Buttonhole and needle positioning lever 7 Spool...
Owner's Manual - Page 5

... cover (I). On models 800, 802 and 806 place it into
the free arm.
7 -/ 800,802,806
4/-
J 1
To replace the cover, reverse this receptacle from the machine for sewing. Before putting the machine away after sewing replace the receptacle in the slot.
Owner's Manual - Page 6
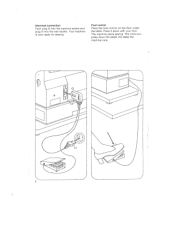
The machine starts sewing. Electrical connection Push plug G into the machine socket and plug H into the wall socket. The more you press down with your foot. Your machine is now ready for sewing. Press it down the pedal, the faster the
machine runs.
2 Foot control Place the foot control on the floor under the table.
Owner's Manual - Page 8
... engage the mechanism.
4 Place a bobbin on one of them. After bobbin winding, turn the stop motion knob towards you start winding the bobbin, disengage the sewing mechanism. Raise pins 7 and place a spool of thread on bobbin winder 8 so that pin H enters slot G. Pass the thread from the spooi around bobbin tension...
Owner's Manual - Page 10
... guide H. Pass the thread around the tension stud and pull it through take -up lever 1 and pull it slightly to back.
6 Upper threading
Raise the sewing foot and the take -up lever.
Threading the needle Thread the needle from front to the right behind guide G. Draw the thread from the right...
Owner's Manual - Page 11
... until the needle moves down and up again and the take -up lever 1.) H = The sewing foot is up.
Pull the bobbin thread out of the needle hole and lay both threads toward...thread Hold the needle thread a little taut. Turn hand wheel 9 toward the left and back under the sewing foot. N
E_
I is marked by a notch.
7-
Position I
7 Presser bar litter Lever 20 has three positions. Drawing...
Owner's Manual - Page 12
... and pull them downwards to set at mark G on models 806 and 807.
/-
Thread cutter (G) The thread cutter is set the stitch length control for sewing stretch stitches on the stitch length control.
Owner's Manual - Page 14
...-ntowhgf.). and stretch-stitch 5 should only be turned in the red sector on the machine and
explained on mTisutw(tnahtshhtiondiaeeteelddnciiecthltevgyeatlFa-rhattspetierpegeaiaed8opr.nnn)0zued.ec6iinsaglsoSrstzartagsertanrrrentregeedeitdnstct-tehcpsch8noettho0hhin-tsn7eiscsyndtsthpimictitattincuhctblghgcetheoeohvlutleres1oeert(se1ndsl.ttageepohttsTeceohetttushhocFsrsseetnritiegoibtdl...
Owner's Manual - Page 17
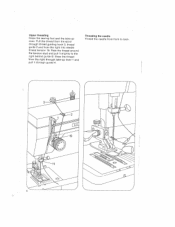
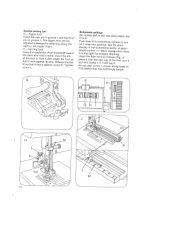
...,hnsoielhg1tous3otnti0sthsedh/eee7uoand0pwnnl5kesenaceswHrbfdeaaaflnwcarrei.rdenesTGag.dshlaIteeoinntnwsd(wewhairlpiortltdulhadlgltotnhhtt.heeheweTebfhlaaectnk) tighten screw G. Dropping the machine feed Push drop-feed button 22 to G.
'4
GH
13
As long as you button depressed, the machine
keep sews
this
backwards. Reverse sewing Push button 12.
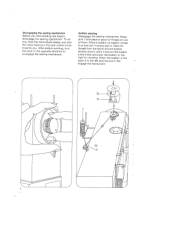
Owner's Manual - Page 20
...
dial
Push let it there. Set the stitch
and
density in groove J.
Tighten screw L.
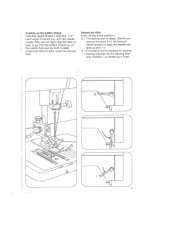
Special sewing feet G Zipper foot Insert the rear pin in groove I, and the front pin in the buttonhole sector... back and hold it
lever snap
6 to the right for stitching along scale M. As you sew, arrow L moves along the right or left zipper chain. lever
Insert the filler cord as follows...
Owner's Manual - Page 22
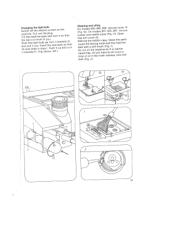
... bedplate. G and H below left.)
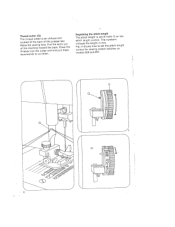
Fitting the detachable workplate
on , the back downwards until its two haoks enter the two holes in the machine base. I) and press it to the machine so that its two guide pins enter the holes provided. Fitting the detachable workplate
on models 800, 802 and 806 The foot...
Owner's Manual - Page 23
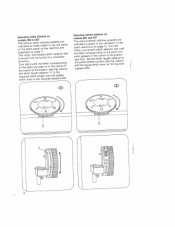
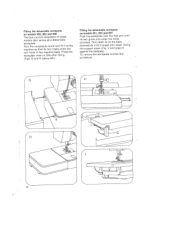
Pull out the plug. J).
19 On models 801, screws and needle plate
remove cover 15 803, 807: remove (Fig. Clean round the sewing hook and the
the parts machine
fDdneraoeondpnceowo-tifftrohoeiliela.thisnAeolftlhtmyebaorcuhuhosihohnakev(eFraaisgtco.eitwId)i.oas ymisnaopiwuntteaand
then (Fig. Insert the new its pins slide in front of you. G). Open
free arm cover 24...
Owner's Manual - Page 24
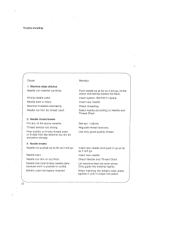
... the bobbin case, press against it until it will go . Machine skips stitches Needle not inserted correctly. Needle thread breaks For any of the above ... too dry by excessive storage.
3.
Needle too thin or too thick. Bobbin case improperly inserted.
Machine threaded improperly. Poor-quality or knotty thread used .
2. Insert new needle. Trouble shooting
Cause:
...
Owner's Manual - Page 25
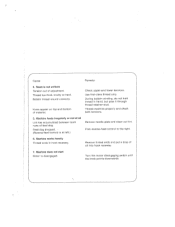
...raceway.
7. Feed dog dropped. (Reverse-feed control is at all Lint has accumulated between tooth rows of adjustment. Use first-class thread only.
Thread too thick, knotty or hard. Remove... wound unevenly.
Turn the motor disengaging switch until the knob points downwards. Thread machine properly and check both tensions. During bobbin winding, do not hold thread in hook raceway. Flick...
Similar Questions

Parts For Pfaff 145 Industrial Sewing Machine
Looking for Gear housing part # 91-019 619-90 for Pfaff 145-H3-6/1B industrial sewing machine or a u...
Looking for Gear housing part # 91-019 619-90 for Pfaff 145-H3-6/1B industrial sewing machine or a u...
(Posted by bertc1960 3 years ago)

Pfaff 262-261 Sewing Machine With Cabinet
I have Pfaff 262-261 with cabinet. I use motor but needle shaft is not working. Is it possible to re...
I have Pfaff 262-261 with cabinet. I use motor but needle shaft is not working. Is it possible to re...
(Posted by sushishah 8 years ago)

Hobby 1032 Pfaff Sewing Machine Instructions
Can I order the instruction book for the Hobby 1032 Pfaff Sewing Machine Instructions ? If so, how m...
Can I order the instruction book for the Hobby 1032 Pfaff Sewing Machine Instructions ? If so, how m...
(Posted by raylindab 10 years ago)

Pfaff C1100 Pro Sewing Machine Instruction
Can you please direct me to "easy" to understand instruction on how to "thread" my Pfaff C1100 Pro s...
Can you please direct me to "easy" to understand instruction on how to "thread" my Pfaff C1100 Pro s...
(Posted by magicfeathers55 10 years ago)

Sewing Machine Is Blinking Away And Not Able To Operate
Sewing machine was sewing constantly even after I removed my foot from the pedal. I had to switch it...
Sewing machine was sewing constantly even after I removed my foot from the pedal. I had to switch it...
(Posted by kasperflindt 11 years ago)