
Pfaff Tipmatic 1035 Support Question
Pfaff Tipmatic 1035 Support Question
Find answers below for this question about Pfaff Tipmatic 1035.Need a Pfaff Tipmatic 1035 manual? We have 1 online manual for this item!
Question posted by vanbesel on November 28th, 2020
Pfaff Tipmatic 1035- Bulb Replacement.
What kind of bulb is needed to replace the light in this machine and how do you do it?We have the original manual, but can not seem to loosen the bulb to twist out.
Current Answers
Answer #1: Posted by INIMITABLE on November 28th, 2020 3:29 PM
INIMITABLE

Member since:
April 3rd, 2020 Points: 2,087,520

Member since:
April 3rd, 2020 Points: 2,087,520
I hope this is helpful? PLEASE "ACCEPT" and mark it "HELPFUL" to complement my little effort. Hope to bring you more detailed answers
-INIMITABLE
Related Pfaff Tipmatic 1035 Manual Pages
Owner's Manual - Page 2
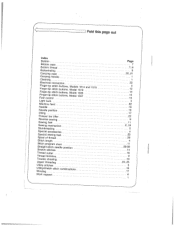
...Finger-tip stitch Foot control
buttons, buttons, buttons, buttons,
Models 1014 Model 1019 Model 1035 Model 1037
and
1015
Light bulb
Machine feed
Needle
Needle position
Oiling
Presser bar lifter Reverse sewing
Sewing feet
Sewing mechanism
Slot-threading
Special accessories Special sewing feet Spool of thread
Stitch length
Stitch program chart
Straight-stitch needle Stretch stitches...
Owner's Manual - Page 4
...: Blue: Neutral Brown: Live
As the colours of the wires in the mains lead of your sewing machine
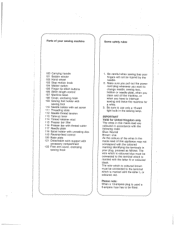
4 Some safety rules
100 Carrying handle 101 Bobbin winder 102 Hand wheel 103 Stop motion knob 104... sewing foot, bobbin or needle plate, when you clean and oil the machine, or when you have to be connected to the terminal which is coloured blue must be connected to use only a 15-watt light bulb ...
Owner's Manual - Page 5
... hand (N), swing the left (0), and lift it out toward Then open its
The accessory box sewing feet, thread
is used to arrow. the the
carrying rear, as
case cover, fold indicated ...handle to and other
put away accessories. lid (Q). N
i
N
Model 1014 on a sewing reason, this has two holes at
sewing cabinet (not ill.) be placed on Model 1014 can
cabinet.
Removing the carrying case ...
Owner's Manual - Page 8
...teupuihdpoprteeholalele0edvav)sie,nneerdrgwfr,1moidn1mbru3gao.swttbfhoebolittoeht.wieniPntnouintlehltseoeldtoihrslteelo"Nttuahnp(Prt"deoaapttndhhodeesfirtolieomfnt . Placing spool of thread on the machine spool of thread
at the right.
iFrTnioghtorhetnttwhthdeorr-aesnwlaeodet idttglobueaitdshceekewQliiennftgoto,nosfdltohrgateuwPindoeeanen0dedletaihnnrhtdeooaltddthheeer.
4 on pin
Load thread...
Owner's Manual - Page 9

... Thread the needle from you.
5 Hold the hand wheel steady and turn the stop motion knob toward you start winding the bobbin, disen gage the sewing mechanism. One of the guide.
I
other into the left thread guide on the needle holder. Disengaging the...
Owner's Manual - Page 10
... toward the left and take it through guide P and around thread retainer stud 114. LI_.._1 __.J
Winding
Disengage the sewing mechanism (page 5). Place a bobbin on the bobbin. Then pull the thread toward the right,
press down the foot control... wind a few turns of thread on it. Fit a second spool holder to the machine and place a spool of thread on spindle 101 so that pin 0 enters slot N.
Owner's Manual - Page 12

Stud 0 and latch P must point upwards. Turn hand wheel 102 toward the left and back under the sewing foot.
8 Release the latch.
Replace cover 108 or close free arm cover 122. Drawing up . Pull the bobbin thread out of
the needle hole and lay both threads toward you ...
Owner's Manual - Page 13
... hand wheel to raise the needle and lever.)
= sesLDiTlannoohamsttwe.reenerreistsrnietngitnwmghoiepetnecogxphpstirurtfeRaiosos-hotsnathetiirfitcsotkhbbrreaaadmcriabksarleotindsfetittlrenoiigfrgamutlahrsfntl.oohydfoeturiatnostftonitlrlhyie.t
The sewing sewing. Presser bar lifter
Lever 115 has four positions:
N
o
The sewing remove the toward you
the take-up
foot is
lowered
for
Thread cutter...
Owner's Manual - Page 15
...
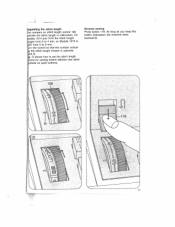
7 from 0 to 6 mm. , the control so that the number indicat the stitch lenght chosen is opposite
k N. . 0 shows how to set the stitch length trol for sewing stretch stitches (red stitch
ibols on push buttons). Reverse sewing Press button 119. As tong as you keep this button depressed, the machine sews
backwards.
11
Owner's Manual - Page 18
... triple straight stitch Straight stitch
I Closed overlock stitch Joining stitch
K Overlock stitch Shell-edge stitch
M Honeycomb stitch Elastic stitch
14 Finger-tip controls on Model 1035 A, B, C; Buttons for buttonholing Button B is also used as clearing button for releasing the pushed buttons and for setting the left needle position (see page 17...
Owner's Manual - Page 21
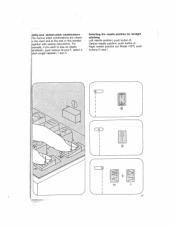
... various stitch combinations are shown jn the chart and at the end of this booklet, ogether with sewing instructions. Right needle position (on Model 1037): push
buttons H and I
H For
xample if you want to sew an elastic
lindstitch, push buttons M and F, select a
titch length between 1 and 4. Utility-and- Central needle position: push...
Owner's Manual - Page 22
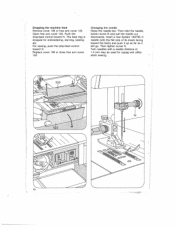
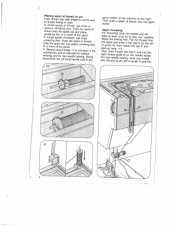
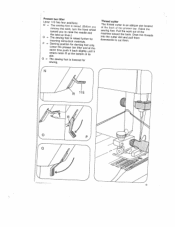
Dropping the machine feed Remove cover 108 or free arm cover 122.
Then hold the needle, loosen screw N and pull the needle out downwards. Insert a new System .... For sewing, push the drop-feed control toward N. Then tighten screw N. Open free arm cover 122. Push the drop-feed control toward 0. The feed dog is dropped for zigzag and utility stitch sewing.
18 Replace cover 108...
Owner's Manual - Page 23
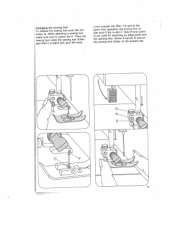
...make sure stud 0 enters slot P. Place the sewing foot under the sewing foot holder and hold it in slot P. Screw S serves to secure
the sewing foot holder on the presser bar.
19 attaching...
Hole R and screw an edge guide and
the darning foot. Lower presser bar lifter 115 and at the
same time reposition the sewing foot so
...
Owner's Manual - Page 24
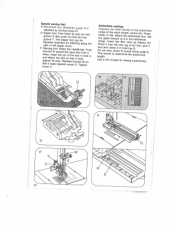
Special sewing feet
N
Blindstitch foot.
R
is
O raggZidgrrioojphuootpsvveoteererdfTSloe.softittThd.zheeFinewpirpazpseyituprssipnhcfehsorearitrifstsnot.ofiirtttcoshcnraitennapgribnapeliionnntoginttohe
P ....uohhtnttlfeogtoofol(onoebn0slhtulh)c,foo.toaowtplololePueestnl.rlheS(SosiP.tsel)e:t Use a thin thread for sewing buttonholes.
20 Blindstitch adjusted by turning screw
guide Q.
Owner's Manual - Page 25
... button A. Remove the fabric, pull the filler cord taut and trim.
6 Cut the buttonhole open.
21 Raise the needle. Sew the second button
hole seam the same length as it depressed until the machine has sewn 4 to 6 bar tacking stitches. Raise the needle.
Raise the needle.
4 Push button B and keep it depressed...
Owner's Manual - Page 26

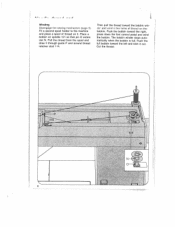
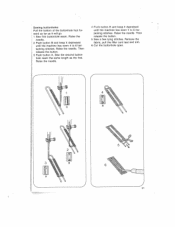
Changing the light bulb tptPtbomcabTchipSuuwoknooeaoawlsvsexvbakwcheireeehtsdiraeccdrtlitrninhathgaodha0dneenecuene.o.odtdfin....Let the position
lamp and
housing resume pull out the edge
its original guide. Cleaning and oiling wttThaiiektlhtepnaiaetrestodosufltetin(bp0trlh)ua.estehCv.li1ec1ain7nituythpoefatmthtahecehsiebnwaecinkfge(eNhd)oaoankndd...
Owner's Manual - Page 27
... For single-needle cording
93-035946-45 98-620404-00 98-694804-00
For eyeletting
For finishing raw edges or fabrics and simultaneonsly
for
special
sewing
jobs. Special accessories The special accessories
listed
below
are
intended
for joining elastic overcasting their
edges
For hemming edges with 1 4-1 8
mm
needle
gauge...
Owner's Manual - Page 29
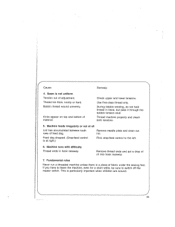
...the machine, even for a short while, be sure to the left.
6.
Machine ...runs with difficulty Thread ends in hand, but pass it through the bobbin tension stud.
Kinks appear on top and bottom of oil into hook raceway.
7. Machine...:
Remedy:
4. Thread machine properly and check both ....
Fundamental rules
Never run a threaded machine unless there is particularly important when children...
Owner's Manual - Page 30
... programs as far
stitch and, in this chart are
lower half, the buttons marked "stretch", turn
the stitch program number, the to be pressed to sew this seam the stitch length control toward
corresponding pattern.
F
03
04
1F=I
..'.-
..-
-
-
-..
II
m
'
III
II
- --
E E
--
---.
CI)
ABC
GDM
r+
- D E
-..-
-.---
-.---.-
-
.._-.•...
Owner's Manual - Page 32
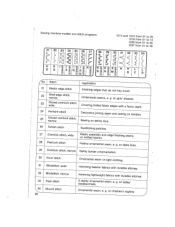
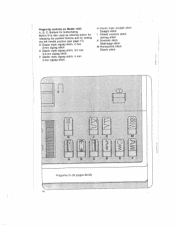
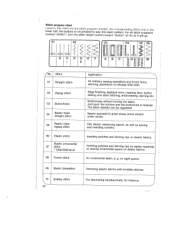
Sewing machine models and stitch programs:
1014 and 1015 from 01 to 05 1019 from 01 to 15 1035 from 01 to 30 1037 from 01 to 48
21 22 23 24 25 26 27
Similar Questions

Edge Guide - Pfaff Select 1540 Sewing Machine
How does the Edge Guide work for the Pfaff Select 1540 sewing machine?
How does the Edge Guide work for the Pfaff Select 1540 sewing machine?
(Posted by jesjames 2 years ago)

Pfaff 1035 Sewing Machine Service Manual
- I need a service manual please. Not instructions but actual service manual. Although these are lis...
- I need a service manual please. Not instructions but actual service manual. Although these are lis...
(Posted by rnoel28 6 years ago)

Pfaff 259 Sewing Machine Won't Run With Foot Petal
I have a pfaff 259. When I push on the foot petal the motor runs but the machine itself doesn't run....
I have a pfaff 259. When I push on the foot petal the motor runs but the machine itself doesn't run....
(Posted by Aemazing 8 years ago)

Pfaff Tipmatic 1035 Manual Instruction
I have just bought a PFaff Tipmatic 1035 but the previous owner did not have the instruction manual....
I have just bought a PFaff Tipmatic 1035 but the previous owner did not have the instruction manual....
(Posted by desrochersmichele 9 years ago)
